Support Requests Portal
The Support Requests Portal allows you to create, update, and monitor support cases in one centralized location. It is the preferred method for managing all support-related interactions.
Access to the Support Requests Portal is through the Megaport Portal.
If you have any problems with access, contact your Company Admin.
To access the Support Requests Portal
-
Visit the Megaport Portal and log in.
-
Choose
 (Help & Support) > Support Requests.
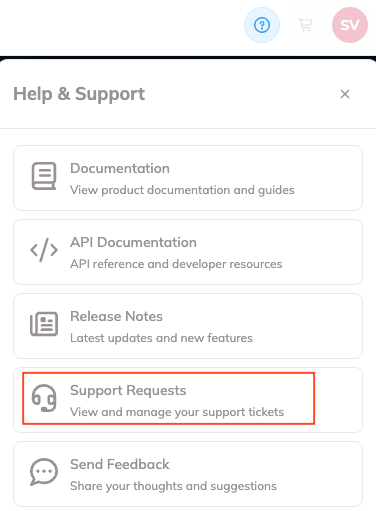
The Support Requests Portal home page opens in a new tab.
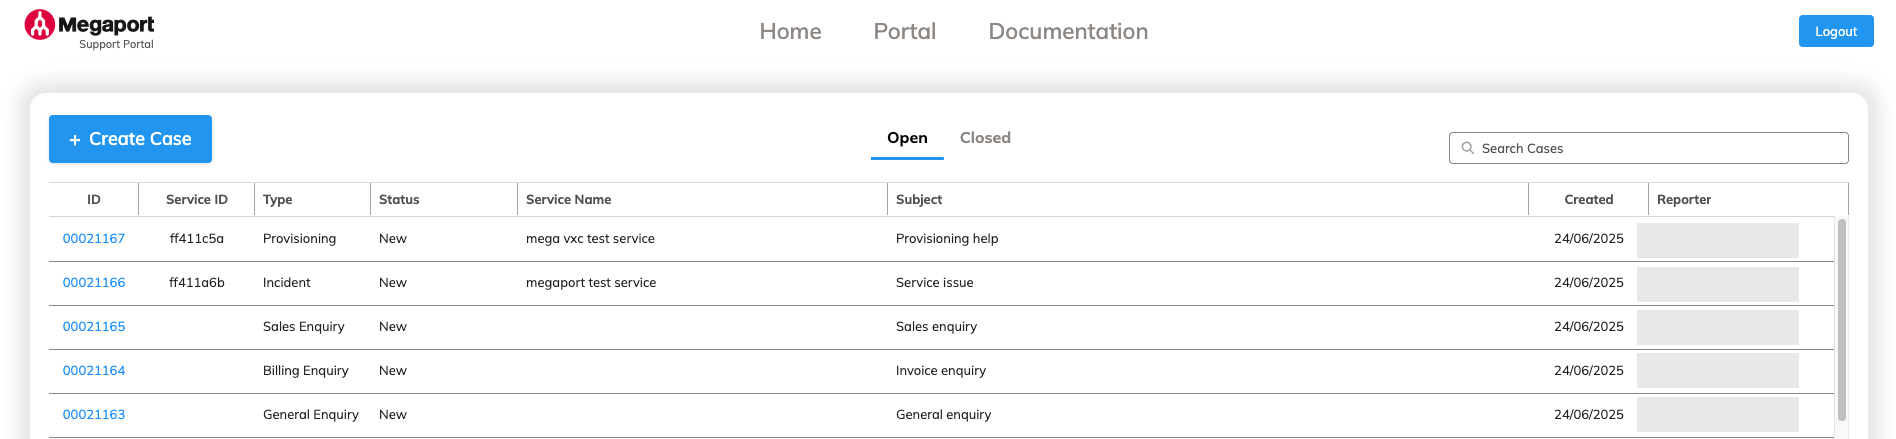
Support Requests Portal home page
The Support Requests Portal home page allows you to create, view, and manage your support cases.
The portal header remains the same in all areas of the Support Requests Portal.
It includes these options:
-
Megaport icon – This takes you to the Support Requests Portal home page in the same tab. The Home tab performs the same function.
-
Portal – This takes you back to the Megaport Portal in the same tab. You will return to the page you were on when you clicked Support Requests Portal.
-
Documentation – This opens the Megaport documentation in a new tab.
-
Logout button – This logs you out of the Support Requests Portal, but leaves you logged in to the Megaport Portal. You are redirected back to the last page you were on in the Megaport Portal.
Case status
The home page displays a list of your support cases. There are two tabs:
-
Open – Shows new, open, and resolved cases.
- New cases are raised, but not yet addressed by the Megaport support team.
- Open cases have been investigated by the Megaport support team, and are in progress.
-
Resolved cases have gone through the case workflow, and are pending customer review.
Note
Resolved cases are shown for 8 calendar days after they have been set to resolved. You can reopen the case during this time, if required. After 8 days, resolved cases are closed and cannot be reopened.
-
Closed – Shows closed cases.
Only cases closed since 1st December 2025 will be listed on the Closed tab. Cases closed earlier than that date will not be shown on the Support Requests Portal.
Note
The case list shows all cases associated with your company account, not just cases you have created.
Creating a support case
You can create and manage your own support cases using the Support Requests Portal.
To create a support case
-
On the Support Requests Portal home page, click + Create Case.
-
Enter these details:
-
Subject – Enter the a brief summary of your case.
-
Description – Enter a detailed description explaining the reason for your issue or request, including any troubleshooting steps you have completed.
-
Request Type – Select the most relevant request type for your issue or request from the drop-down list.
-
I need to speak to someone about my invoice - Use this for billing enquiries.
-
I have a general enquiry – Use this when you have an enquiry that is not covered by the other request types.
-
I need to report an issue with a previously working service (incident) – Use this when you have a problem with your Megaport network.
-
I need assistance with a new set up (Provisioning) – Use this for help when you are setting up a service and you cannot find the answer in the Megaport documentation.
-
I would like to speak to a sales person – Use this if you want to expand your Megaport network.
For more information about request types, see Understanding Support Requests.
If you select a request type of I need to report an issue with a previously working service (Incident) or I need assistance with a new set up (Provisioning), you will see a Service ID field. You must enter the service ID of the service you are reporting a problem with.
To find and use the service ID
-
Search for the service you are reporting a problem with on the Services page of the Megaport Portal.
-
Next to the service entry, click the service ID button to copy the service ID.

-
Paste the service ID into the Service ID field on the Create Case screen of the Support Requests Portal.
-
-
Collaborators (optional) – Add the email addresses of people you want to be included in interactions and updates on this issue. If the person is known to the Support Requests Portal, their email address will appear when you start typing. If they are not known to the Support Requests Portal, you can enter the email address.
-
-
Click Save.

The new case will appear on the case list on the Support Requests Portal home page.
Searching your case list
You can search your case list using the Search field.
You can search on these fields:
-
Case ID
-
Created by
-
Creation date

Sorting your case list
You can sort your case list by any field, in either ascending or descending order. The up or down arrow next to a column heading indicates the current sort order.
-
In the Support Requests Portal home page, click the small up/down arrow next to the field name on the case list heading. The case list reloads.

-
Click the arrow again to reverse the sort order.
Viewing and updating support case details
To view the details of a support case and add more information, click the case ID number in the list on the home page.
On the view details page, you will see these tabs:
-
Comments – Add more information to the case when it becomes available.
Click Submit Comment to add your comment to the case.
-
Details – This tab lists the case details, such as service ID, name, case type, created date, created by, and status. You cannot update these fields.
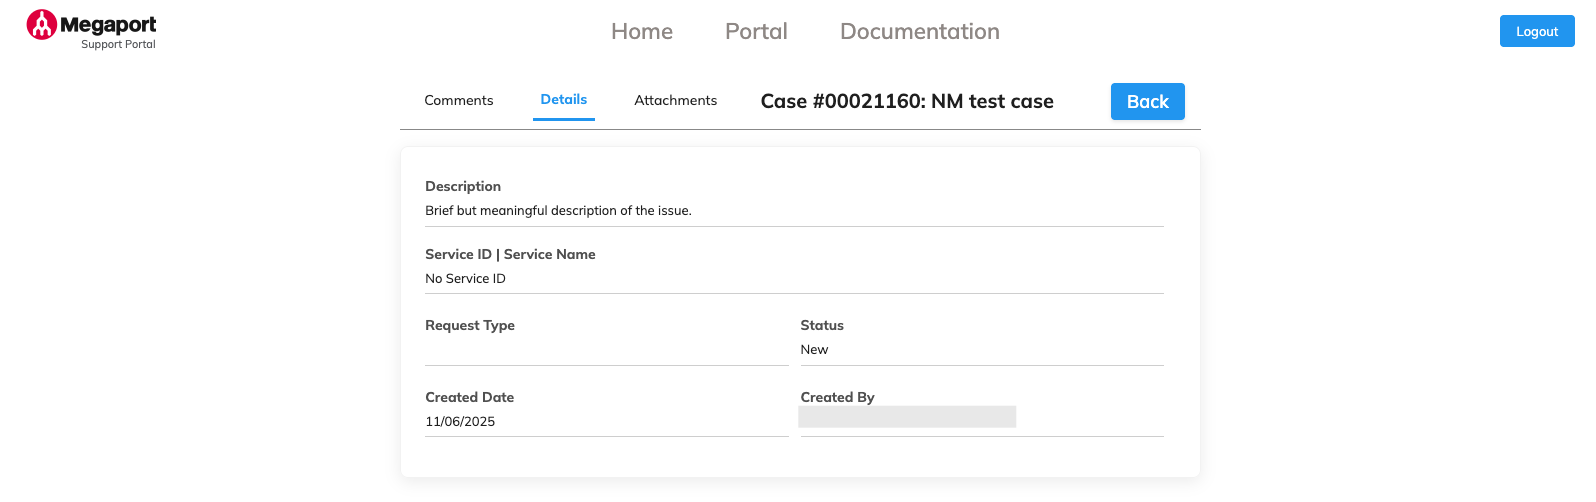
-
Attachments – You can provide additional information by uploading attachments. Valid file types are PDF, JPG, PNG, and TXT.
-
Click Upload File then select your file from the list.
You will be asked to add a file description. -
Enter the file description and click OK.
The file description will be added to the comments list.

-
The Back button will take you back to the Support Requests Portal home page.