Port Diversity
This topic describes how to configure and manage Port diversityPort diversity improves the robustness of your network by providing Port services on different physical devices at a single Megaport location. Ports are assigned to diversity zones. A diversity zone groups devices at the same location to ensure that services are provisioned on physically separate devices that always remain diverse.
.
Port diversity improves the robustness of your network by providing Port services on different physical devices at a single Megaport location. Ports are assigned to diversity zones. A diversity zone groups devices at the same location to ensure that services are provisioned on physically separate devices that always remain diverse.
Assigning Ports to diversity zones reduces the risk of service interruption due to an impacting event on a single device. For example, during scheduled maintenance, no more than one diversity zone at a given data center location will experience downtime at any moment. If a Port in a diversity zone experiences scheduled downtime, Ports in the other zone at the same location are not affected by that same scheduled maintenance.
Ports deployed at locations supporting diversity are zoned into one of two groups - red or blue. In the Megaport Portal, Ports on the Services page indicate their assignment in a diversity zone with either a red or blue icon.

At locations where diversity is supported, you can:
- Create a new Port on a device that is diverse from an existing Port
- Create multiple Ports or LAG bundles as a diverse pair in the same order
Configuring a Port for diversity
When you create a new Port, you can make it diverse from an existing Port or create a diverse pair of Ports at the same time, with one in each diversity zone.
Note
A Port ordered to a specific zone always remains in that zone. To change a Port diversity zone after placing the order, you must cancel and re-order the Port.
To configure a Port for diversity
- Log in to the Megaport Portal and choose Services.
- Click Add Services, then select Port.

-
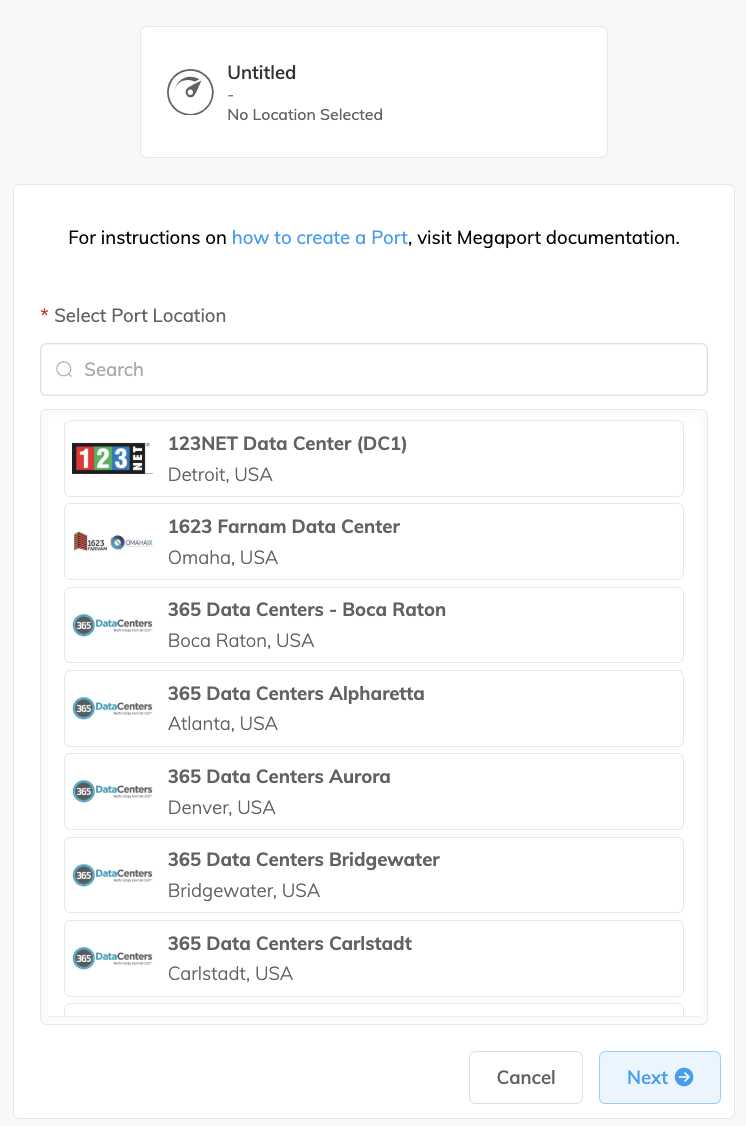
Select a data center location for the Port and click Next.
You can use the Search field to find the Port name, Country, Metro City, or address of your destination Port.
-
Specify the details for the Port.
-
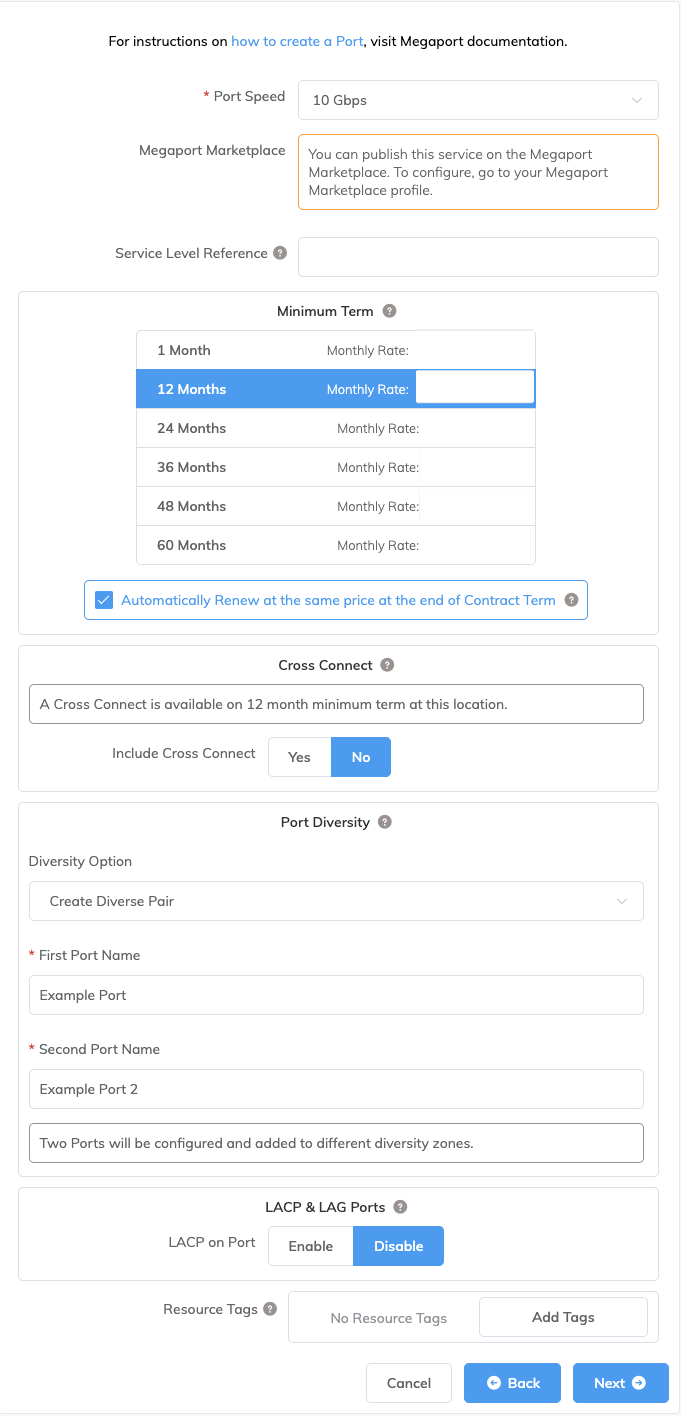
Port Speed – Select the required Port speed. Port capacity depends on location and service availability. Ensure that your equipment is capable of interfacing with the selected speed. If Port diversity is available at the location and speed you select, Port diversity options are enabled. If Port diversity is not available at your desired location, contact a Megaport Sales representative for more information.
-
Port Name – Specify a name for the Port that is easily identifiable, particularly if you plan on having more than one Port.
-
Megaport Marketplace – By default, each service is private to your enterprise and consumes services from the Megaport network for your own internal company, team, and resources. When set to private, the service is not searchable in the Megaport Marketplace, however, others can still connect to you using a service key. Megaport Marketplace visibility is controlled on your Megaport Marketplace profile. For more information about how to make your service visible to the Megaport Marketplace, see Adding services to your profile.
-
Service Level Reference (optional) – Specify a unique identifying number for your Megaport service to be used for billing purposes, such as a cost center number, unique customer ID, or purchase order number. The service level reference number appears for each service under the Product section of the invoice. You can also edit this field for an existing service.
-
Minimum Term – Select No Minimum Term, 12 Months, 24 Months, 36 Months, 48 Months, or 60 Months. Longer terms result in a lower monthly rate. 12 Months is selected by default. Take note of the information on the screen to avoid early termination fees (ETF).
Enable the Minimum Term Renewal option for services with a 12, 24, 36, 48 or 60-month term to automatically renew the contract at the same discounted price and term length at the end of the contract. If you don’t renew the contract, at the end of the term, the contract will automatically roll over to month-to-month contract for the following billing period, at the same price, without term discounts.
For more information, see Port Pricing and Contract Terms.
-
Cross Connect – When you have entered a Port speed, the Cross ConnectA Cross Connect is a dedicated physical point-to-point connection that links two parties within a data center. It is a non-standard product and can only be ordered with a Port.
section will appear if Cross Connect is available at your chosen location. Select Yes if you want to include a Cross Connect with your Port order. The price for the Cross Connect will be shown. For more information, see Ordering a Cross Connect. -
Port Diversity – Diversity options are displayed only if diversity is available at this location and speed. Select one of the following options from the drop-down list:
- None – Select this option if you do not have a preference for a specific diversity zone.
- Create Diverse Pair – Select this option to create two Ports, each in its own diversity zone. The system prompts you for the name of the second Port in the pair, and configures the second Port using identical settings.
- Diverse from Existing Port – Select this option to make this Port diverse from a Port you already own. In the drop-down list, Ports are listed that you own and are available at the selected location. The corresponding diversity zones of each Port is shown next to the Port name. (If the existing Port is part of a LAG, the primary Port of the LAG is listed.)
-
LACP on Port – Click Enable if you want the Port to be a member of a LAG. To enable LACP, the Port speed must be 10 Gbps or higher. Specify the number of Ports to include in the LAG, up to a maximum of 8. For more information about LAG, see Creating a Link Aggregation Group.
-
Resource Tags – You can use resource tags to add your own reference metadata to a Megaport service.
To add a tag:- Click Add Tags.
- Click Add New Tag.
- Enter details into the fields:
- Key – string maximum length 128. Valid values are a-z 0-9 _ : . / \ -
- Value – string maximum length 256. Valid values are a-z A-Z 0-9 _ : . @ / + \ - (space)
- Click Save.
If you already have resource tags for that service, you can manage them by clicking Manage Tags.
Warning
Never include sensitive information in a resource tag. Sensitive information includes commands that return existing tag definitions and information that will identify a person or company.
-
-
Click Next to view the Summary page.
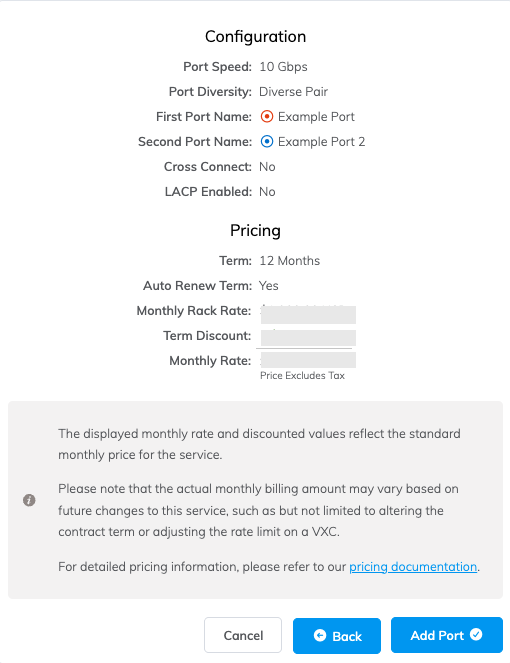
The Summary shows Port Diversity enabled and the diversity zones for the Ports. If you created a diverse pair of Ports, the monthly charge in the Summary reflects both Ports.
If a Cross Connect has been ordered, the summary also shows the monthly rate and the One-Time fees for the Cross Connect.
-
Confirm the selected options and click Add Port.
On the right side of the screen, Configured Services displays newly created Ports, their diversity zones, and the monthly charges. -
Click Review Order to deploy the new Ports now, or click Save to save the configured services before placing the order.
-
Click Create Port to add more Ports in other locations or click Order Now to start the provisioning of your new Ports.
After the Ports are provisioned, Megaport generates Letters of Authorization (LOAs) specifying the demarcation point to be applied.
-
Click Download LOA next to the new Ports on the Services page.
Megaport will also send you the LOA PDF by email. -
Provide the LOAs to your data center operator to establish the physical cross connects from your network device to your new Ports.
Note
The cost of a new cross connection and any related VXC fees are the responsibility of the customer, as outlined in Megaport’s Global Services Agreement.
Once the Port has been provisioned and deployed, you have access to the Megaport network and can start adding Virtual Cross Connects (VXCs) to the Port. For more information about adding VXCs, see Creating a VXC.