Creating MCR Connections to Google Cloud Services
Megaport makes it easy to provision fast, secure, and private connections between a customer’s data center and Google Cloud Platform.
Partner Interconnect
Partner Interconnect accesses the private address space (RFC 1918).
As part of the Google Cloud Interconnect (GCI) Partner program, Megaport provides users with dedicated access to Google Cloud Platform (GCP) and enables customers to create private connections between their remote network environments and their Virtual Private Cloud (VPC) deployments.
The benefits of creating GCI Partner Connections with Megaport include:
- Enhanced security and higher network performance
- Connectivity reach beyond Google’s existing network locations
- Scalable connectivity for those who do not require the full bandwidth of Google’s Dedicated Interconnect
- Savings on egress traffic costs from the customer’s VPC network to their on-premises network
- API integration between Megaport and Google Cloud which simplifies the provisioning of connections for a fast and seamless experience
- Layer 3 routing capabilities without having a physical router located in a data center
When connecting to Google Cloud Platform (GCP) through Partner Interconnect with Megaport, the Virtual Cross Connect (VXC) forms the Layer 2 component of the connection and Layer 3 BGP is established directly between the customer and GCP. Through Partner Interconnect, a customer can access VMs (Virtual Machines) built within a VPC.
Creating a VXC to the Google Cloud Platform
![]() Watch a 7-minute video on the Google Cloud connection process.
Watch a 7-minute video on the Google Cloud connection process.
Before you begin, create a Megaport Cloud Router (MCR). If you don’t have an MCR, create one following the procedures in Creating an MCR.
To deploy a VXC to Google Cloud Platform
- Log in to your Google Cloud Console and create a pairing key.
-
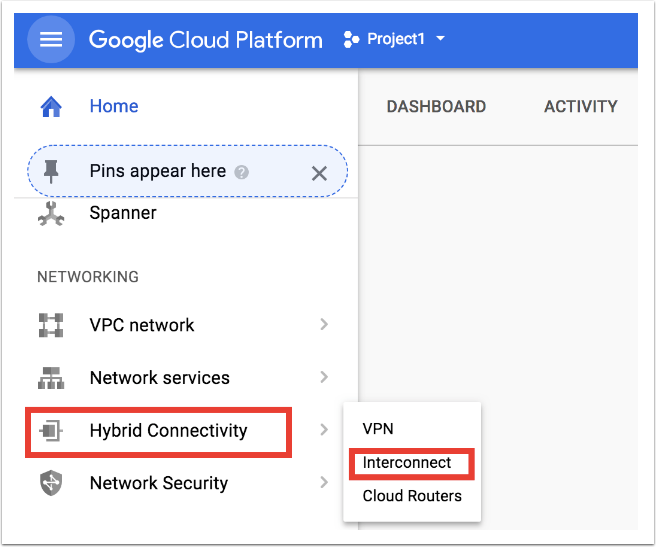
From the main menu in the Console, select Hybrid Connectivity > Interconnect.
-
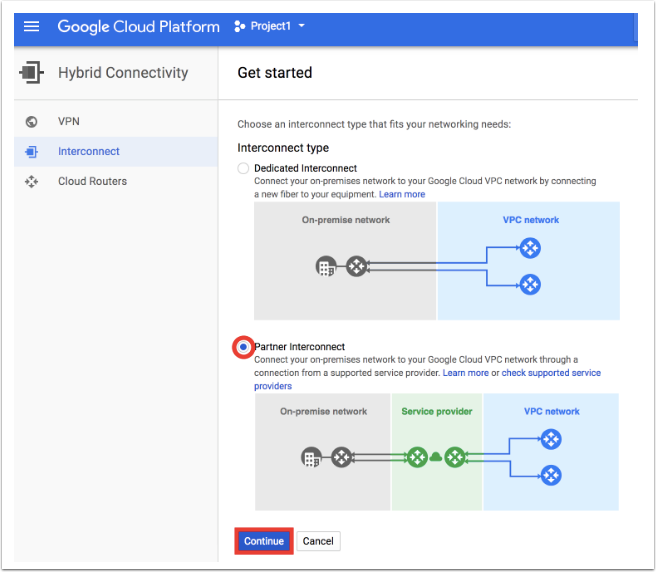
Click Get Started.
-
Select Partner Interconnect and click Continue.
-
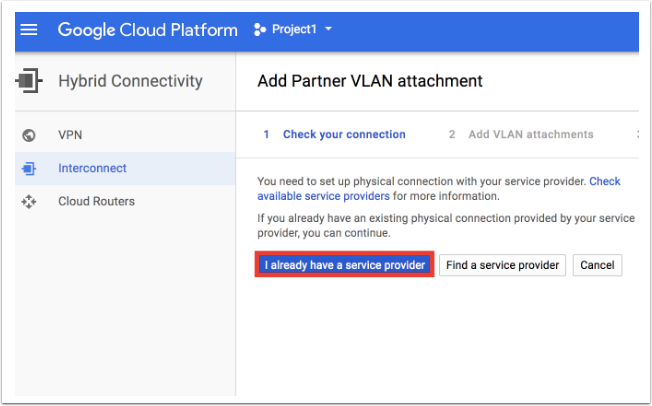
Click I already have a service provider.
-
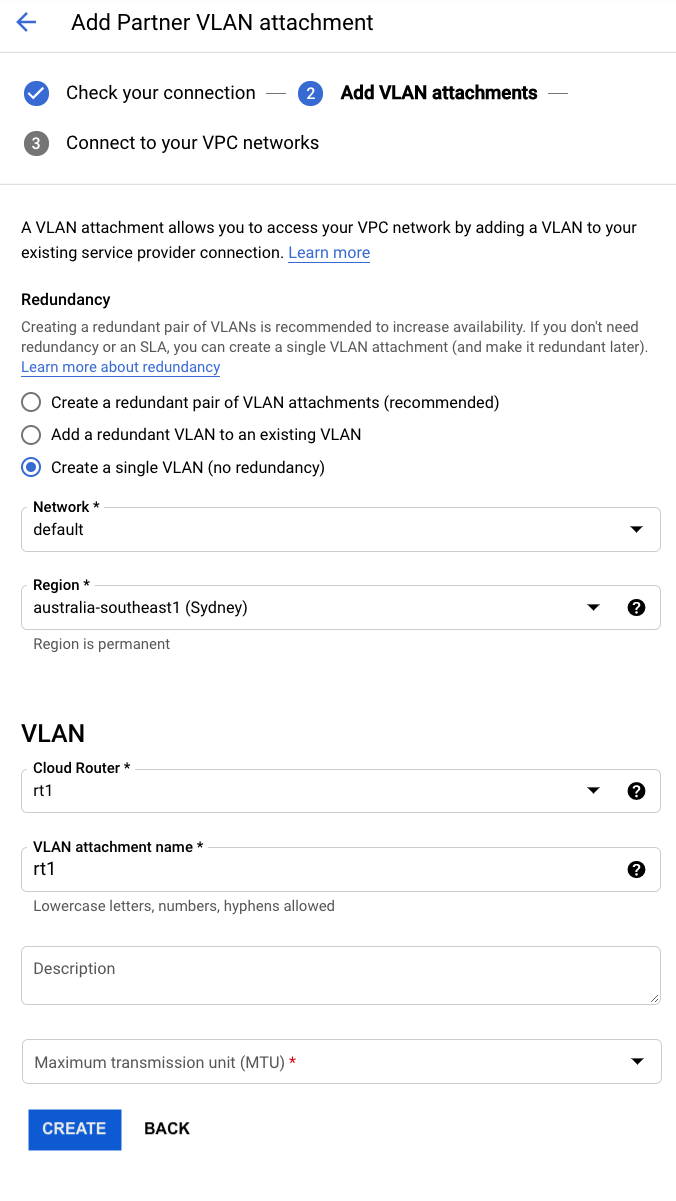
Configure your attachment. Provide these attachment details:
-
Redundancy – Select a redundancy option. You can create redundant attachments or a single attachment. For more information about redundancy, see Diversity in Google Connections.
-
Network – Select the VPC network you want the VPC to connect.
-
Region – Select the region where your attachment will connect.
-
Cloud Router – Select a Cloud Router to associate with this attachment. You can only select a Cloud Router in the VPC network and region that you selected with an ASN of 16550. If you don’t have an existing Cloud Router, create one with an ASN of 16550. For redundancy, each VLAN attachment must be associated with a unique Cloud Router. Google automatically adds an interface and a BGP peer on the Cloud Router.
Note
The Google ASN will always be 16550.
-
VLAN attachment name – Enter the VLAN attachment name using lowercase letters only.
-
Description (optional) – Enter a description for the attachment.
-
Maximum Transmission Unit (MTU) – Set the MTU to match the MTU of your VPC network. The default VPC network MTU is 1460 bytes.
-
-
Click Create.
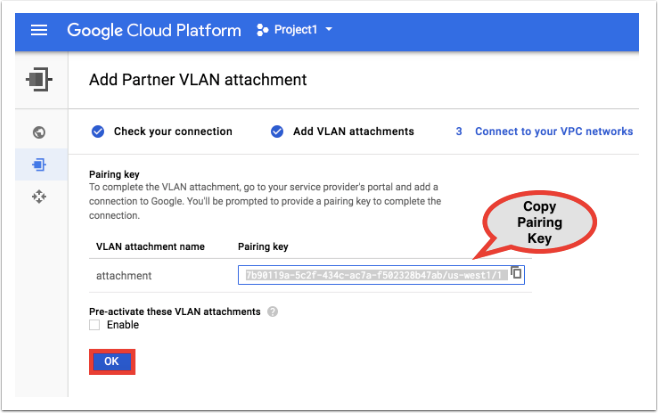
A pairing key appears. - Copy the pairing key and click OK.
-
In the Megaport Portal, create a VXC to your Google peering location: click +Connection on the MCR for your VXC.

-
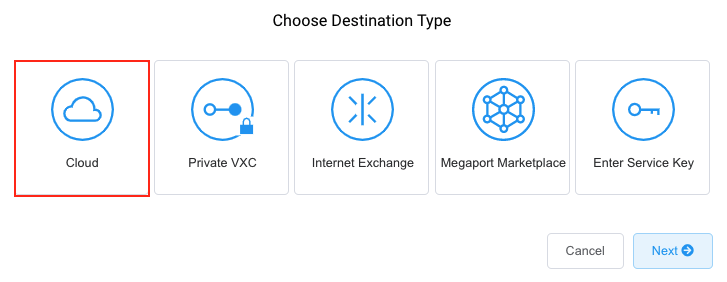
Click the Cloud tile.
-
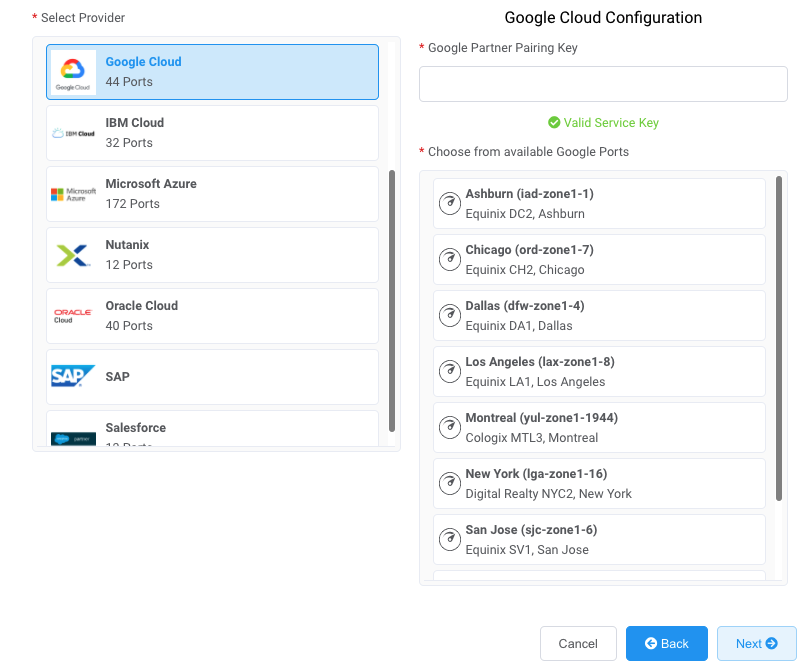
Select Google as the provider.
-
Copy and paste the pairing key from the Google Cloud console into the field in the right-hand panel.
The relevant Google targets appear based on the region of your GCI Partner connection. - Select the target location for your first connection and click Next.
-
Provide these connection details:
-
Connection Name – Enter an easily identifiable name for this connection.
-
Service Level Reference (optional) – Specify a unique identifying number for the VXC to be used for billing purposes, such as a cost center number or a unique customer ID. The service level reference number appears for each service under the Product section of the invoice. You can also edit this field for an existing service.
-
Rate Limit – Enter the same rate you selected for your Google port speed.
-
VXC State – Select Enabled or Shut Down to define the initial state of the connection. For more information, see Shutting Down a VXC for Failover Testing.
Note
If you select Shut Down, traffic will not flow through this service and it will behave as if it was down on the Megaport network. Billing for this service will remain active and you will still be charged for this connection.
-
Minimum Term – Select No Minimum Term, 12 Months, 24 Months, or 36 Months. Longer terms result in a lower monthly rate. 12 Months is selected by default.
Take note of the information on the screen to avoid early termination fees (ETF). See VXC Pricing and Contract Terms and VXC, Megaport Internet, and IX Billing for more information. -
Resource Tags – You can use resource tags to add your own reference metadata to a Megaport service.
To add a tag:- Click Add Tags.
- Click Add New Tag.
- Enter details into the fields:
- Key - string maximum length 128. Valid values are a-z 0-9 _ : . / \ -
- Value - string maximum length 256. Valid values are a-z A-Z 0-9 _ : . @ / + \ - (space)
- Click Save.
If you already have resource tags for that service, you can manage them by clicking Manage Tags.
Warning
Never include sensitive information in a resource tag. Sensitive information includes commands that return existing tag definitions and information that will identify a person or company.
-
-
Click Next.
-
Review the Summary and click Next.
-
Click Add VXC and configure further VXCs or proceed through the ordering process.
-
To deploy a second connection (recommended), repeat these steps and select “Add a redundant VLAN to an existing VLAN” in step 6. Adding a second connection ensures that you receive redundancy and an SLA from Google.
After placing the order, wait a few minutes until the VXC status changes from red to green. Green indicates Layer 2 connectivity has been established.

This completes your Layer 2 VXC deployment.
After the VXC is established in the Megaport Portal, you need to accept the attachment in the Google Cloud Console and configure BGP. Google provides you with a private IP address to configure BGP.
For more information, see the Google documentation on Google Partner Interconnects.
To activate and accept the connection
-
In Google Console, return to the attachment you just created. The attachment status should be Activation needed. If the status shows Pending partner, refresh your screen or wait a couple of minutes until it changes to Activation needed.
-
Click Activate.
Google asks you to accept the connection.
-
Click Accept and wait about a minute.
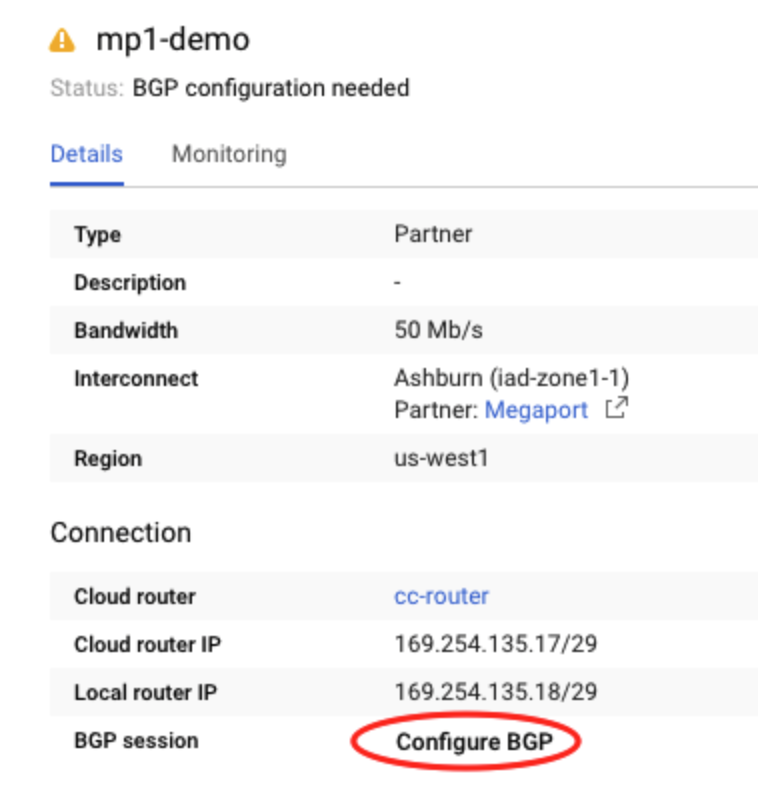
The status updates to BGP configuration needed.
To configure BGP
-
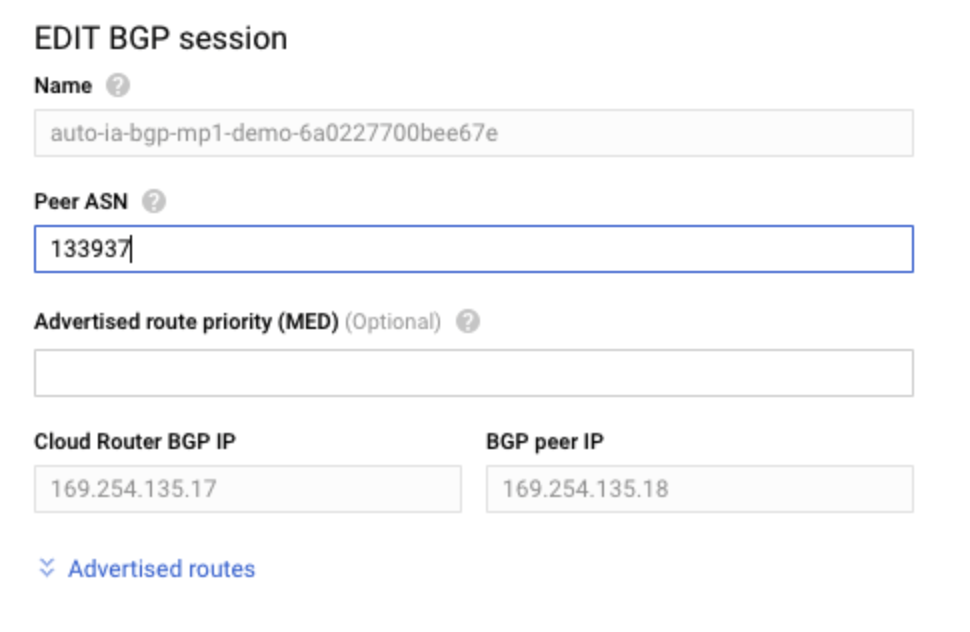
In Google Console, click Configure BGP.
-
By default, the ASN assigned to the MCR is 133937. Leave the default peer ASN or enter a private ASN.
-
Click Save and Continue.
Wait a few minutes for the BGP peer to establish and then verify the BGP configuration.
To verify the BGP configuration
-
In the Megaport Portal, select the VXC.
-
Select the Logs tab.
The VXC status should be BGP Established.
-
In the Google Cloud Console, view the VLAN attachment. The status should be BGP Up.
For more information, see the Google documentation on Viewing Router Status and Advertised Routes.
Using a service key
You can create a service key that allows you to share your service with another Megaport account holder. For more information, see Setting up Service Keys.