Integrating Megaport with Snowflake on AWS
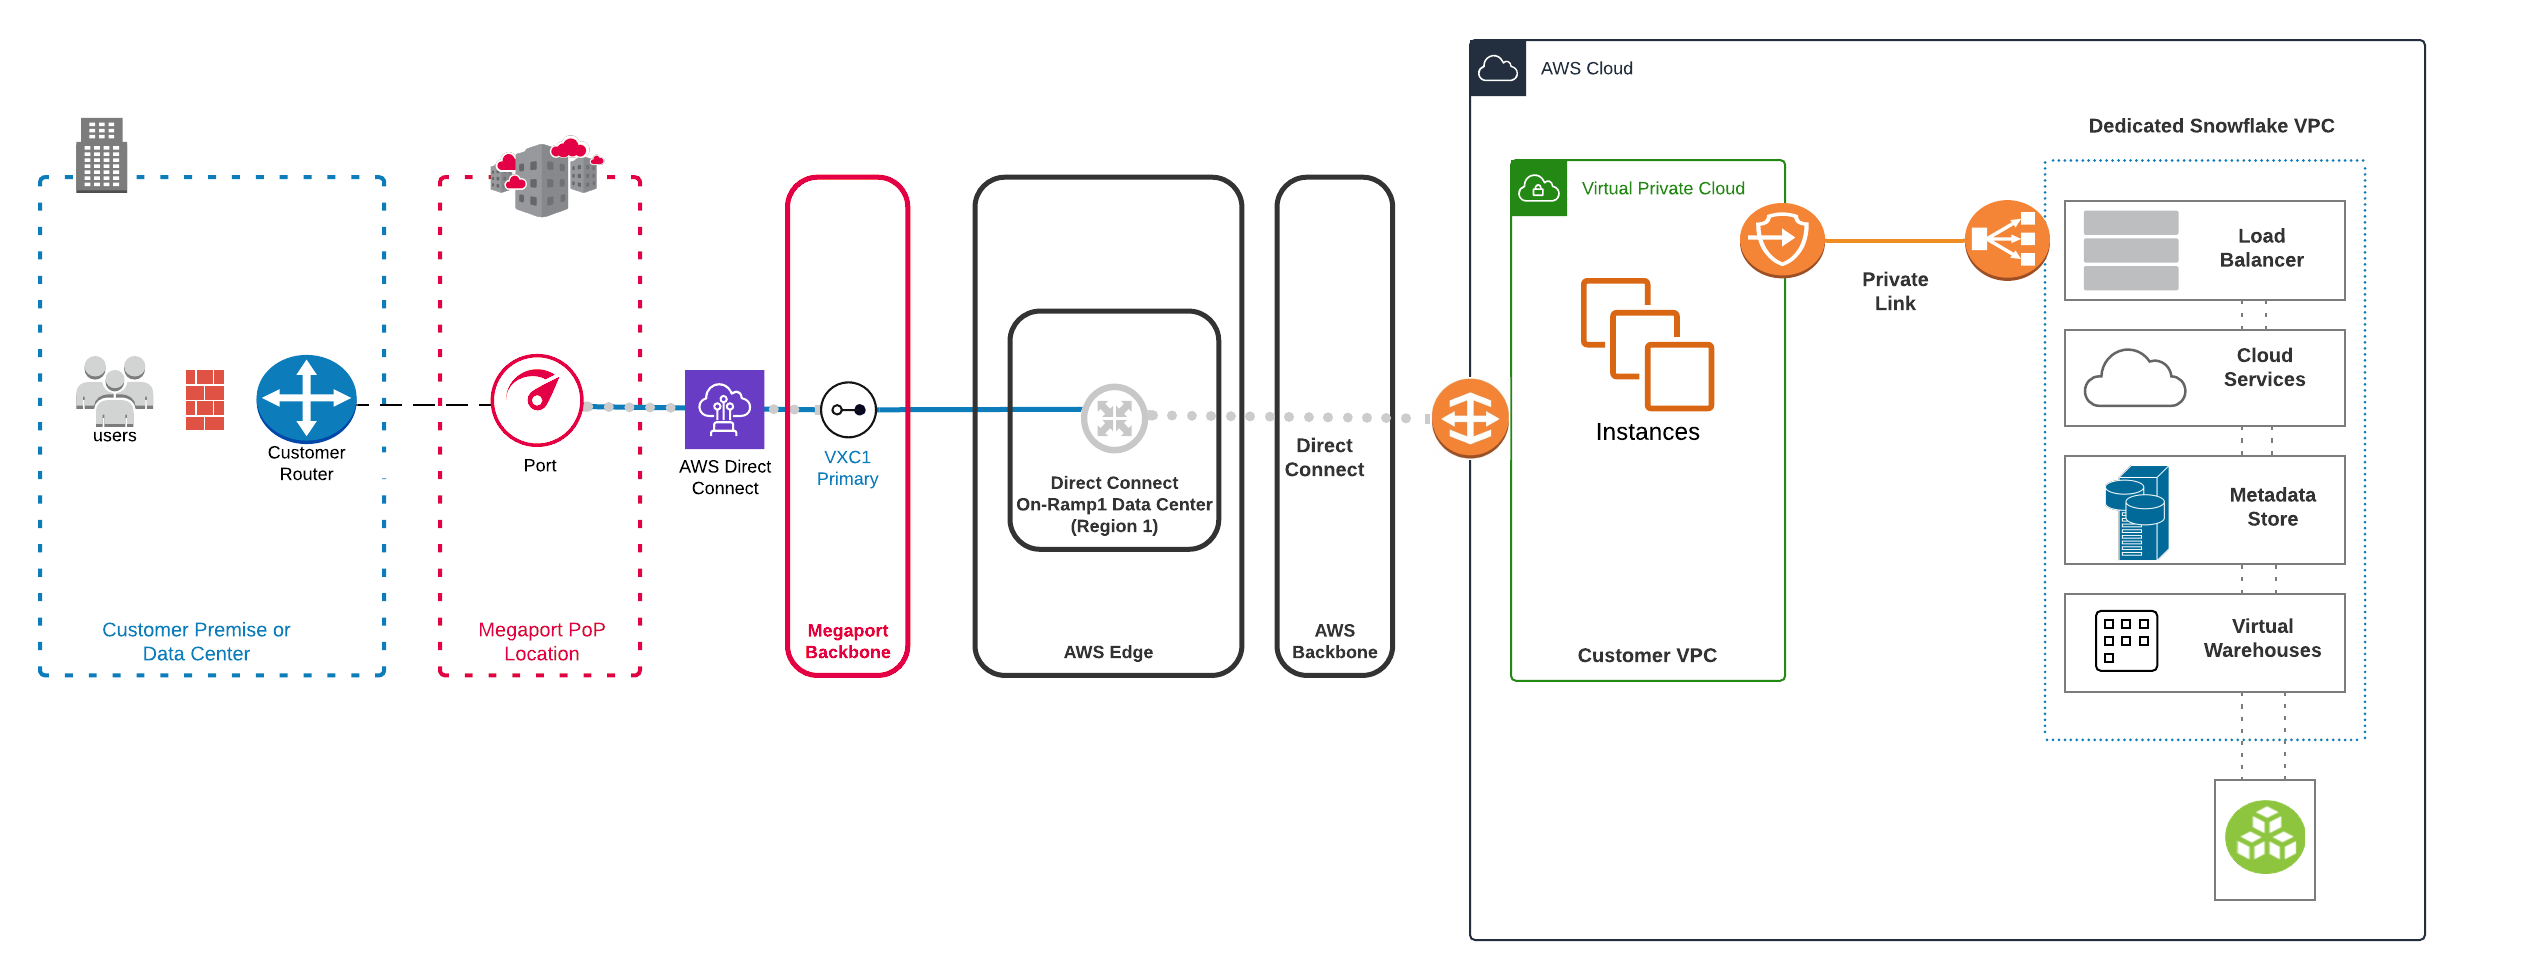
You can use Megaport to create an AWS Direct Connect Layer 2 connection between your on-premises or colocation-based infrastructure and your Snowflake environment on AWS.
Before you begin, ensure that you have created a Port. After you create the Port, you can connect a Virtual Cross Connect (VXC) from the Port to the virtual gateway associated with the AWS VPC infrastructure. A VXC is a point-to-point Ethernet connection between an A-End (your Port) and a B-End (in this case, your AWS instance).
If you aren’t a Megaport customer, you can create a 10 Gbps, 100 Gbps, or higher Port in one of our global data centers/Points of Presence. If your company is not located in one of our PoPs, you can procure a last mile circuit to one of the sites to connect to Megaport. Contact Megaport for more information.
Note
If you require a Port in a different location to physically separate this solution from other existing traffic traversing your Ports, we recommend that you create a new one before proceeding.
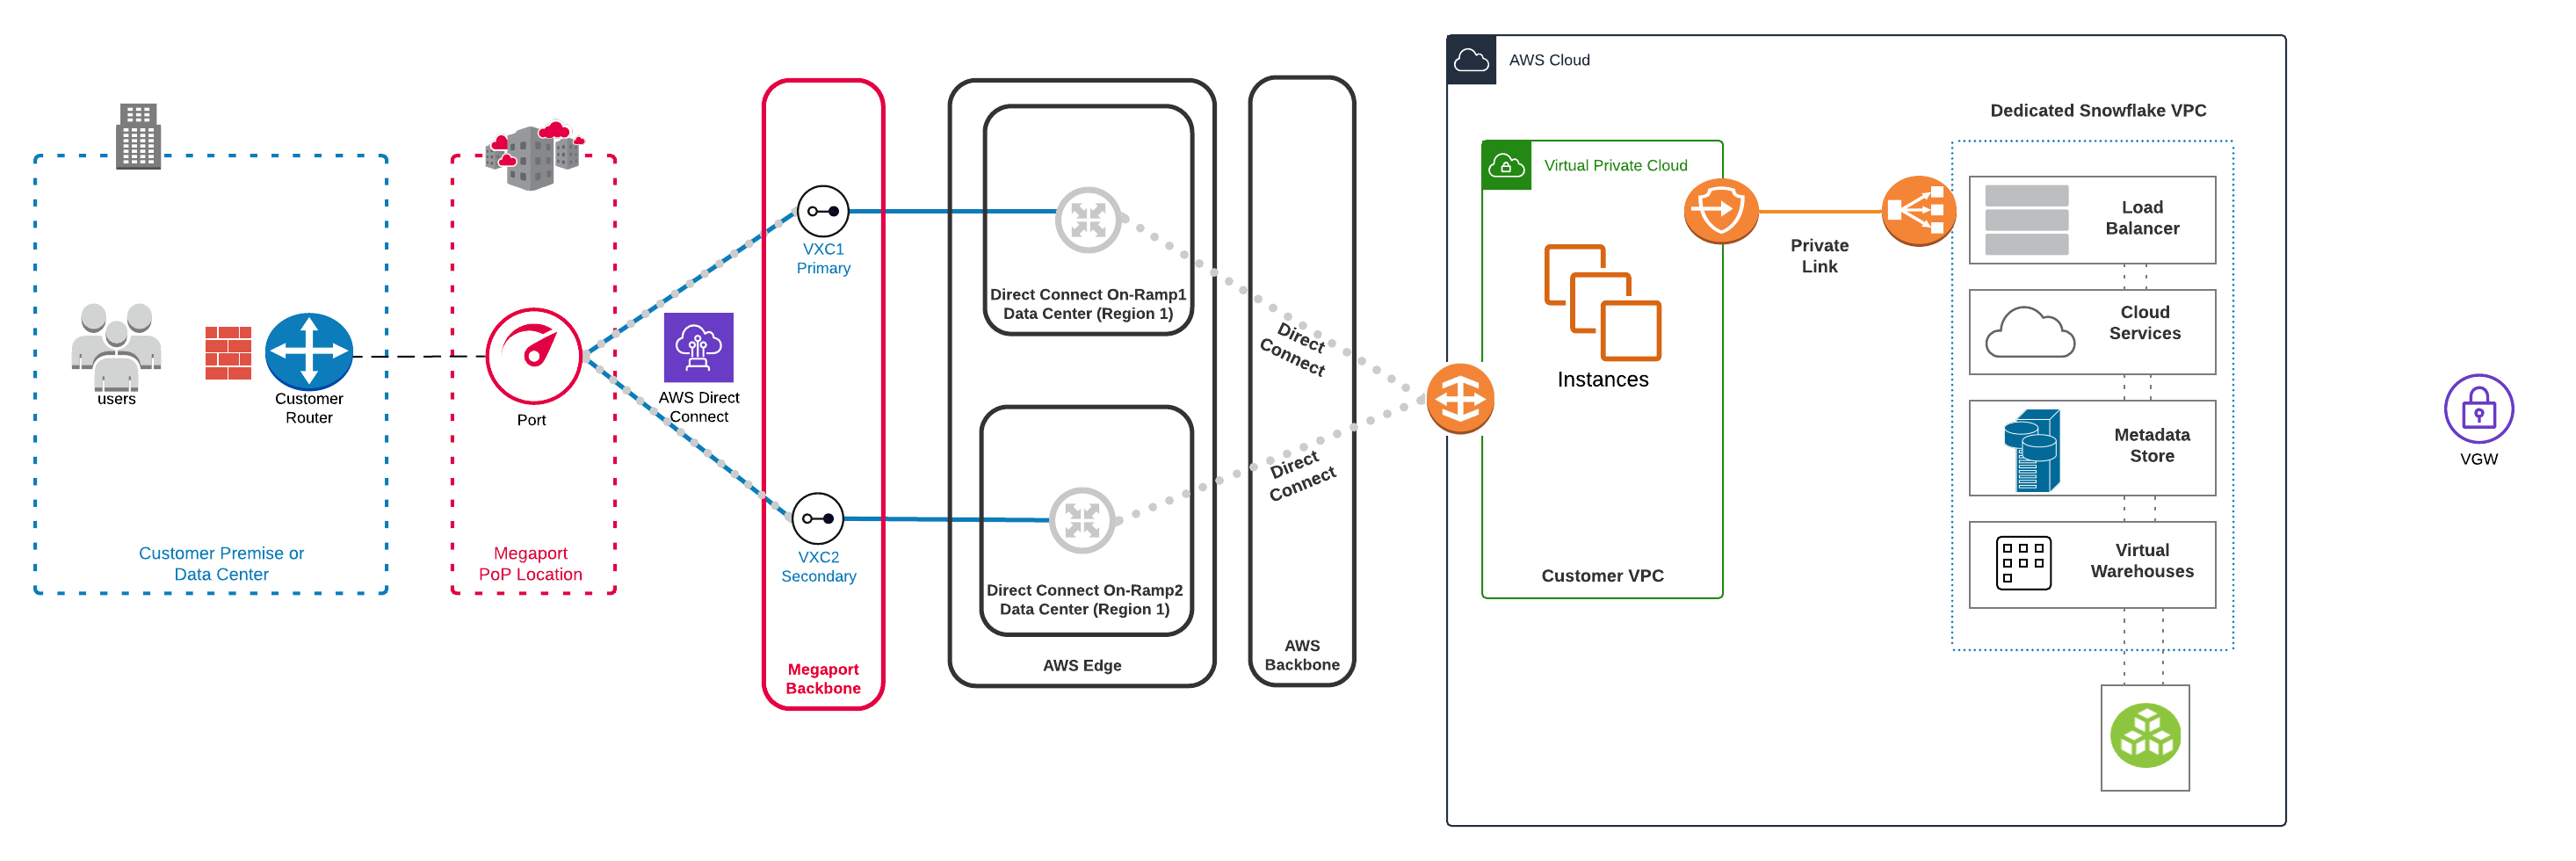
This image shows a high level topology diagram of a solution integrating Megaport with Snowflake Data Warehousing on AWS using a single connection.
Setting up your Snowflake environment
To set up your Snowflake environment, you will:
- Log in to Snowflake
- Create Snowflake objects
- Stage the data files
- Copy data into the target table
- Query the loaded data
For more information about setting up Snowflake in an AWS environment, see Snowflake Prerequisites.
To ensure that data transfer between your Snowflake solution and your VPC remains secure, you can use AWS PrivateLink to connect the two environments. PrivateLink is an AWS service that lets you implement direct and secure connectivity between AWS VPCs. This allows your data to stay within the AWS infrastructure without being exposed to the internet which reduces some of the security risks related to having data traversing the internet.
Note
Enabling AWS PrivateLink can take up to 2 business days. For more information about enabling AWS PrivateLink for your Snowflake on AWS solution, see AWS PrivateLink & Snowflake.
Integrating Megaport with Snowflake Data Warehousing on AWS
You can use the Megaport Portal to create the VXC to the Snowflake on AWS environment.
-
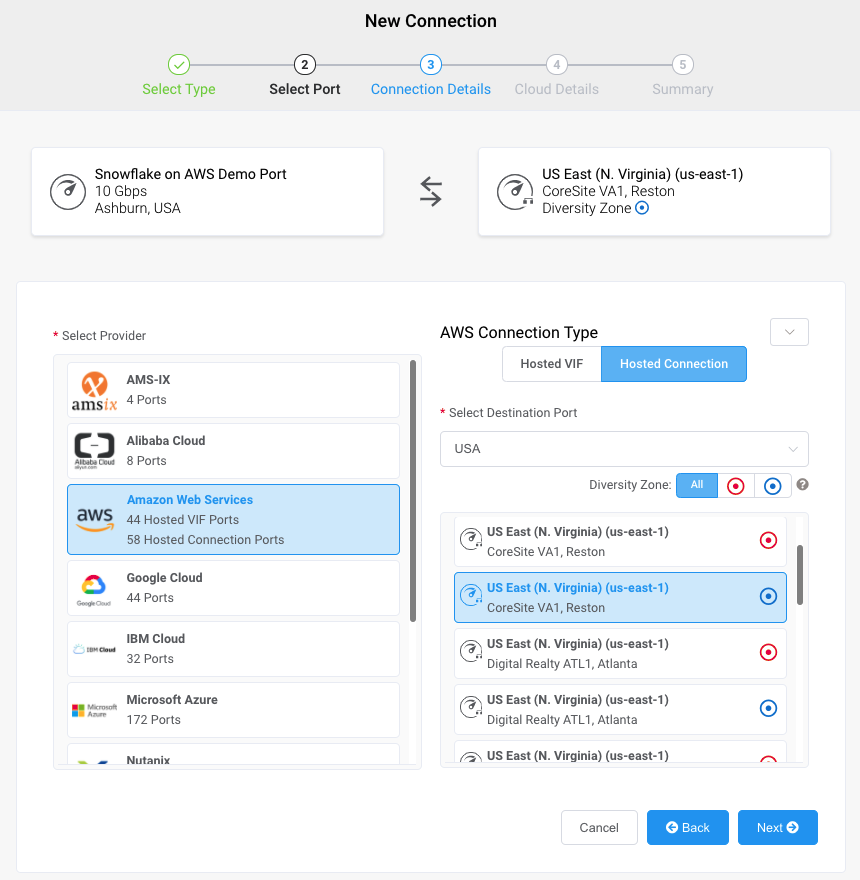
In the Megaport Portal, go to the Services page and select the Port you want to use.
If you haven’t already created a Port, see Creating a Port. -
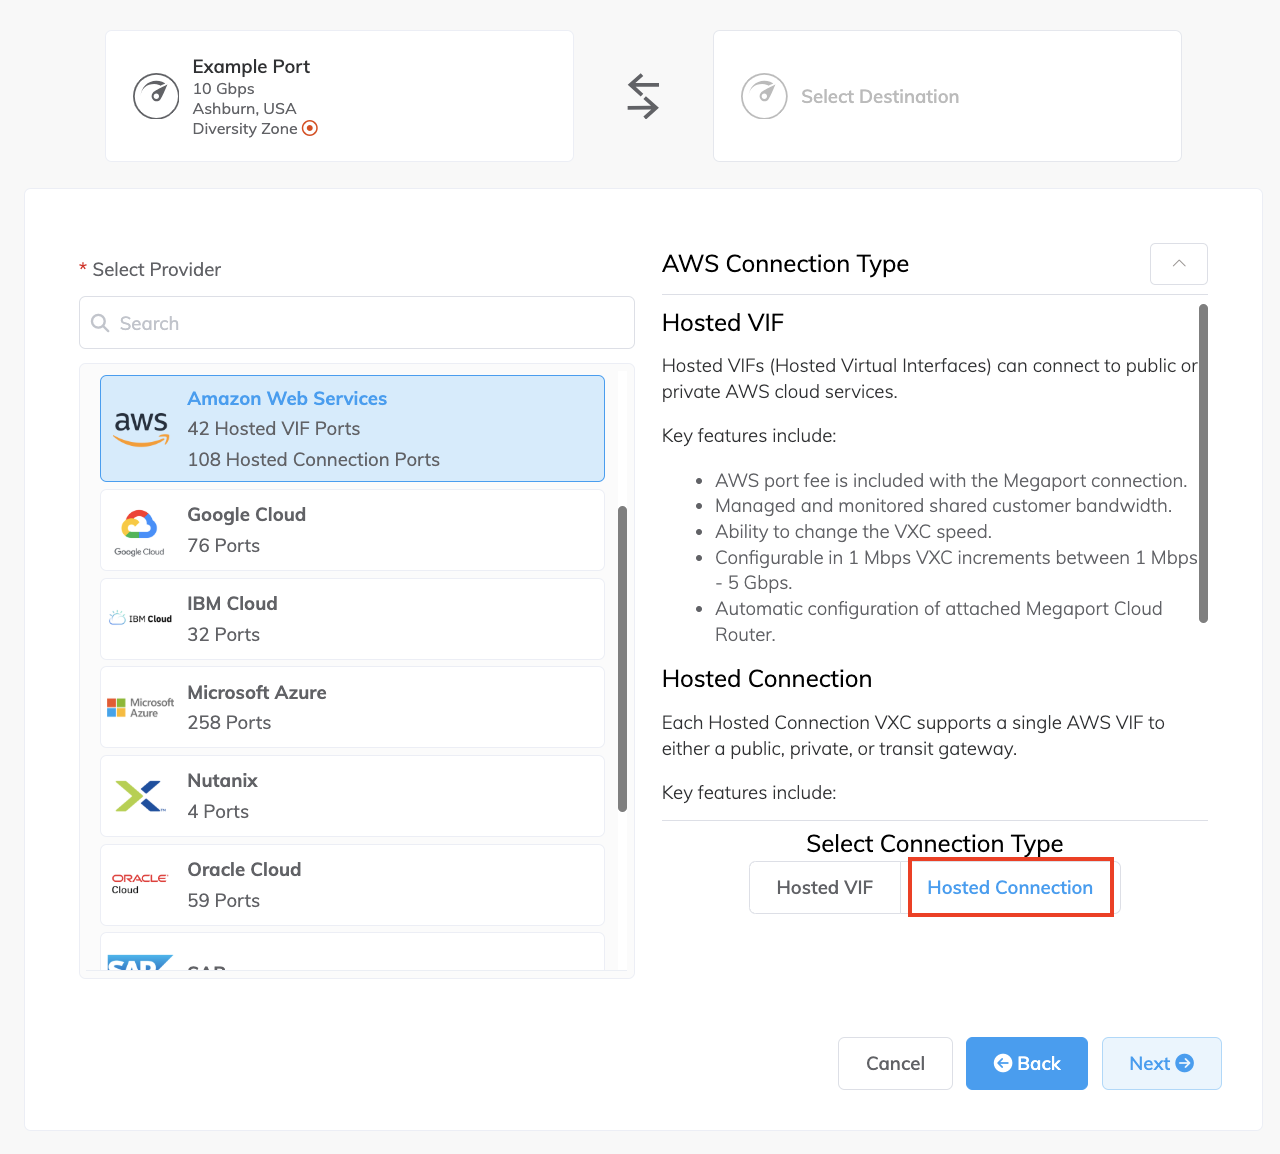
Add an AWS connection for the Port.
If this is the first connection for the Port, click the AWS tile. The tile is a shortcut to the configuration page. Alternatively, click +Connection, click Cloud, then click AWS. -
For AWS Connection Type, click Hosted VIF or Hosted Connection and click Next.
For this example, we will click Hosted Connection.
-
Next, you will create a new VXC. In the Select Destination Port list, select the AWS region and the interconnection point for your connection, then click Next.
You can use the Select Destination Port search field to narrow the selection. You can also filter by diversity zone.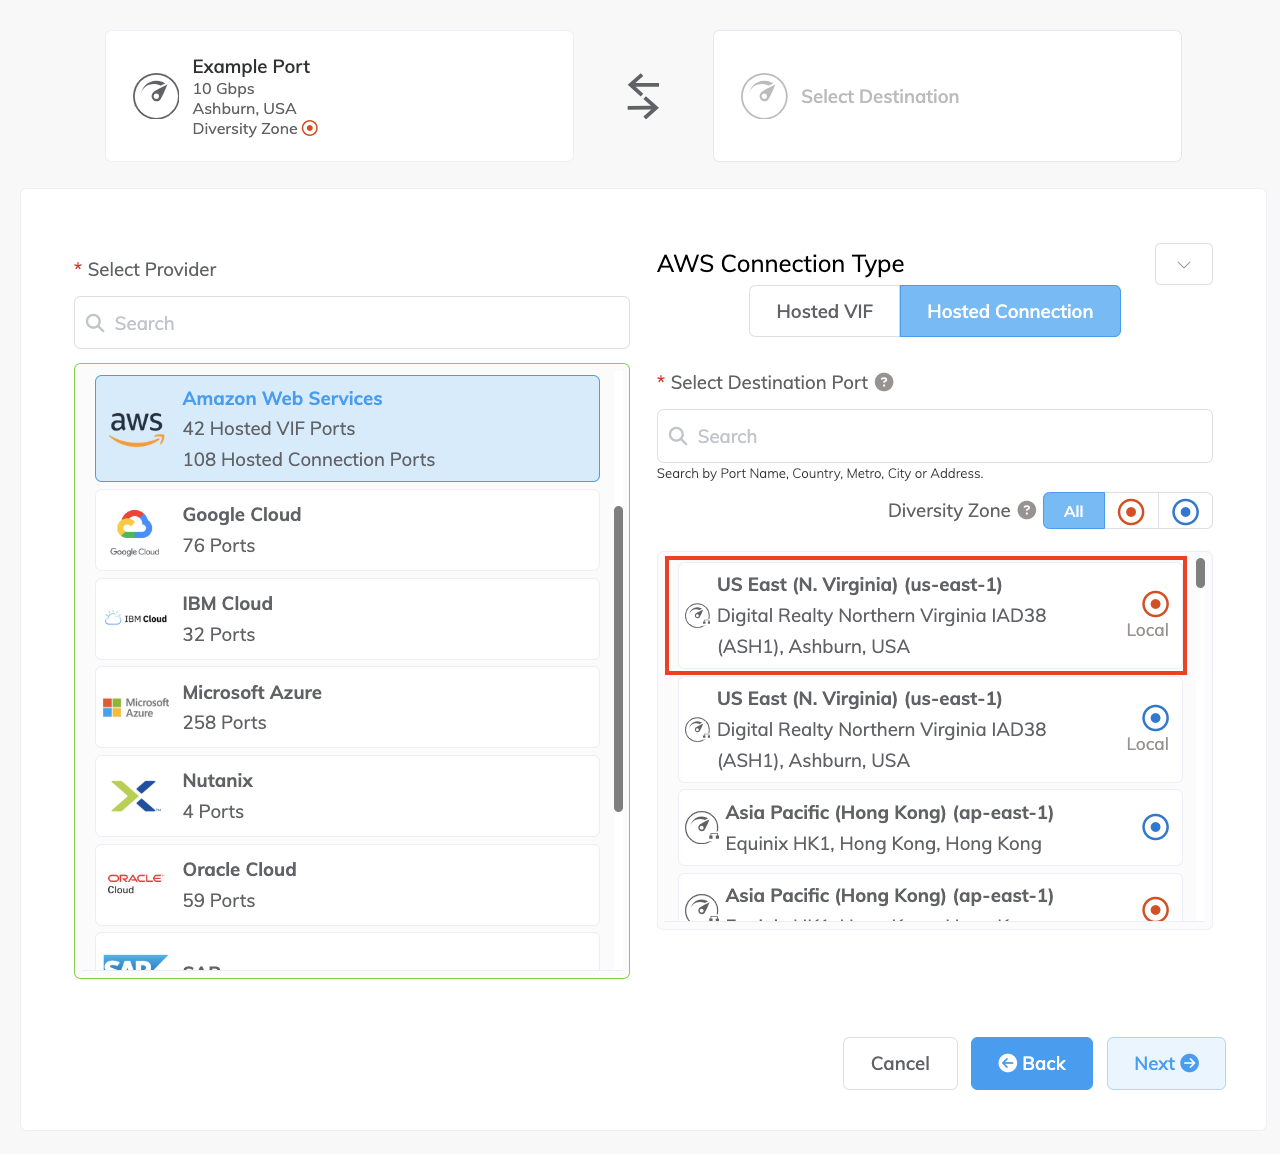
-
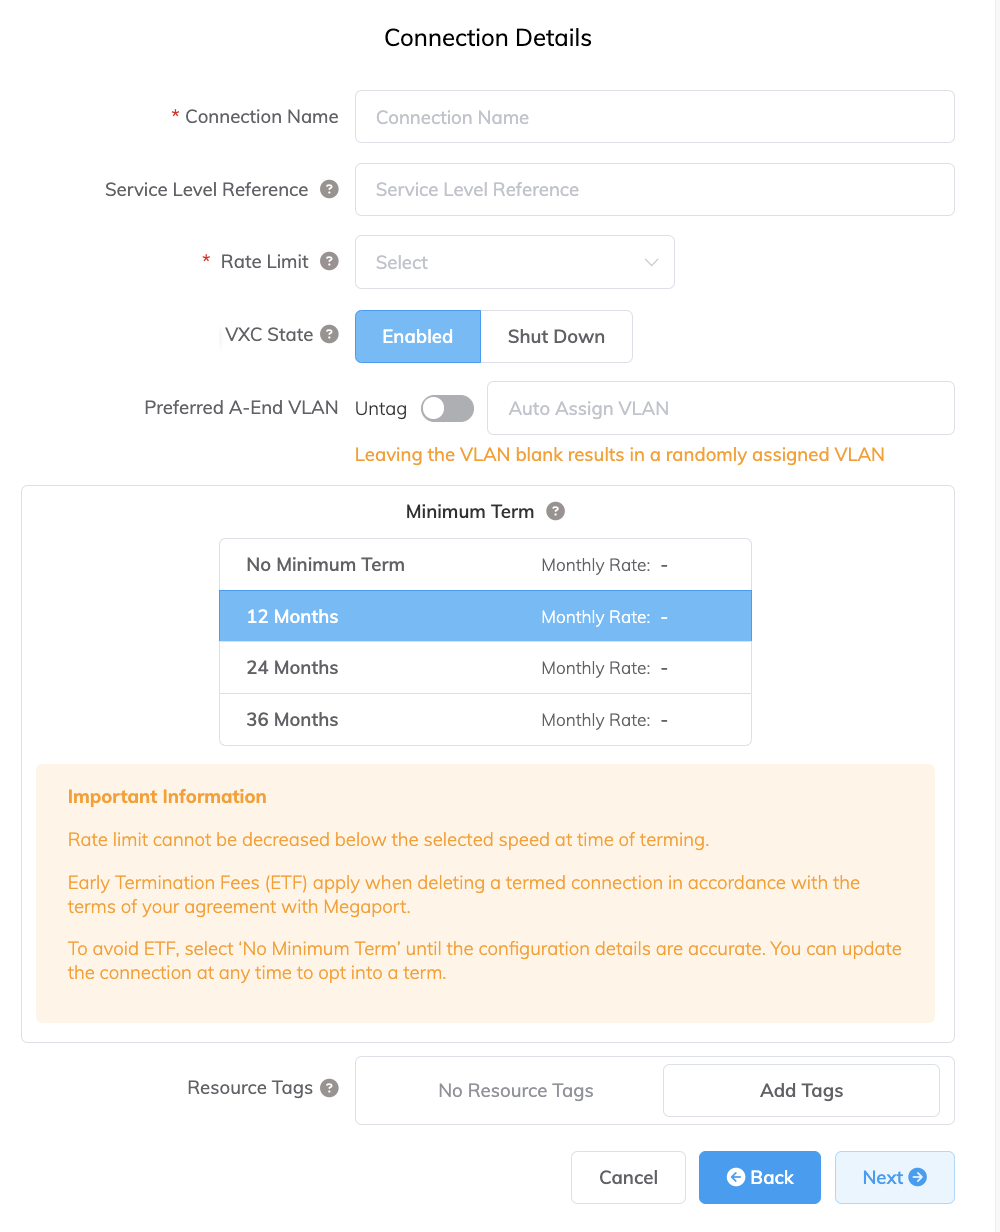
Specify the connection details:
-
Connection Name – The name of your VXC to be shown in the Megaport Portal.
-
Service Level Reference (optional) – Specify a unique identifying number for your Megaport service to be used for billing purposes, such as a cost center number, unique customer ID, or purchase order number. The service level reference number appears for each service under the Product section of the invoice. You can also edit this field for an existing service.
-
Rate Limit – The speed of your connection. You must choose from the provided bandwidth options (50 Mbps to several Gbps for Hosted VIF, or up to 25 Gbps for a Hosted Connection). Higher speeds might be available depending on region and capabilities. The sum of all hosted virtual VXCs to a service can exceed the Port capacity (for example, 10 Gbps, 100 Gbps, or higher), however the total aggregate will never burst beyond the Port capacity.
-
VXC State – Select Enabled or Shut Down to define the initial state of the connection. For more information, see Shutting Down a VXC for Failover Testing.
Note
If you select Shut Down, traffic will not flow through this service and it will behave as if it was down on the Megaport network. Billing for this service will remain active and you will still be charged for this connection.
-
Preferred A-End VLAN (optional) – Specify an unused VLAN ID for this connection.
This VLAN ID must be a unique ID on this Port and can range from 2 to 4093. If you specify a VLAN ID that is already in use, the system displays the next available VLAN number. The VLAN ID must be unique to proceed with the order. If you don’t specify a value, Megaport will assign one.Alternatively, you can select Untagged to remove the VLAN tagging for this connection. The untagged option limits you to only one VXC deployed on this Port.
-
Minimum Term – Select No Minimum Term, 12 Months, 24 Months, 36 Months, 48 Months, or 60 Months. Longer terms result in a lower monthly rate. 12 Months is selected by default. Take note of the information on the screen to avoid early termination fees (ETF).
Enable the Minimum Term Renewal option for services with a 12, 24, 36, 48 or 60-month term to automatically renew the contract at the same discounted price and term length at the end of the contract. If you don’t renew the contract, at the end of the term, the contract will automatically roll over to month-to-month contract for the following billing period, at the same price, without term discounts.
For more information, see VXC Pricing and Contract Terms and VXC, Megaport Internet, and IX Billing.
-
Resource Tags – You can use resource tags to add your own reference metadata to a Megaport service.
To add a tag:- Click Add Tags.
- Click Add New Tag.
- Enter details into the fields:
- Key – string maximum length 128. Valid values are a-z 0-9 _ : . / \ -
- Value – string maximum length 256. Valid values are a-z A-Z 0-9 _ : . @ / + \ - (space)
- Click Save.
If you already have resource tags for that service, you can manage them by clicking Manage Tags.
Warning
Never include sensitive information in a resource tag. Sensitive information includes commands that return existing tag definitions and information that will identify a person or company.
-
-
Click Next.
-
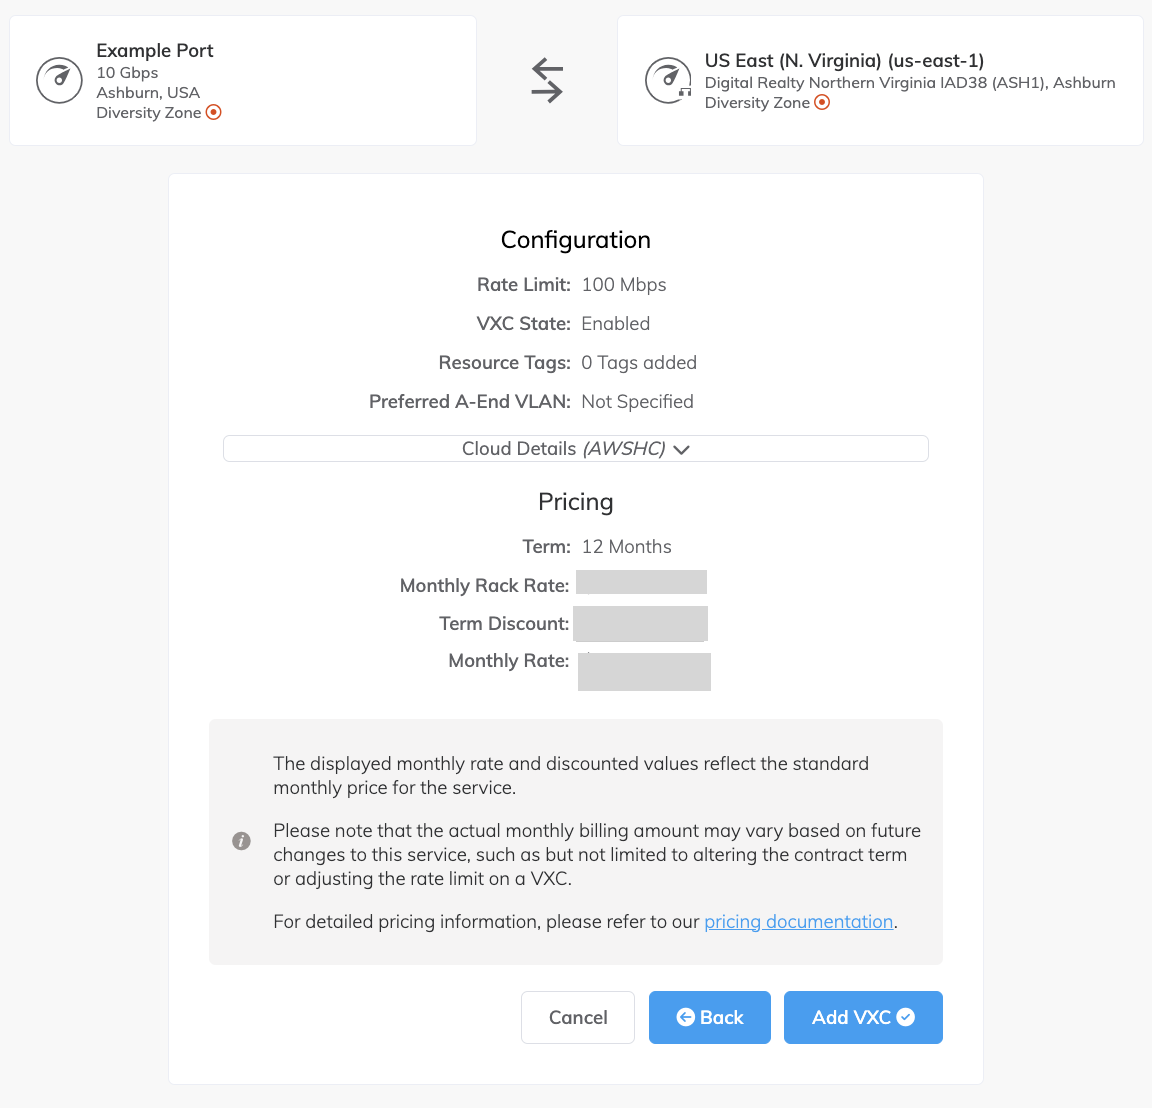
Specify the cloud details:
- AWS Connection Name – This is a text field and will be the name of your virtual interface that appears in the AWS console. For easy mapping, use the same name for this field as you did for the VXC name on the previous screen.
- AWS Account ID – This is the ID of the account you want to connect. You can find this value in the Account Settings section of your AWS console.
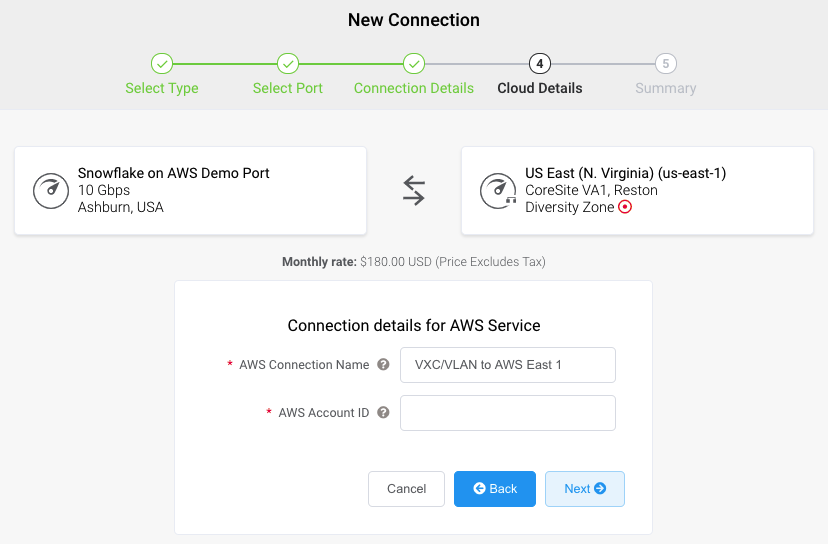
-
Click Next.
-
Review the connection details and click Add VXC.
-
Click Review Order to proceed through the checkout process, or click Save to save the configured services before placing the order.
-
Review the Important Information section and confirm agreement with the Service Agreements.
If you do not have a promotion code, skip to the Order Now step. If you do have a promotion code, enter it into the Enter discount code field then click Apply. Alternatively, if a code already appears in the Discounts field, verify it is correct and click Apply.
The promotional discount appears below the Standard Term discount. This discount is not reflected in the Monthly Rate shown here, it is applied at the time of billing. If an invalid or expired code causes an error with your order, contact your Megaport Account Manager for a replacement code.
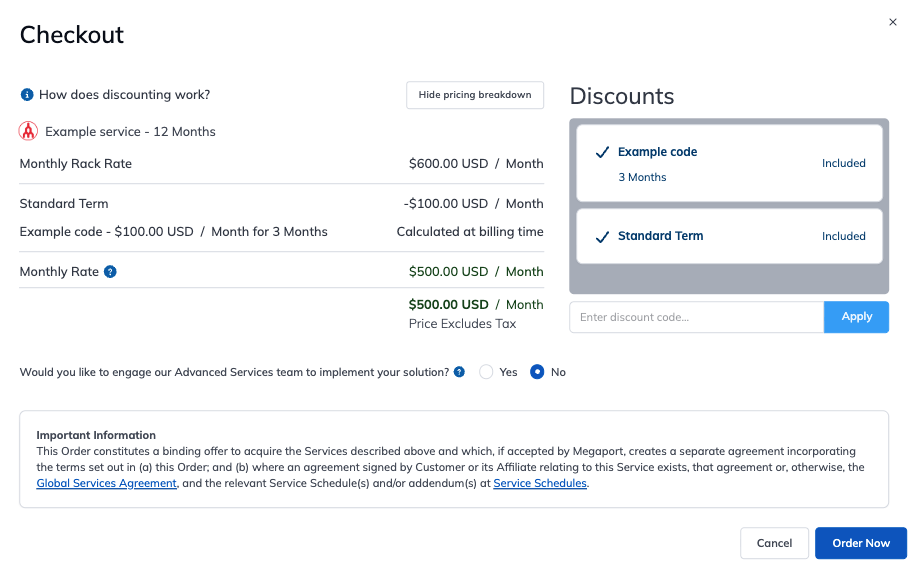
If you entered an incorrect promotion code, you can remove it by clicking Remove.
-
Click Order Now.
Your work in the Megaport Portal is complete. Next, you will connect the new VXC to your AWS environment.
-
In approximately 2 minutes, log in to your AWS account.
The VXC you implemented will appear in your Direct Connect under Connections. 1. Click Create connection.
You will then need to connect to a Direct Connect Gateway. For more information about connecting to various types of gateways, see Working with Direct Connect gateways - AWS Direct Connect.
Redundancy
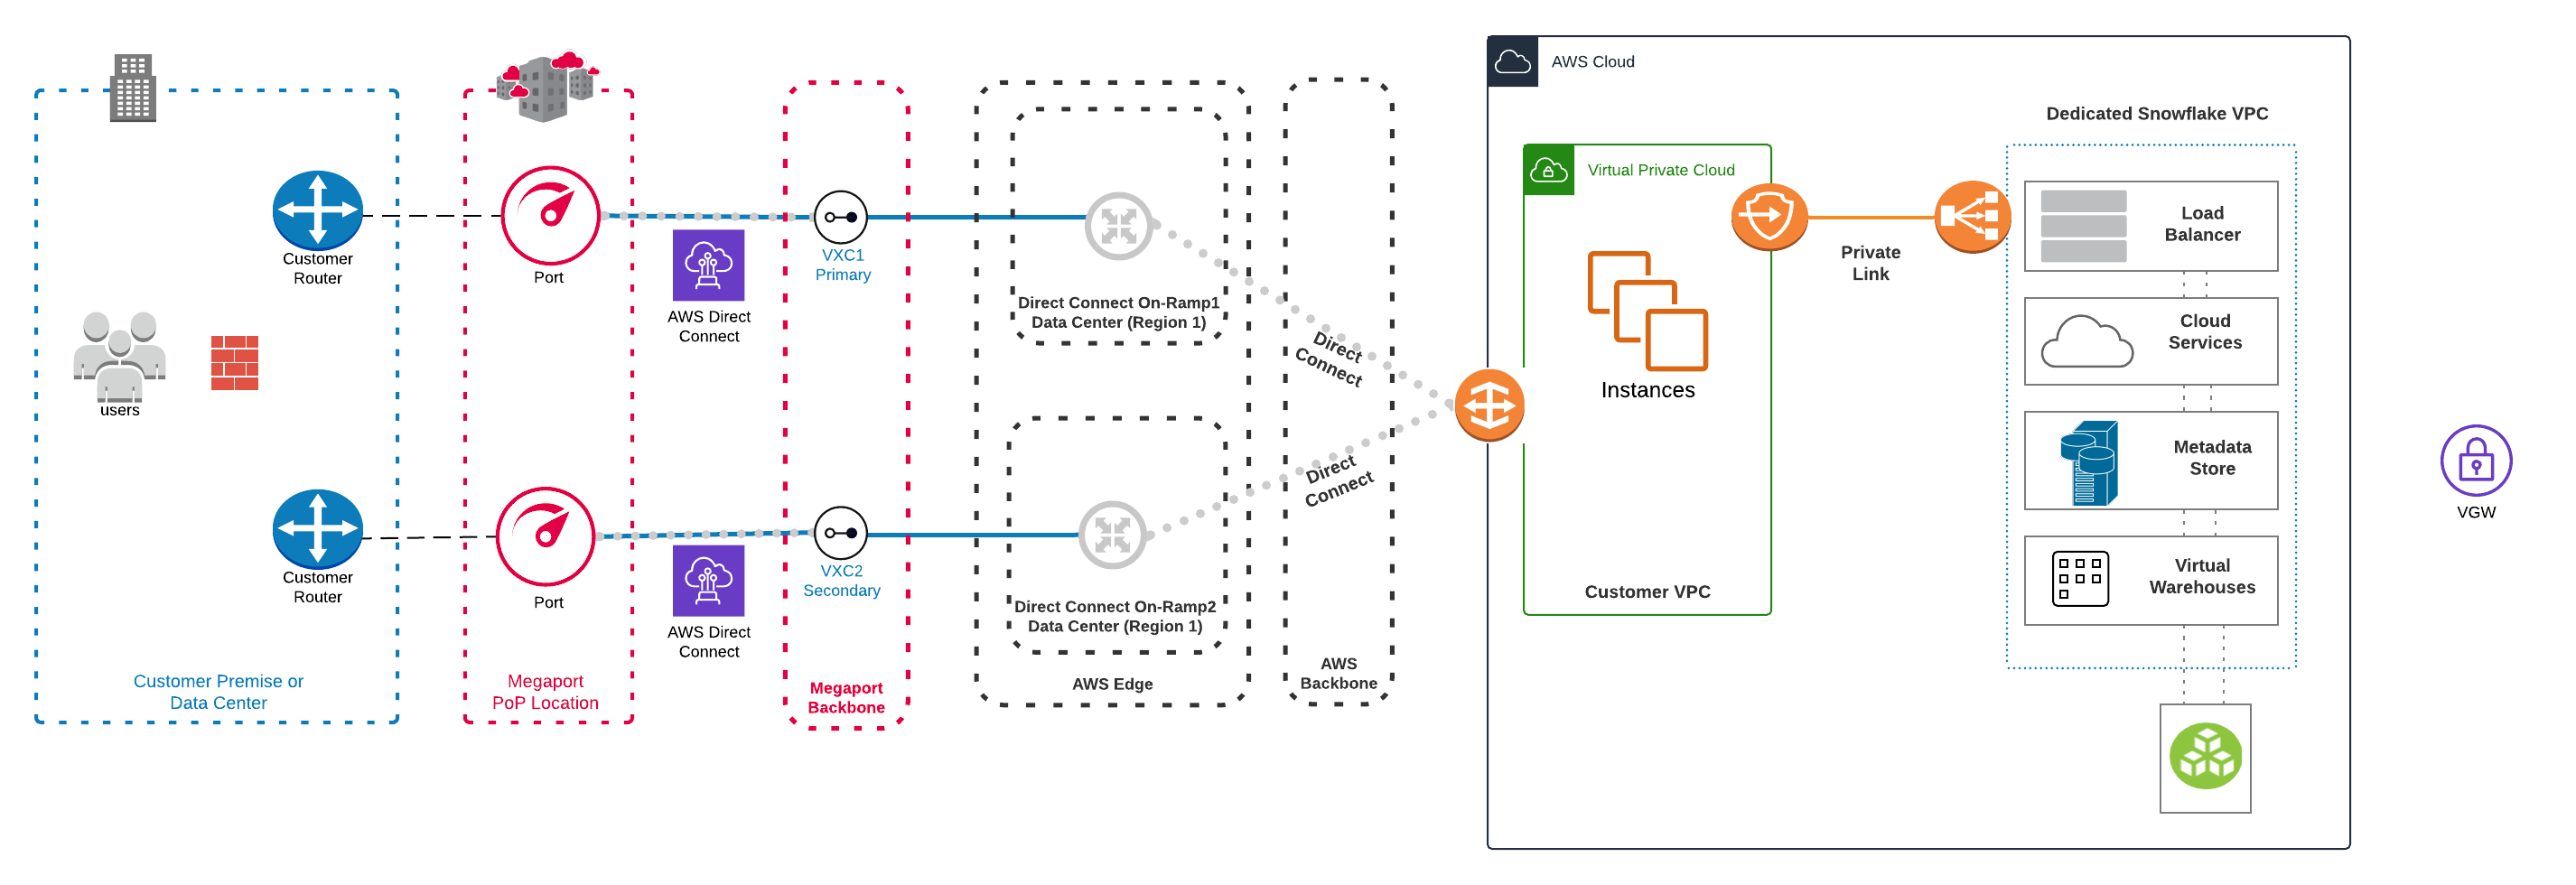
To achieve redundancy for the connectivity portion of this solution, establish an additional VXC to a diverse edge router within the AWS environment. Follow the Integrating Megaport with Snowflake Data Warehousing on AWS procedure from step 3, and choose the alternate Diversity Zone (identified by the blue circle icon) when choosing the AWS region.
Note
The Diversity Zones identified in the Megaport Portal only refer to AWS edge router locations, and not to the Availability Zones within the AWS infrastructure.
Complete the procedure, including the required steps within the AWS console.
This image shows a high-level topology diagram of a solution integrating Megaport with diverse connections into the Snowflake Data Warehousing on AWS infrastructure.
For additional physical redundancy for the connectivity, you can implement the VXCs on separate Ports:
Background information
Snowflake is a Software as a Service (SaaS)Software as a Service (SaaS) is a form of cloud computing in which the provider offers the use of application software to a client and manages all the physical and software resources used by the application. SaaS is sometimes referred to as “on-demand software” and is usually priced on a pay-per-use basis or using a subscription fee.
data warehouse service that is purpose-built for the cloud. The infrastructure is built within the AWS cloud and allows for fast and simple implementation and integration with your AWS VPC environment and on-premises infrastructure. In a Snowflake on AWS environment, you can take advantage of benefits such as elasticity and scalability while only paying for the resources that you use. It provides metadata management, security of data, and an ANSI compliant engine on a resilient and redundant platform that allows you to store, query, and analyze all of your data in one place. Snowflake is available within the AWS Marketplace; it competes with services that are offered directly by AWS, but can offer more functionality at lower costs. We recommend that you review available options to determine which is best for your business requirements.
For more information about Snowflake, see these additional links: