Ordering a Cross Connect
A Cross Connect is a dedicated physical point-to-point connection that links your location within a Megaport-enabled data center to a Megaport Port. It can only be ordered with a Port on a term.
You can order a Cross Connect at the same time as you create your Port, after the Port order has been created but before the service is ordered, or after you have ordered the Port when it is in Configured status.
If you order a Cross Connect at the same time as a Port, whichever method you used, Megaport will process the Cross Connect order with the data center to streamline the ordering process.
Note
When you order a Port with a Cross Connect, the Port will only be live after the Cross Connect has been deployed. This means that the Port will not be available within seconds, as it would be without the Cross Connect, but there will be a delay while the Cross Connect is provisioned.
Ordering a Cross Connect when creating a Port
You can order a Cross Connect during the Port creation process.
To order a Cross Connect when creating a Port
-
Start the process to create a Port.
For more information about creating a Port, see Creating a Port. -
Select the Port location.
-
Enter a Port name and select the Port speed.
If the location has Cross Connect availability, a section will appear on the ordering page allowing you to include one with the Port order.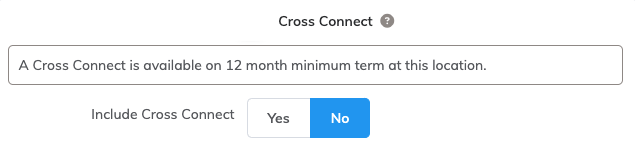
-
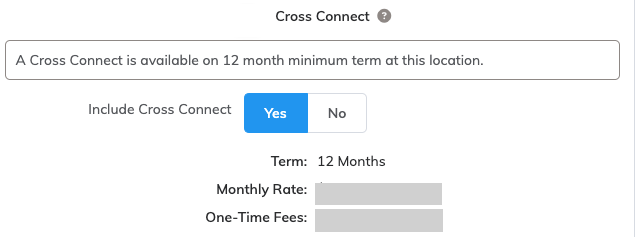
Select Yes to include a Cross Connect with your Port order.
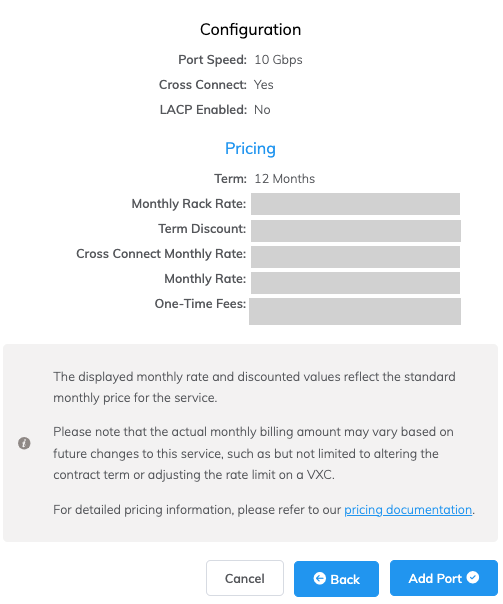
The pricing for the Cross Connect is displayed.- Monthly Rate – Indicates the Cross Connect pricing in addition to the monthly Port fees. The term is the same as the Port.
- One-Time Fees – Indicates installation and decommissioning charges.
If you include Link Aggregation Groups (LAGs) or Port diversity, incremental costs will be added to the Cross Connect on a per Port basis. For more information about LAGs, see Creating a Link Aggregation Group. For more information about Port diversity, see Port Diversity. -
Enter the remaining new Port details on this page.
-
Click Next.
On the Summary page, the Port and Cross Connect pricing is displayed.
Note
The term discount and any other associated discount apply only to the Port.
-
Click Add Port.
The total monthly cost of the Port and Cross Connect is shown in the cart. The one-time fee is not included in the cart. -
Click Review Order.
The Cross Connect pricing is summarized.
Read the Cross Connect disclaimer with the important information on the pop-up window. -
Click Order Now.
Ordering a Cross Connect after creating a Port, but before ordering the service
If you decide you want to add a Cross Connect after creating your Port, you can add one before you click Review Order and deploy your service.
To order a Cross Connect before ordering the service
-
Create a Port.
For more information about creating a Port, see Creating a Port. -
After clicking Add Port to finalize the Port setup, click the gear icon next to the connection on the Services page to make changes.

If the location has Cross Connect availability, a section will appear allowing you to include one with the Port order.
-
Click Yes in the Cross Connect section to add a Cross Connect to your order.
The pricing for the Cross Connect is displayed.- Monthly Rate – Indicates the Cross Connect pricing in addition to the monthly Port fees. The term is the same as the Port.
- One-Time Fees – Indicates installation and decommissioning charges.
-
Click Next.
-
Review the pricing information summary and click Update Port.
-
Click Review Order and review the details.
-
Click Order Now to order your Port.
Ordering a Cross Connect when the Port is in Configured status
If you decide you want to order a Cross Connect after you have created your Port, and clicked Review Order and Order Now, you can add a Cross Connect when it is in Configured status.
To order a Cross Connect in Configured status
-
Go to the Services page.
You will see the Port on the Services page in Deployable status while the Port is waiting for resource allocation.

After a few seconds, the status will change to Configured.

-
Click the gear icon next to the connection to make changes.

If the location has Cross Connect availability, a section will appear allowing you to include one with the Port order.
-
Click Yes in the Cross Connect section to add a Cross Connect to your order.
The Cross Connect will be added to your Port, and the pricing will be adjusted accordingly.
Note
The Port will remain in Configured status until the Cross Connect has been deployed.
Uploading a Letter of Authorization (LOA)
Megaport cannot deploy the Megaport-provisioned Cross Connect until you provide the LOAA Letter of Authorization (LOA) is a document that customers need to present to their data center provider to establish the physical cross-connect from their data center services to their Port. The LOA is provided via the Megaport Portal when a customer provisions a new Port.
. After you order the Cross Connect, you will receive an email from Megaport with a case reference number and instructions to complete your order.
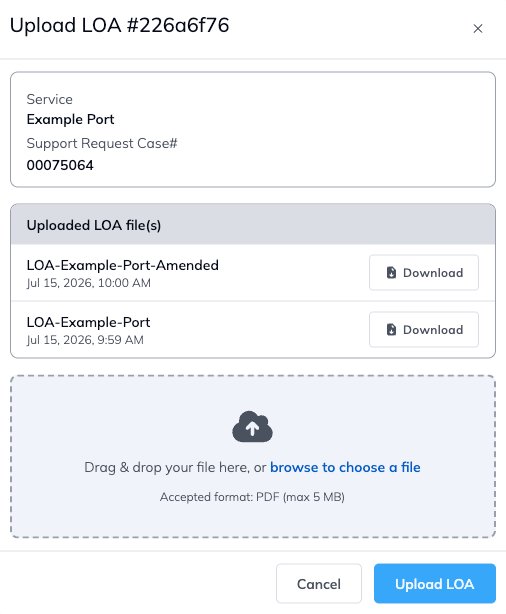
When the Port is in Configured status, an Upload LOA button appears on the Services page entry. Click it to open the Upload LOA screen, where you can upload a new LOA and view or download any LOA files already uploaded for the Cross Connect case.
To upload a LOA
-
Click Upload LOA for the required Port on the Services page.

-
On the Upload LOA screen, drag and drop your LOA file onto the upload area, or click browse to choose a file and select it.
The file must be a PDF and no larger than 5 MB.
-
Click Upload LOA.
The uploaded file appears in the Uploaded LOA file(s) list.
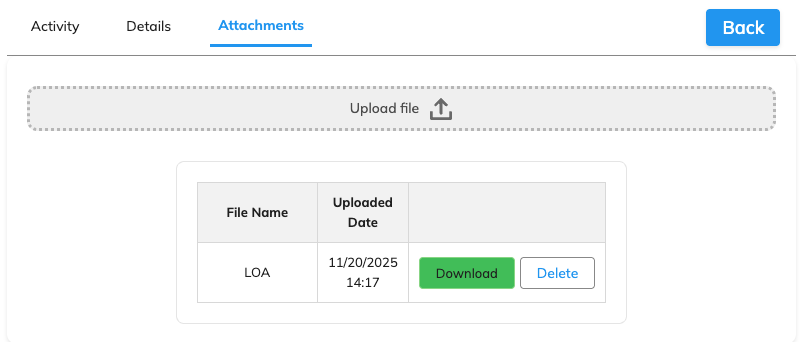
Viewing and downloading uploaded LOA files
The Upload LOA screen lists any LOA files already uploaded for the Cross Connect case under Uploaded LOA file(s), showing the name of each file and the date it was uploaded.
To download a file, click Download next to it in the list.
Note
You cannot delete an uploaded LOA file. If you need to correct a mistake, upload a new file, and it will appear alongside the existing files in the list.
Support Requests Portal
Megaport creates a support case for each Cross Connect order. You can use the Support Requests Portal to see more details about your Cross Connect case and to keep track of progress.
For more information, see Support Requests Portal.
You will be able to see these tabs:
-
Activity - The Activity tab allows you to see the activity that has taken place on the case. You can use this page to enter comments.

-
Details - In the Details tab, you can see the details of this Cross Connect order, including Port information and Cross Connect information. You can also add Collaborators, people in your organization that you want to participate in this case.

-
Attachments - The Attachments tab is for uploading attachments, such as the LOA.
For more information, see Support Requests Portal.