Creating a Port with the API
This topic describes the API procedure to create a Port, including how to look up Port locations, validate the Port and determine the cost, order the Port, and download the Letter of Authorization (LOA)A Letter of Authorization (LOA) is a document that customers need to present to their data center provider to establish the physical cross-connect from their data center services to their Port. The LOA is provided via the Megaport Portal when a customer provisions a new Port.
.
Before you begin, obtain a valid access token. For more information, see Creating an API Key.
To look up Port location details in the Postman collection
-
Click Locations in the left navigation and click GET Locations (v3).
This request is not expecting Parameters or Body information. -
Click Send to make the request.
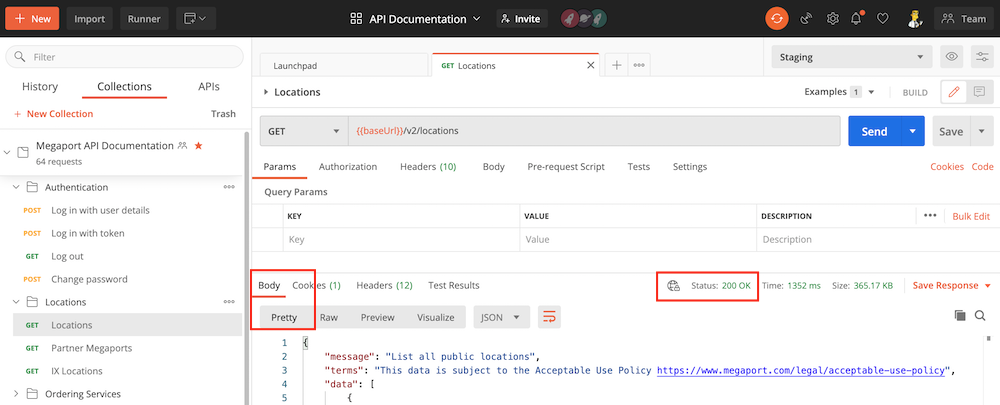
Ensure the request was successful by looking for Status: 200 OK and display the response in the Body section in the Pretty format.
The request returns hundreds of Port locations. You can search by clicking the magnifying glass and entering a specific city, data center, or other parameter in the search field. This example uses the Digital Realty, London location.
{
            "id": 89,
            "name": "Digital Realty London LHR20",
            "address": {
                "street": "227 Marsh Wall",
                "suburb": null,
                "city": "London",
                "state": null,
                "postcode": "E14 9SD",
                "country": "United Kingdom"
            },
            "dataCentre": {
                "id": 3,
                "name": "Digital Realty"
            },
            "metro": "London",
            "market": "UK",
            "status": "Active",
            "longitude": -0.012144,
            "latitude": 51.499714,
            "orderingMessage": null,
            "diversityZones": {
                "red": {
                    "mcrSpeedMbps": [
                        5000,
                        100000,
                        1000,
                        25000,
                        10000,
                        2500,
                        50000
                    ],
                    "megaportSpeedMbps": [
                        100000,
                        10000,
                        1000
                    ],
                    "mveMaxCpuCoreCount": null,
                    "mveAvailable": true
                },
                "blue": {
                    "mcrSpeedMbps": [
                        1000,
                        2500,
                        5000,
                        10000
                    ],
                    "megaportSpeedMbps": [
                        1000,
                        10000,
                        100000
                    ],
                    "mveMaxCpuCoreCount": null,
                    "mveAvailable": true
                }
            },
            "productAddOns": {
                "crossConnect": {
                    "available": false,
                    "type": null
                }
            }
        }
To create a Port, you need the market value and id value. In this example, the market is UK and the data center ID is 89.
To test and validate the Port order
-
In Postman, open the Ports folder in the left navigation and select POST Validate Port Order (v3).
-
Update the Body with the
locationId(89),term(number of months - 1, 12, 24, 36, 48, or 60),productName(whatever name you want for your Port),portSpeed(1000, 10000, or 100000 Mbps), andmarket(UK) and click Send.
[
  {
    "locationId": 89,
    "term": 1,
    "locationUid": null,
    "productName": "API Port",
    "productType": "MEGAPORT",
    "createDate": 1452475039656,
    "portSpeed": 1000,
    "virtual": false,
    "promoCode": "promox3mnthfree2",
    "market": "UK"
  }
]
A successful response passes validation and has a 200 OK status. The response also includes pricing details of the service.
{
    "message": "Validation passed",
    "terms": "This data is subject to the Acceptable Use Policy https://www.megaport.com/legal/acceptable-use-policy",
    "data": [
        {
            "price": {
                "hourlySetup": 0,
                "dailySetup": 0,
                "monthlySetup": 0,
                "hourlyRate": 0,
                "dailyRate": 0,
                "monthlyRate": 500.00,
                "fixedRecurringCharge": 500.00,
                "postPaidBaseRate": "no base rate",
                "longHaulMbpsRate": 0,
                "mbpsRate": 0,
                "currency": "GBP",
                "key": "no key",
                "productType": "MEGAPORT",
                "empty": false
            },
            "serviceName": "API Port",
            "productType": "MEGAPORT",
            "productUid": "f9859fd3-344d-4a33-8cd2-a3b6ebfaaef0",
            "market": "UK",
            "string": "London"
        }
    ]
}
To order the validated Port
-
With a validated Port request and reviewed cost information, copy the Body from POST Validate Port Order (v3) and paste into the Body of POST Buy Port (v3).
Important
If you make this call on api.megaport.com, your account will be charged for the service. Alternatively, you can provision against the staging API without charges, as in these examples.
-
Send the request.
A successful response includes atechnicalServiceUid, which is the same as theproductUid.
For our example, this value is a49cf3f1-20a1-4390-93aa-5005bdafe3d7.
{
    "message": "MEGAPORT [a49cf3f1-20a1-4390-93aa-5005bdafe3d7] created. ",
    "terms": "This data is subject to the Acceptable Use Policy https://www.megaport.com/legal/acceptable-use-policy",
    "data": [
        {
            "serviceName": "API Port",
            "name": "API Port",
            "secondaryName": null,
            "technicalServiceId": 68124,
            "technicalServiceUid": "a49cf3f1-20a1-4390-93aa-5005bdafe3d7",
            "requestedDate": 1588862976322,
            "configuredDate": null,
            "currentEstimatedDelivery": null,
            "companyName": "Megaport Lab",
            "companyId": 2278,
            "aggregationId": null,
            "lagPrimary": false,
            "billingContactName": null,
            "billingContactId": null,
            "adminContactName": null,
            "adminContactId": null,
            "technicalContactName": null,
            "technicalContactId": null,
            "salesName": null,
            "salesId": null,
            "billableId": 56333,
            "billableUsageAlgorithm": "NOT_POST_PAID",
            "productType": "MEGAPORT",
            "provisioningStatus": "DEPLOYABLE",
            "inAdvanceBillingStatus": "NOT_ACTIVATED",
            "provisioningItems": [],
            "tags": [],
            "vxcDistanceBand": null,
            "intercapPath": null,
            "marketplaceVisibility": true,
            "vxcPermitted": true,
            "vxcAutoApproval": false,
            "createDate": 1588862976322,
            "terminationDate": null,
            "contractStartDate": 1588860000000,
            "contractTermMonths": 1,
            "rateType": "MONTHLY",
            "trialAgreement": false,
            "payerCompanyId": null,
            "nonPayerCompanyId": null,
            "minimumSpeed": null,
            "maximumSpeed": null,
            "rateLimit": 10000,
            "errorMessage": null,
            "market": "UK",
            "accountManager": null,
            "promptUid": null,
            "components": [],
            "attributes": [],
            "aLocation": null,
            "bLocation": null,
            "aLocationId": null,
            "bLocationId": null,
            "attributeTags": {},
            "createdBy":  "a51cc1c6-95a0-48c7-a5a0-e49d77a6c536",
            "buyoutPort": false,
            "virtual": false,
            "locked": false,
            "adminLocked": false
        }
    ]
}
The new Port now appears in your working environment, either portal.megaport.com or portal-staging.megaport.com.
Tip
To see all options for the requests used in this example, see https://dev.megaport.com.
Download the Letter of Authorization (LOA)
After you create your Port, you can download the LOA.
Note
Before you can download the LOA, the Provisioning Status of the Port must be Configured.
To download the LOA
-
In Postman, expand Ports in the left navigation and select GET Regenerate LOA for Megaport Service.
-
In the GET command, replace the
productIDwith the value created during Port creation. -
Send the request.
With a successful 200 OK response, this message appears in the Body section:
This response could not be previewed.
Download the response to open it with an appropriate application.
This message appears because the LOA is a PDF document and must be downloaded. To download, click Save Response in Postman and save the PDF to a convenient location.