Creating MCR Connections to OVHcloud Connect
Megaport makes it easy to provision fast, secure, and private connections to OVHcloud Connect through our global software-defined network (SDN). Megaport is an OVHcloud partner providing direct private access to the OVHcloud infrastructure. You can quickly provision connectivity from hundreds of Megaport-enabled locations to OVHcloud regions and OVHcloud Connect Points-of-Presence (PoPs) across North America, Europe, and Asia Pacific.
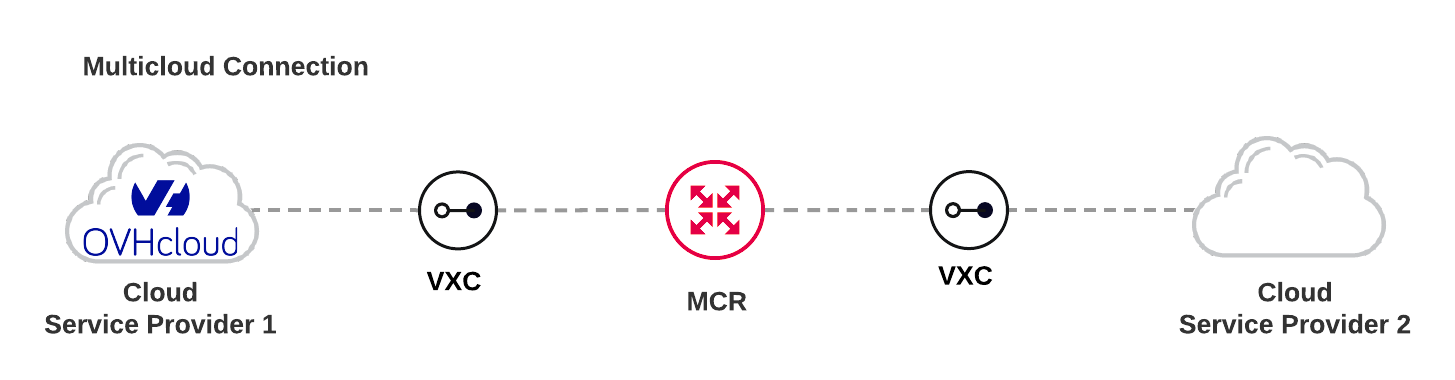
You can create a Virtual Cross Connect (VXC) from an MCR to OVHcloud Connect from the Megaport Portal. You can also create additional VXCs to other Cloud Service Providers (CSPs) for multicloud access from the MCR. Click the appropriate CSP link in the MCR Cloud Connectivity Overview navigation.
The benefits of direct connectivity to OVHcloud Connect through Megaport include:
- Secure, private connectivity throughout Megaport’s redundant network infrastructure. Your traffic will not transit the public internet.
- High performance and predictability of your network.
- Improved data and operational security.
- Flexible and scalable cloud networking options.
- Consistent connectivity while scaling bandwidth to OVHcloud Connect. This means no downtime when you need to change your VXC speed.
- Connect to multiple regions from a single interconnection point, which uses multi-region redundancy at a fraction of the cost.
How it works
OVHcloud Connect consists of a physical network connection at several OVHcloud locations around the world. OVHcloud locations reside within facilities operated by co-located data centers where Megaport is enabled.
Physical fiber connections (NNIs) at each location between Megaport and OVHcloud are established to OVHcloud routers. These physical connections are maintained between OVHcloud and Megaport.
Connecting to OVHcloud follows these general steps through the Megaport Portal:
- Order Megaport Cloud Routers (MCRs) in Megaport locations of your choice. Two MCRs are required for redundancy.
- Order VXCs to OVHcloud in fixed increments of 200 Mbps, 500 Mbps, 1 Gbps, 2 Gbps, or 5 Gbps.
VXCs to OVHcloud are established as a Layer 3 service between OVHcloud and the MCR. One VXC from each MCR is required for redundancy.
Availability
OVHcloud is available in these locations:
- Europe
- Frankfurt
- London
- Paris
You can connect to multiple regions from a single interconnection point (which lets you use multi-region redundancy at a fraction of the cost).
For more information, see OVHcloud Connect.
Prerequisites
Before you begin, notify OVHcloud. If you are an existing OVHcloud customer, contact your OVHcloud Account Manager and establish an agreement for OVHcloud services. If you are a new customer, you can order from the OVHcloud Connect website.
OVHcloud will provide you with a service key that is unique for each cloud peering location interface: one for the primary and one for the secondary cloud peering location interface.
The key includes the provider (Megaport), VLAN ID, speed, and OVHcloud port location.
To use your OVHcloud service key, you will need to create an MCR or connect your service key to an existing MCR from your Megaport Portal account. An MCR enables data transfer between multicloud and hybrid cloud environments, network service providers, and cloud service providers. For more information, see Creating an MCR.
Setting up OVHcloud Connect
The easiest way to create a connection between Megaport and OVHcloud is with a service key. A service key includes the essential configuration details for your business and automates much of the configuration process. Once you receive your service key from OVH, you specify your Layer 3 connectivity information in the OVHcloud portal. You then create a VXC in the Megaport Portal to connect MCR to OVHcloud.
To configure your Point of Presence in OVHcloud
- Log in to the OVHcloud website.
If this is your first time, you will need to register for an account. - Order an OVHcloud Connect with Megaport as the partner.
- Click Order Product.
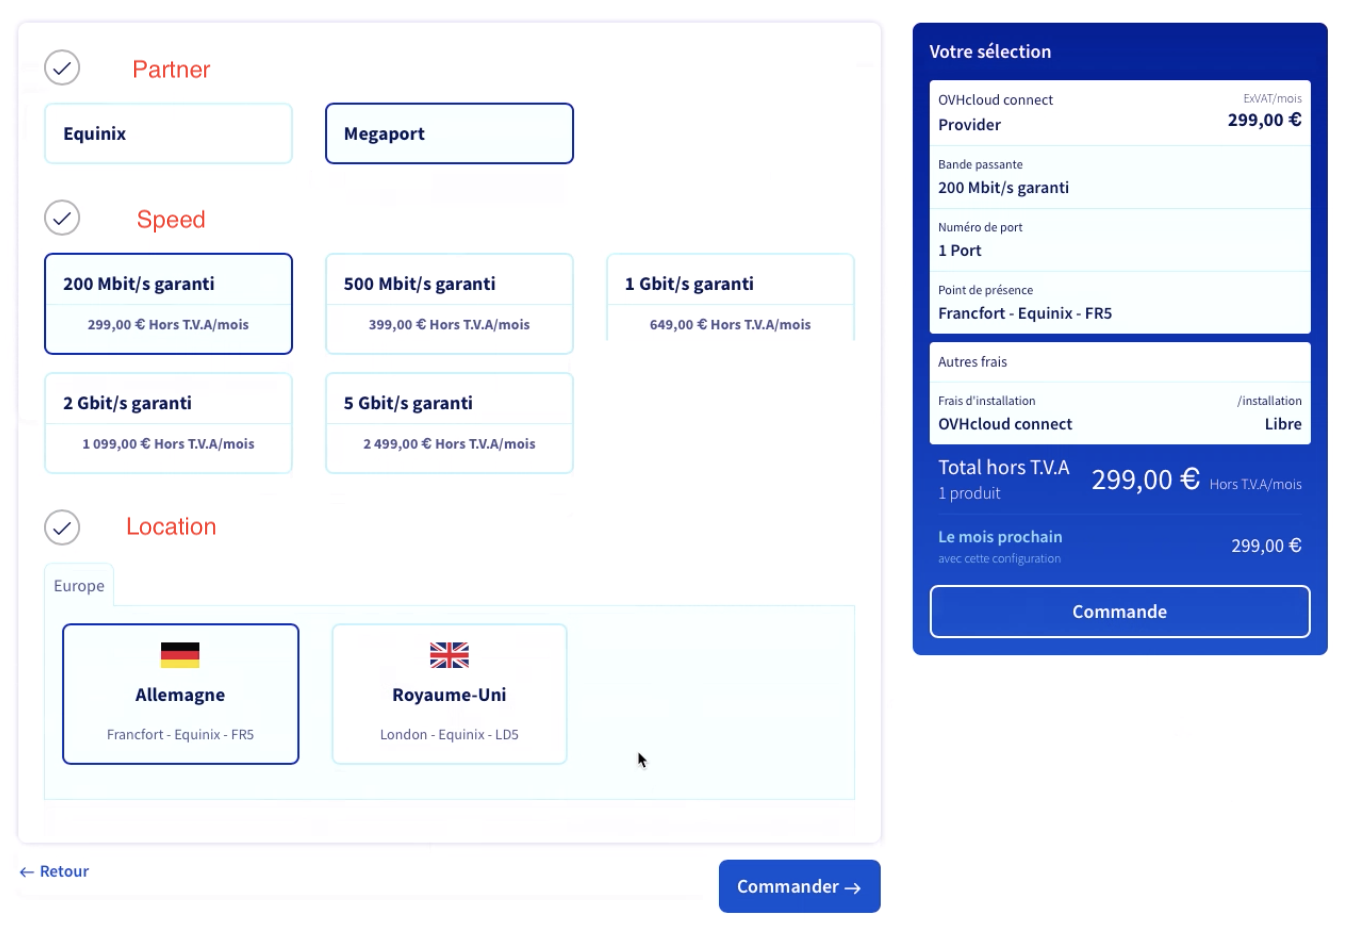
- Select Megaport as the partner.
- Select the speed for the connection.
-
Select the OVHcloud Connect location.
Within minutes of placing the order, you will receive an email notification that includes your Service Key identifier.Note
When you use the service key created by OVHcloud, you are responsible for any VXC charges.
-
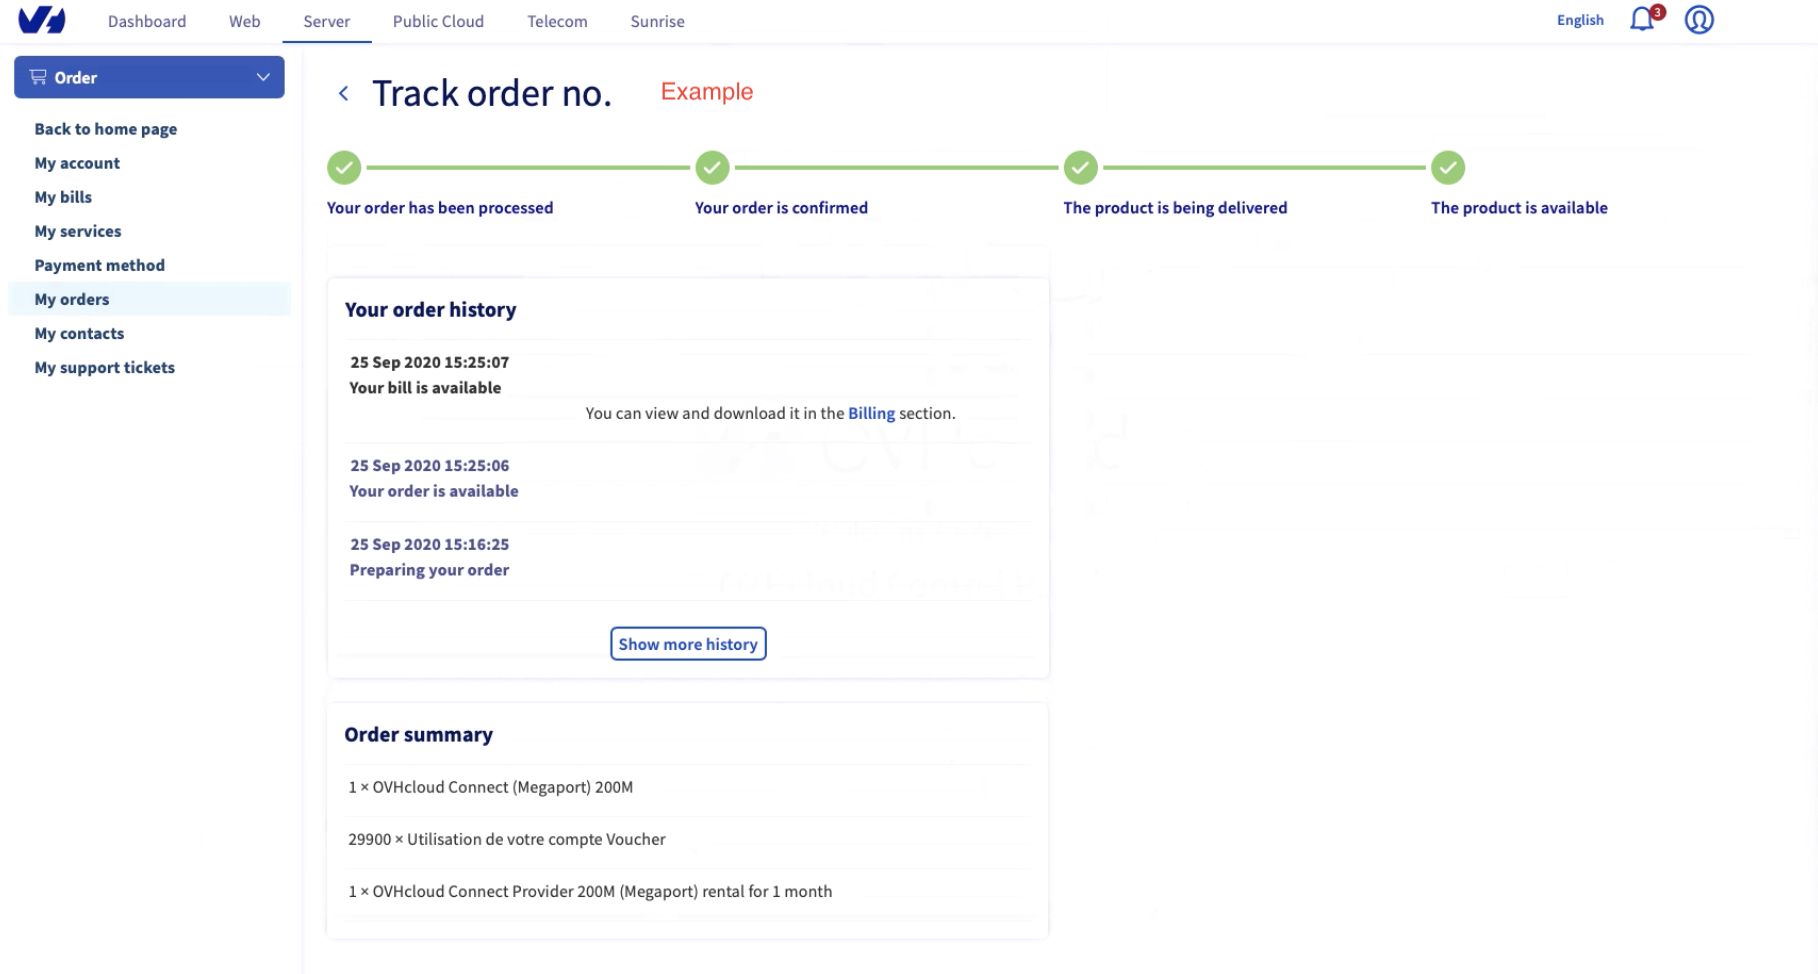
Select My Orders from the Dashboard navigation pane to verify if your order is complete and ready for service.
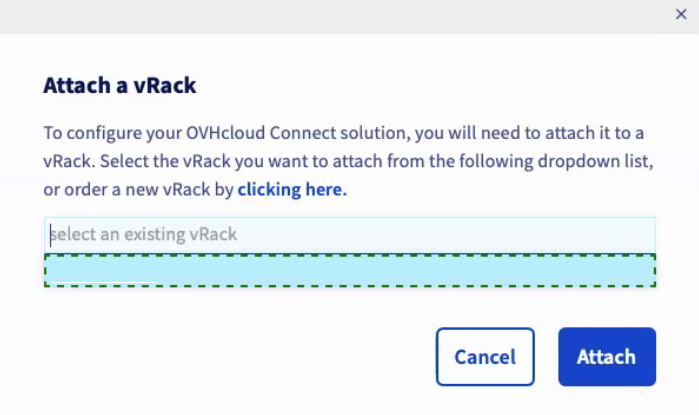
Once the Service Key is active in your OVHcloud portal account, you will attach a vRack. - In the Dashboard view, select OVHcloud Connect.
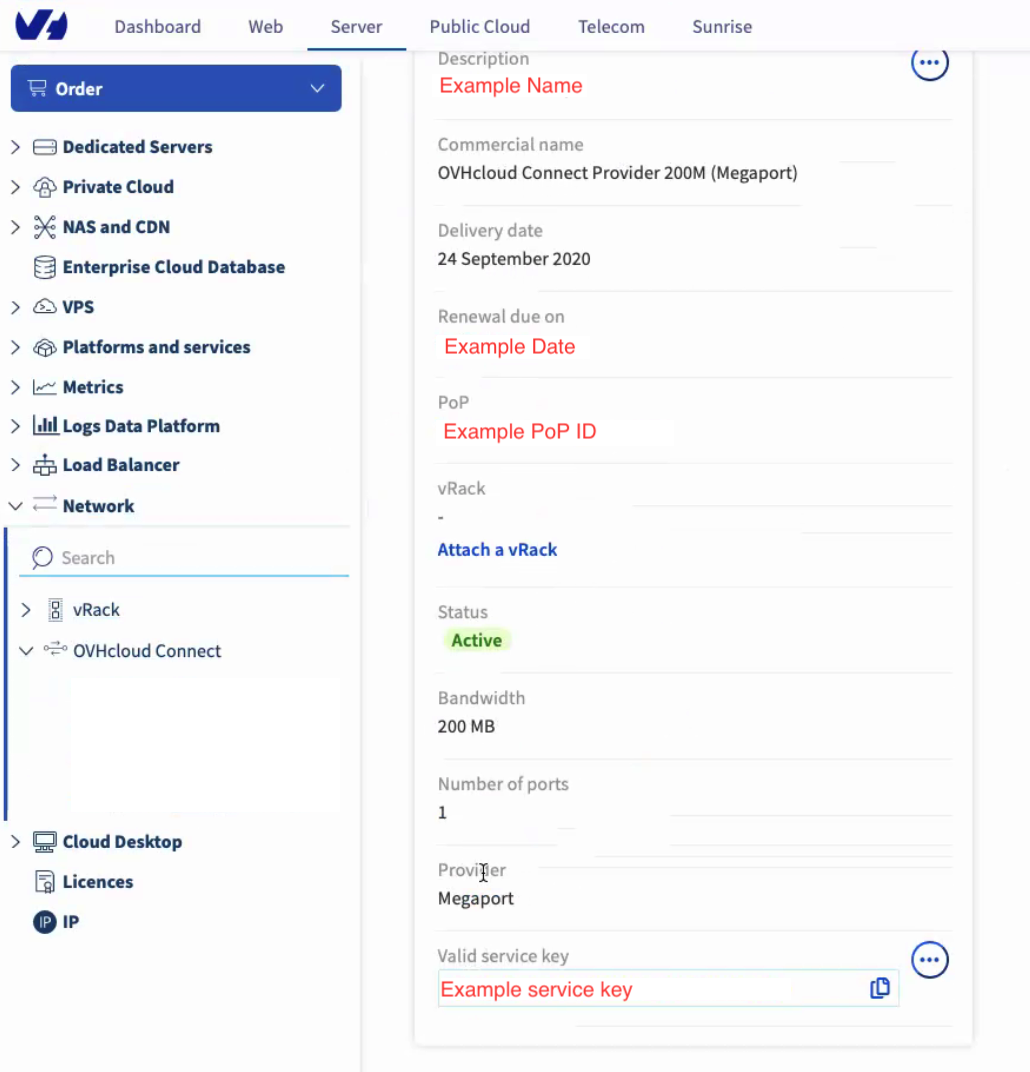
- Choose Network > OVHcloud Connect, and select the Service Description that you created when ordering the OVHcloud Connect service key.
- Click Attach a vRack under vRack.
- Select the vRack to attach from the drop-down list and click Attach.
If required, you can click the link to order a new vRack.
Once the vRack is attached, you will provide the Layer 3 connection details. - Specify the following details in the Add a PoP Configuration dialog box:
- Type – L3
- Customer ASN – Megaport ASN 133937
- OVHcloud ASN – Your customer desired ASN
- Subnetwork in /30 – The IP address subnet range to peer with MCR. For example, 172.16.0.0 /30. OVHcloud will use the first IP address from the subnet mask.
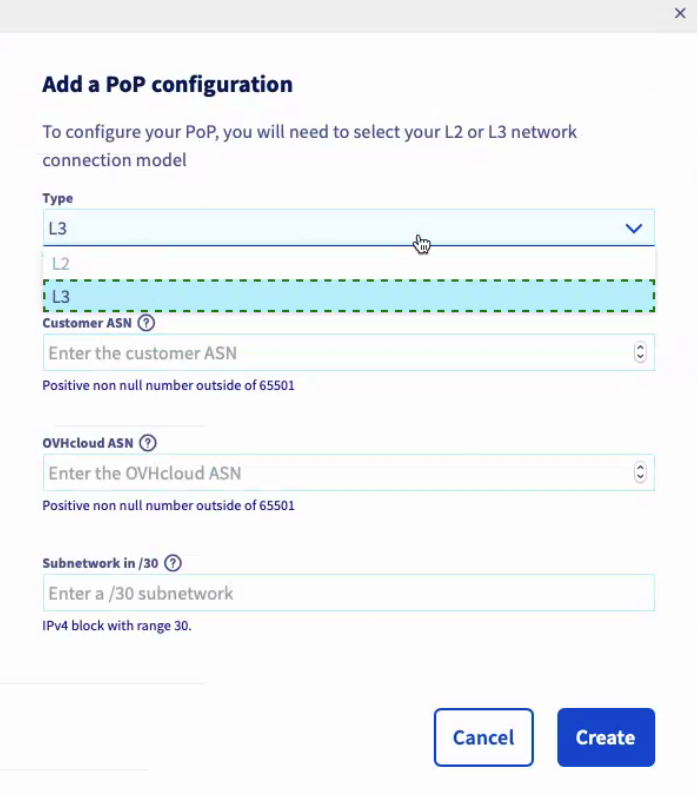
These details apply the required IP address with a subnet mask and ASN to establish your peering connection between OVHcloud and Megaport.
- Click Create.
To deploy a VXC from MCR to OVHcloud Connect
- In the Megaport Portal, go to the Services page.
If you don’t have a Megaport account, see Setting Up a Megaport Account. - Select the MCR for the connection and click +Connection.
- Click Enter Service Key and click Next.
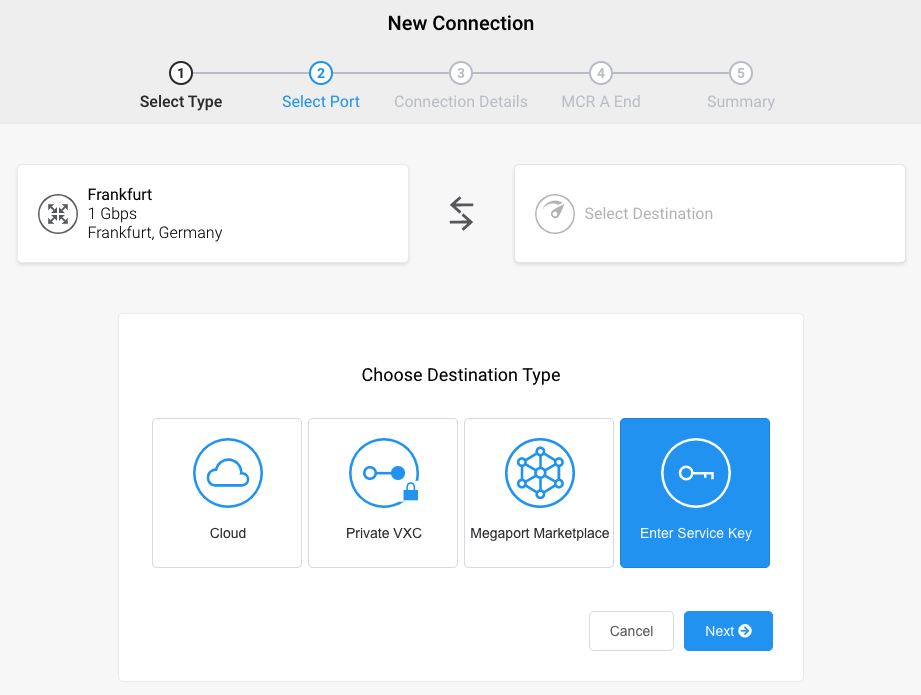
- Enter the service key provided by OVHcloud in the Megaport Service Key ID field.
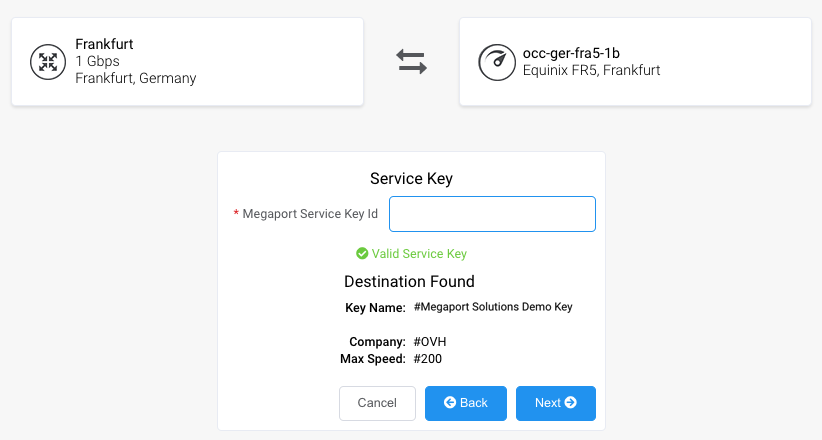
Megaport validates the key. Data including VLAN ID, speed, and OVHcloud location are included in the key and populate automatically. For more information about using a service key, see Setting up Service Keys. -
Click Next.
-
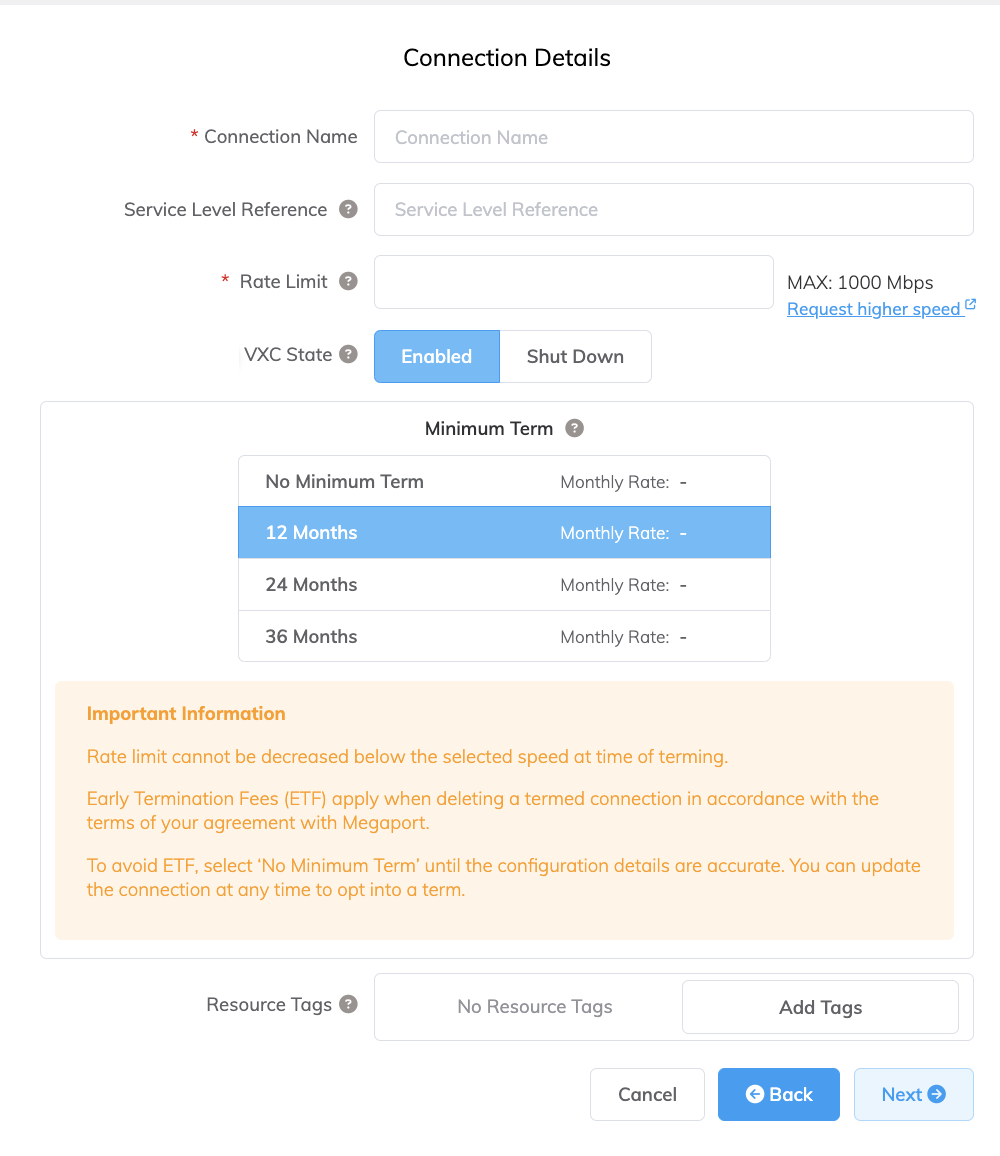
Specify the connection details:
-
Connection Name – The name of your VXC to be shown in the Megaport Portal. Enter the name of the VXC using the label provided by OVH.
-
Service Level Reference (optional) – Specify a unique identifying number for your Megaport service to be used for billing purposes, such as a cost center number, unique customer ID, or purchase order number. The service level reference number appears for each service under the Product section of the invoice. You can also edit this field for an existing service.
-
Rate Limit – The speed of your connection in Mbps. The rate limit for the VXC is capped at the maximum allowable based on the OVHcloud Connect service key speed.
-
VXC State – Select Enabled or Shut Down to define the initial state of the connection. For more information, see Shutting Down a VXC for Failover Testing.
Note
If you select Shut Down, traffic will not flow through this service and it will behave as if it was down on the Megaport network. Billing for this service will remain active and you will still be charged for this connection.
-
Minimum Term – Select No Minimum Term, 12 Months, 24 Months, 36 Months, 48 Months, or 60 Months. Longer terms result in a lower monthly rate. 12 Months is selected by default. Take note of the information on the screen to avoid early termination fees (ETF).
Enable the Minimum Term Renewal option for services with a 12, 24, 36, 48 or 60-month term to automatically renew the contract at the same discounted price and term length at the end of the contract. If you don’t renew the contract, at the end of the term, the contract will automatically roll over to month-to-month contract for the following billing period, at the same price, without term discounts.
For more information, see VXC Pricing and Contract Terms and VXC, Megaport Internet, and IX Billing.
-
Resource Tags – You can use resource tags to add your own reference metadata to a Megaport service.
To add a tag:- Click Add Tags.
- Click Add New Tag.
- Enter details into the fields:
- Key – string maximum length 128. Valid values are a-z 0-9 _ : . / \ -
- Value – string maximum length 256. Valid values are a-z A-Z 0-9 _ : . @ / + \ - (space)
- Click Save.
If you already have resource tags for that service, you can manage them by clicking Manage Tags.
Warning
Never include sensitive information in a resource tag. Sensitive information includes commands that return existing tag definitions and information that will identify a person or company.
-
-
Click Next.
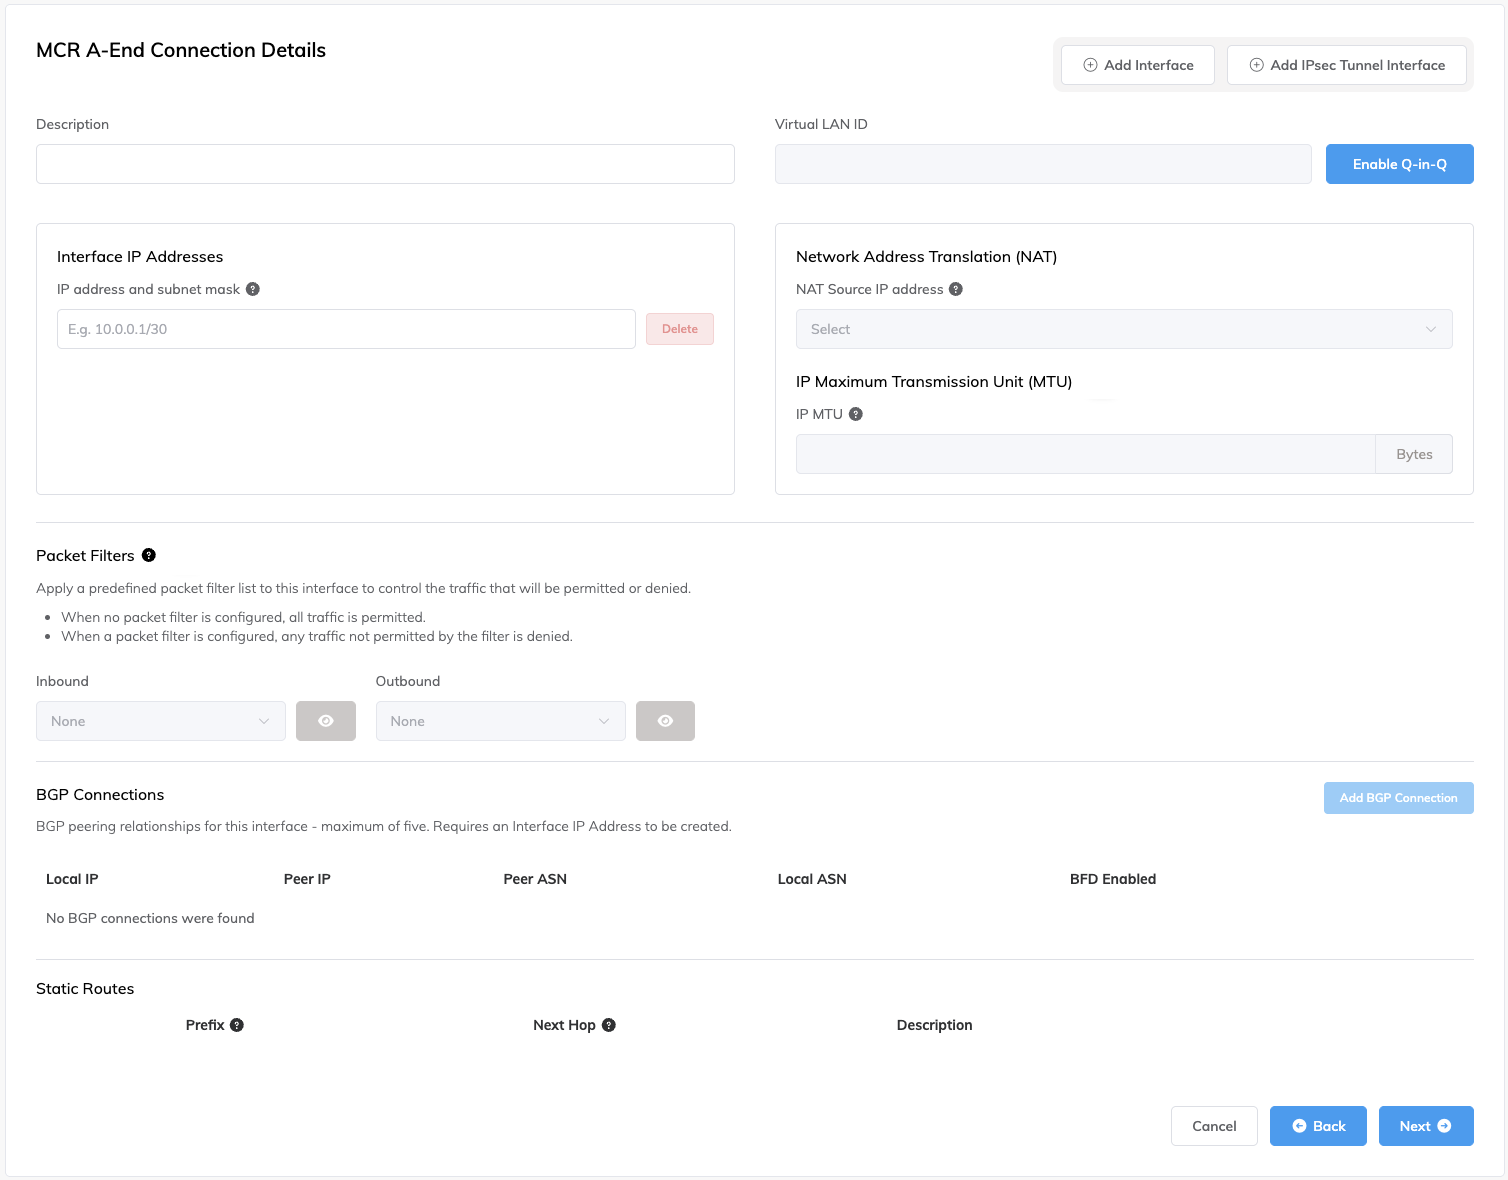
The MCR Connection detail page appears, where you set up the peering session between the MCR and OVHcloud. -
Enter your private IP address to connect to OVHcloud.
You will apply this IP /30 subnet within your OVHcloud Manager Portal for the vRack environment.
-
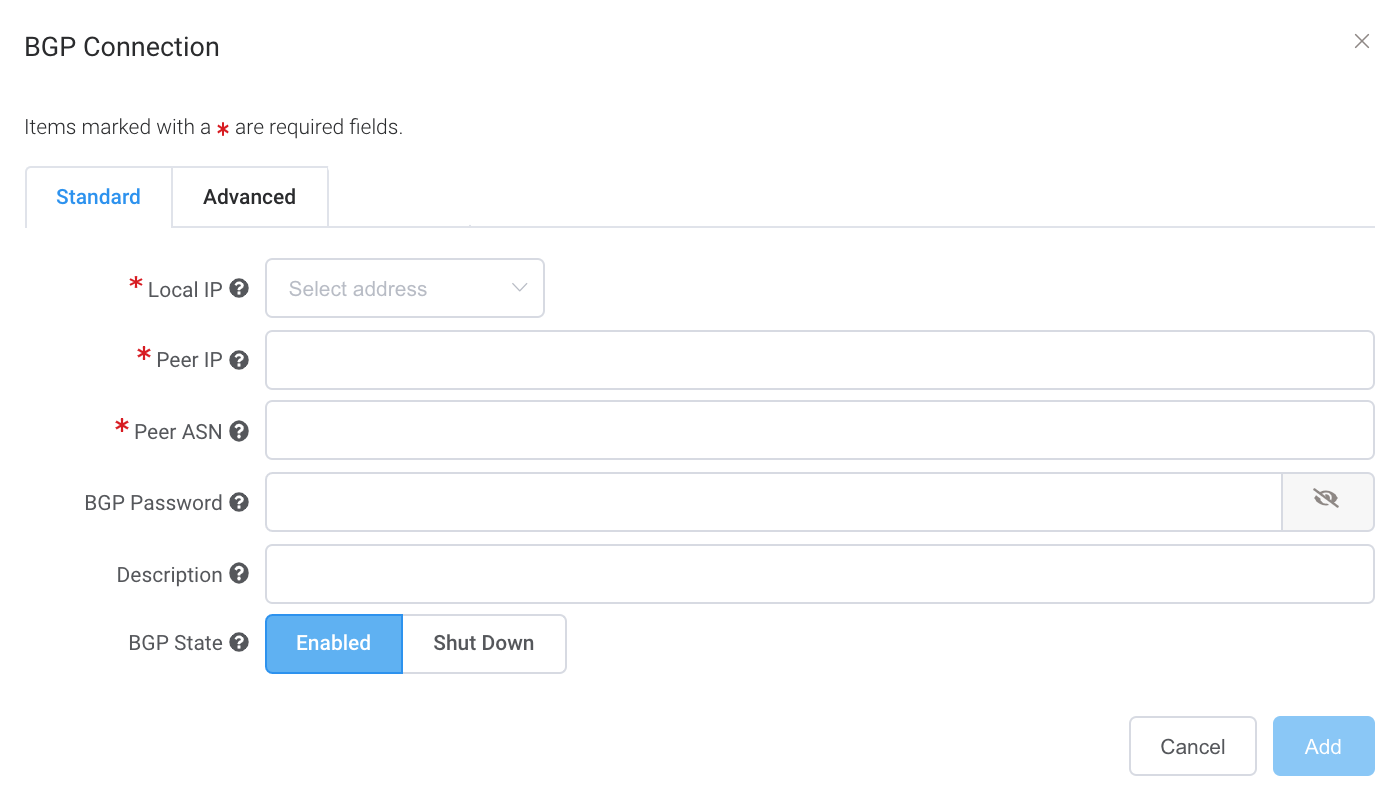
Click Add BGP Connection.
-
Specify the connection details:
- Local IP – The IP address on this interface (the MCR) that communicates with the BGP peer (OVHcloud Connect). The menu is automatically populated based on the address you specified in the MCR Connection detail. Select the IP address assigned to the MCR from the drop-down list.
- Peer IP – Specify the IP address for the BGP peer (OVHcloud Connect).
- Peer ASN – Enter the private peer autonomous system number (ASN) that you specified in the OVHcloud Manager Portal to connect to the MCR. Private ASNs must be between 64512 and 65535.
- BGP Password (optional) – Specify the BGP MD5Sometimes known as an MD5 hash or BGP key. The message-digest (MD5) algorithm is a widely used cryptographic function producing a string of 32 hexadecimal digits. This is used as a password or key between routers exchanging BGP information.
key. If you leave this blank, Megaport negotiates a key automatically for you with OVHcloud which will be displayed in the Megaport Portal. (The key is not displayed in the OVHcloud Control Panel.) The shared key length is from 1 to 32 characters. - Description (optional) – Enter a name for this connection. The minimum description length is from 1 to 100 characters.
- BGP State – This option should be set to Enabled.
- Click Add to view the configured BGP connections.
- Click Next.
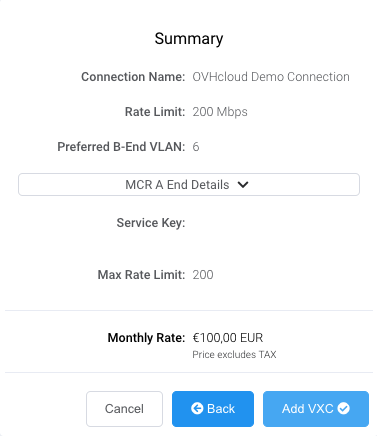
- Click Add VXC to proceed through the ordering process.
-
Repeat these steps to provision your secondary OVHcloud interface on a second MCR.
Note
The second MCR must be in a different location from the primary MCR.
-
Click Review Order to proceed through the checkout process, or click Save to save the configured services before placing the order.
-
Review the Important Information section and confirm agreement with the Service Agreements.
If you do not have a promotion code, skip to the Order Now step. If you do have a promotion code, enter it into the Enter discount code field then click Apply. Alternatively, if a code already appears in the Discounts field, verify it is correct and click Apply.
The promotional discount appears below the Standard Term discount. This discount is not reflected in the Monthly Rate shown here, it is applied at the time of billing. If an invalid or expired code causes an error with your order, contact your Megaport Account Manager for a replacement code.
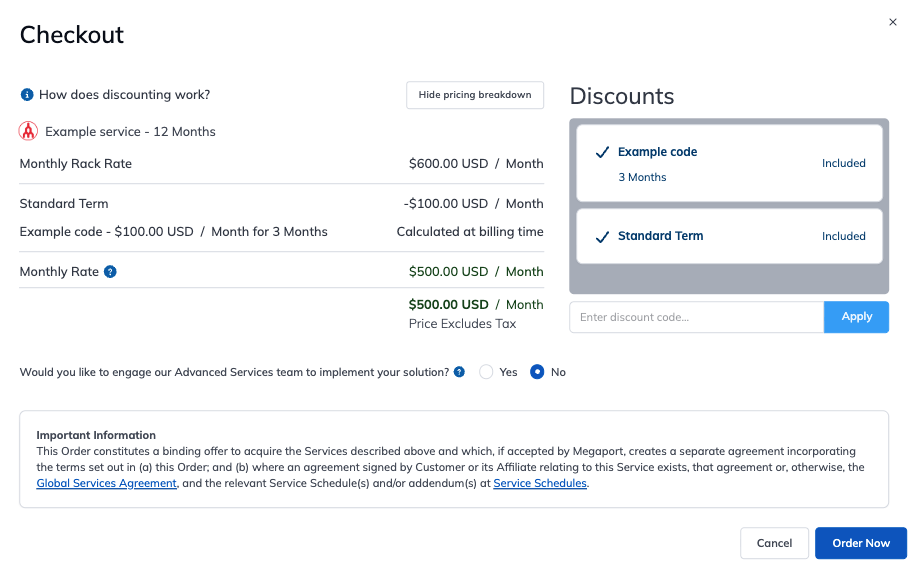
If you entered an incorrect promotion code, you can remove it by clicking Remove.
-
Click Order Now.
Once the VXC connection is deployed to OVHcloud, a single VLAN is assigned from your Megaport Portal account, with Layer 3 networking routing established using BGP between your MCR and OVHcloud VM vRack environment. Connections are private peering types, and will use private IPv4 addresses.
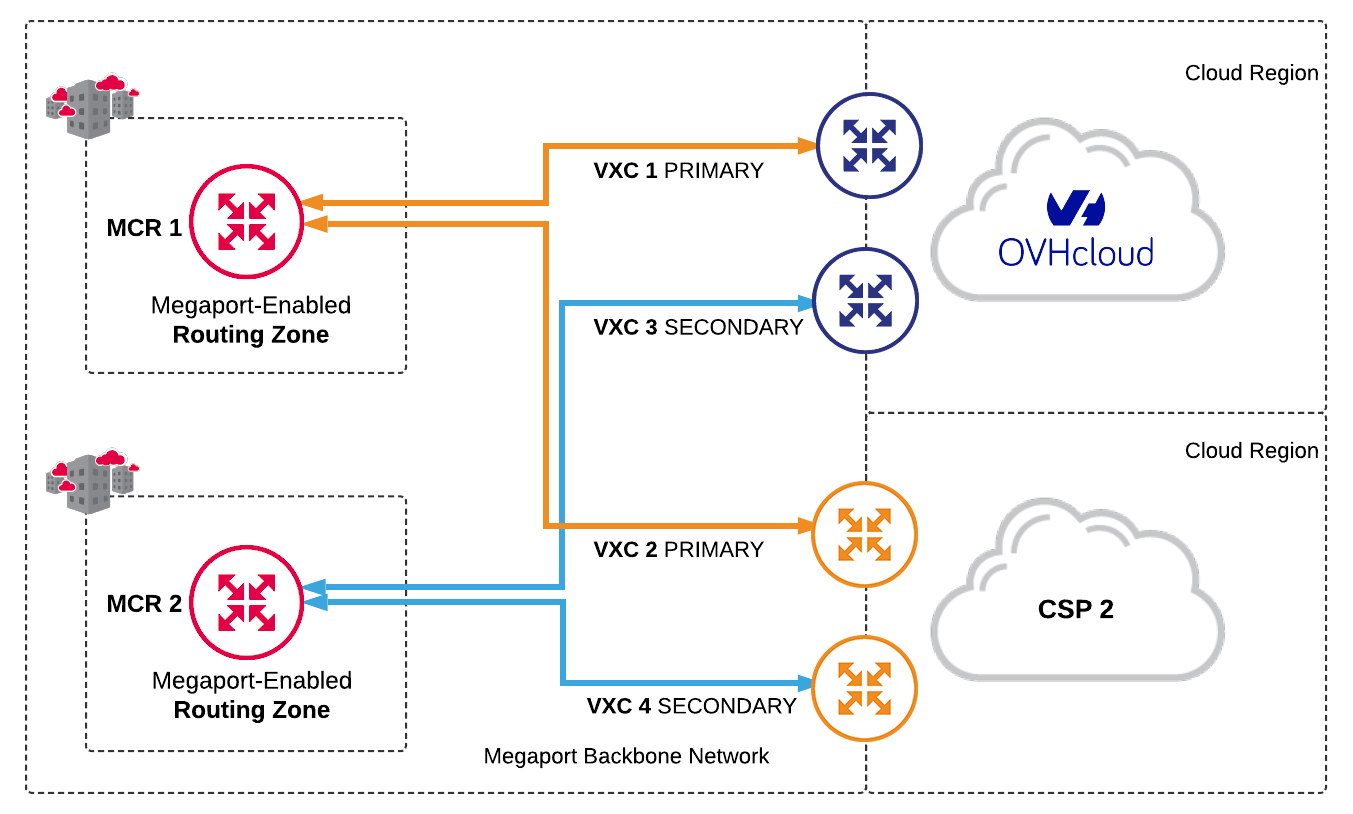
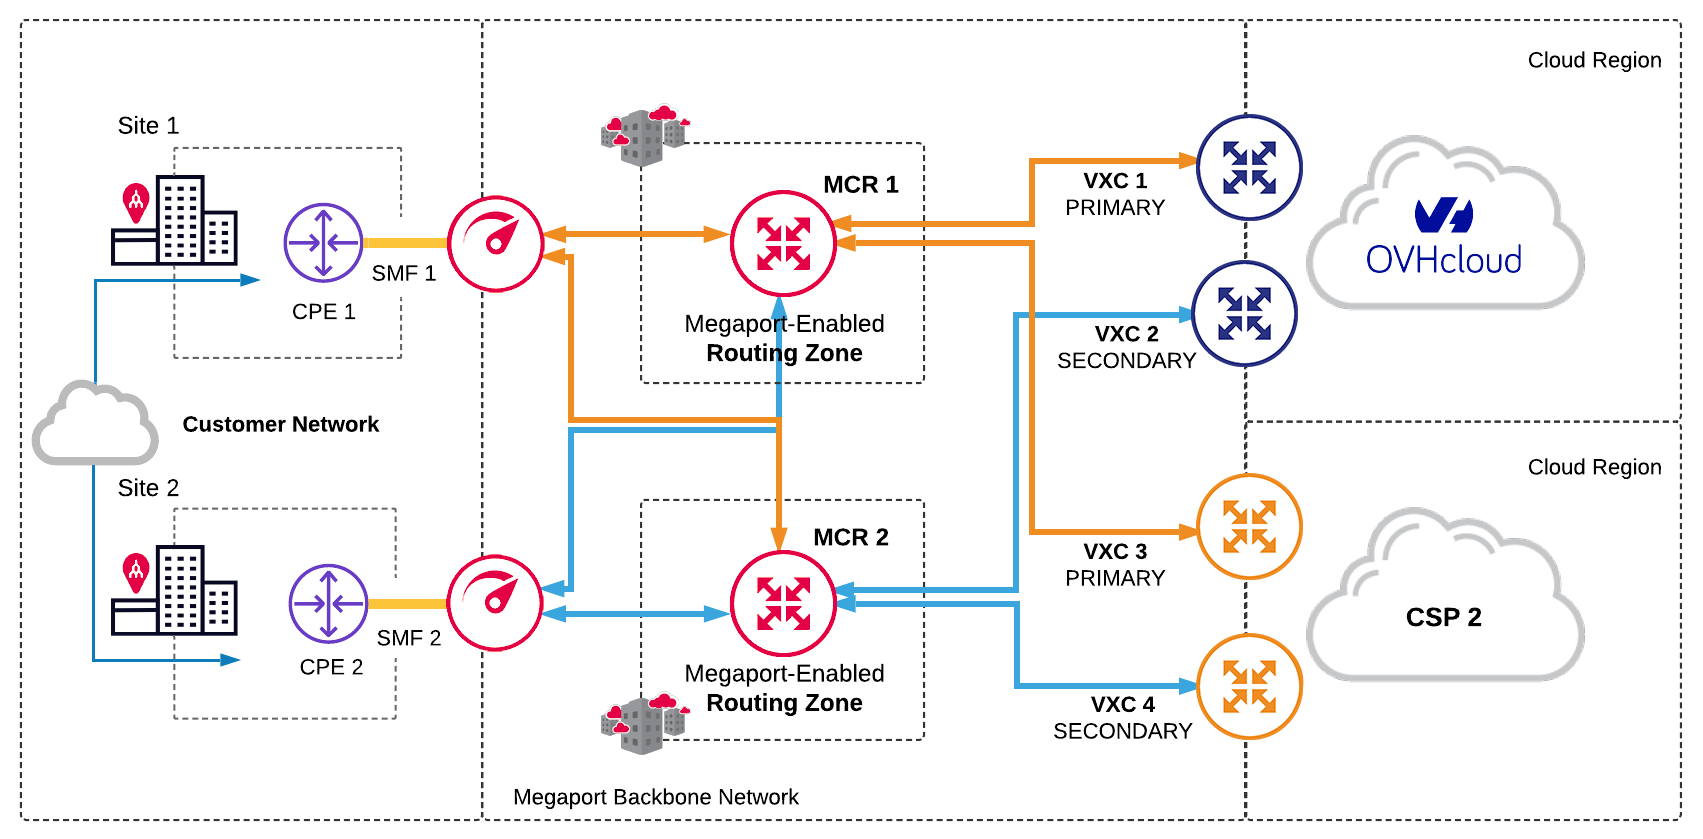
Redundancy
To establish full redundancy between your data center and OVH, we recommend deploying redundant VXCs between two different OVHCloud regions (or availability zones within a region) with two corresponding MCRs at each Megaport-enabled data center.
Redundant solution
Fully redundant solution
Updating the service bandwidth
You can scale the service speed up to the OVHcloud Connect speed rate at any time. If you require additional capacity, you must place an order for a new connection speed on the OVHcloud website.
To change the OVHcloud Connect speed, you must delete the Cloud Connect and VXC connections, and then recreate them.
OVHcloud Frequently Asked Questions (FAQs)
Are there any OVHcloud port fees?
OVHcloud doesn’t charge for data transfer. Customers pay a flat, auto-renewable monthly rate.
What services are available using OVHcloud?
OVHcloud offers Private Cloud based on VMware platform, Bare Metal servers, Public Cloud based on Openstack and PaaSPlatform as a Service vendors offer a development environment to application developers. The provider typically develops toolkit and standards for development and channels for distribution and payment. In the PaaS models, cloud providers deliver a computing platform, typically including operating system, programming-language execution environment, database, and web server without the need to manage any of the underlying operating system or host architecture.
services as Kubernetes Managed, and Databases as a Service.
What if I’m not located within an OVHcloud Point of Presence (PoP)?
You don’t have to be located within the same facility as OVHcloud; you can establish a VXC to the closest OVHcloud location of your choice. Each VXC is carried across Megaport’s redundant network to OVHcloud.
Does OVHCloud support public or private ASNs?
OVHcloud supports public and private ASNs. If you are using a public ASN, you must own it. Private ASNs must be between 64512 and 65535. AS_PATH prepending does not work if you are using a private ASN for your public VIF. Your preference is requested at the time of order. This is a private connection, but customers can peer with their private or public ASN and an OVHcloud private ASN that they can choose.
Using a service key
You can create a service key that allows you to share your service with another Megaport account holder. For more information, see Setting up Service Keys.