AWS Transit Gateway Inter-Region Routing with MCR
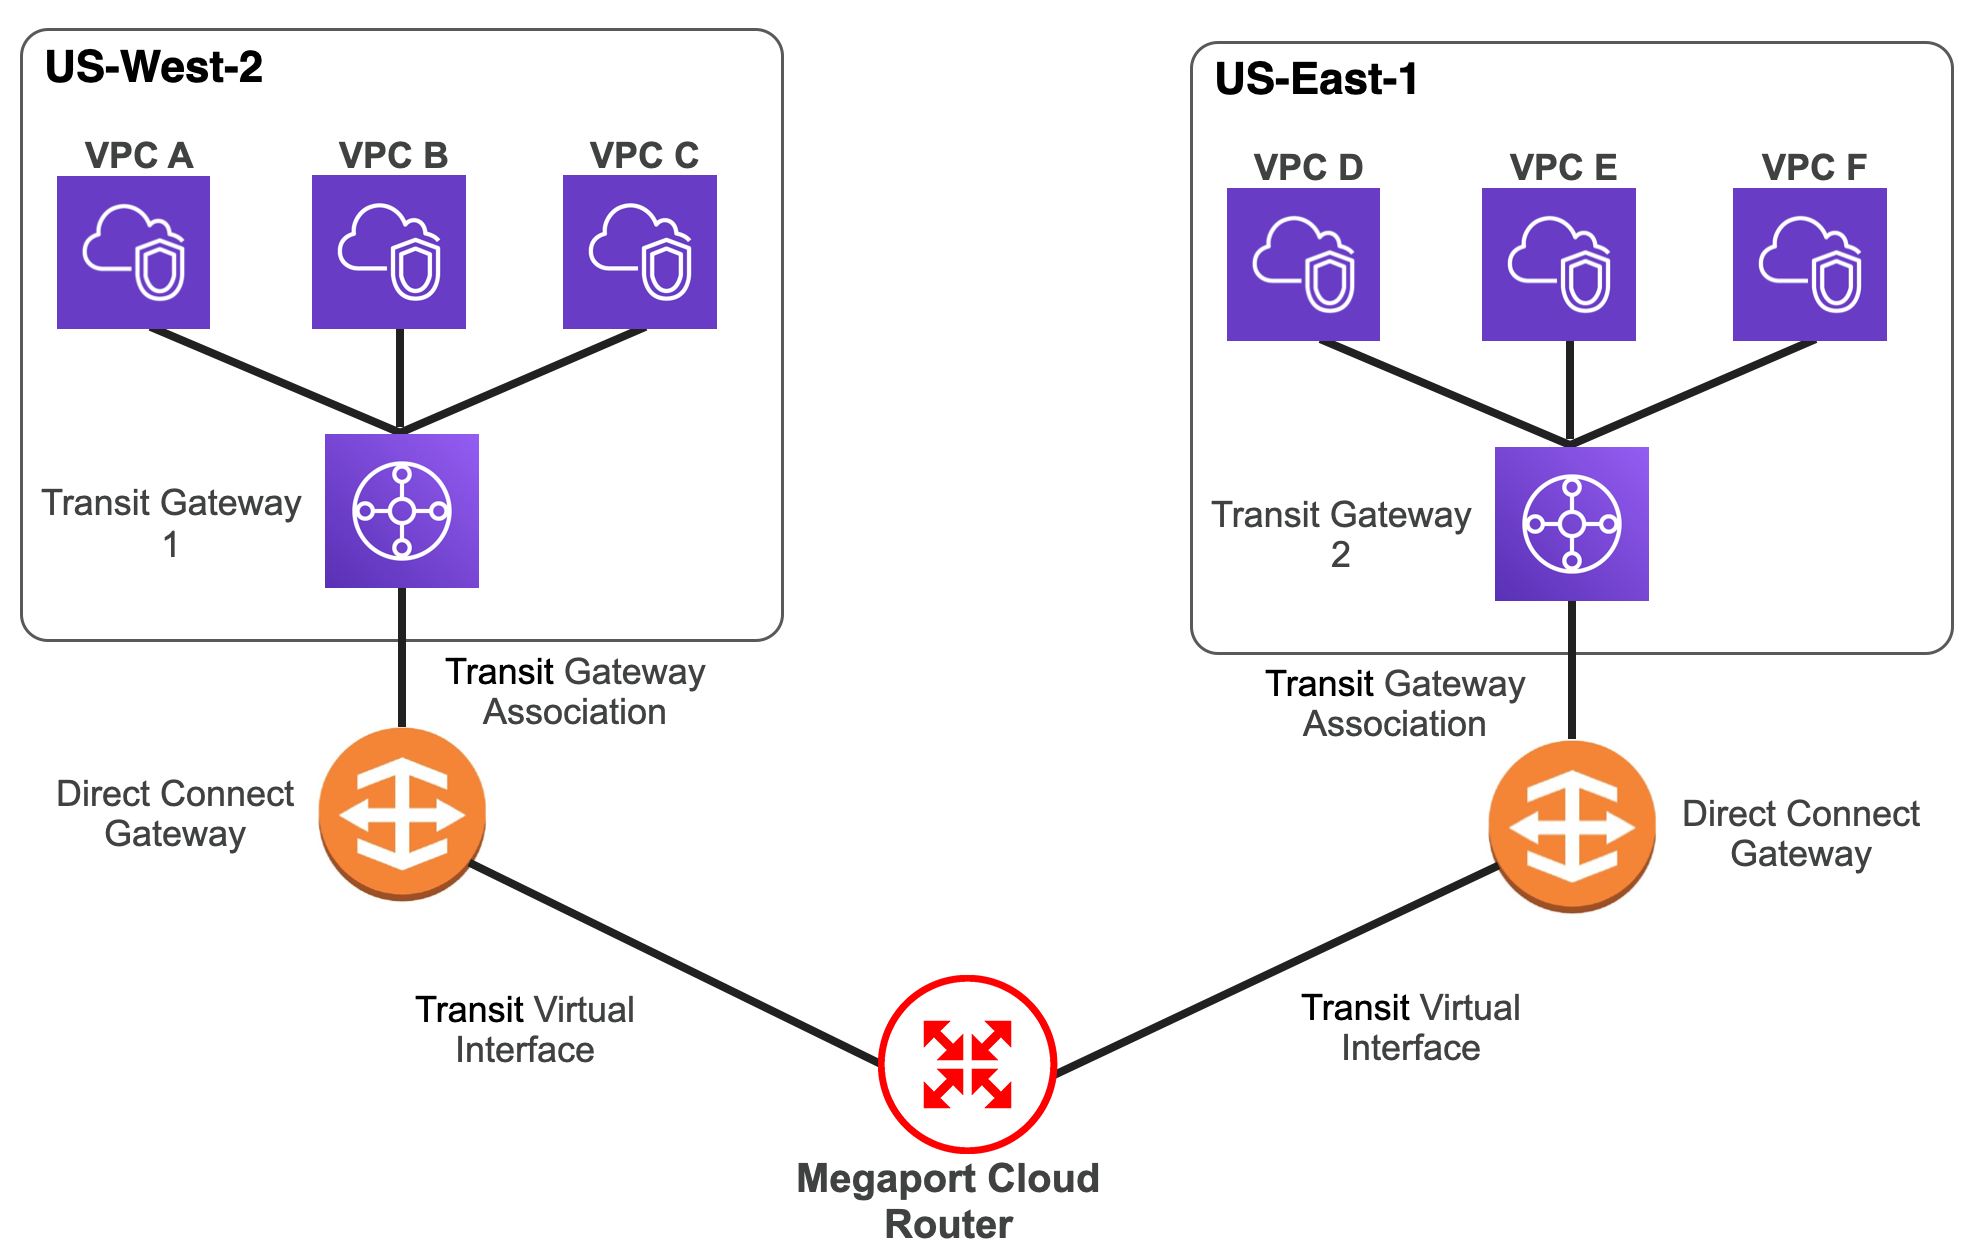
You can configure Megaport Cloud Router (MCR) to provide centralized routing between transit gateways in different regions using BGP to advertise routes dynamically.
This topic describes a sample configuration and explains each of these steps:
- Creating an MCR
- Creating VXCs to AWS Hosted Connect
- Accepting the Hosted Connection
- Creating the Direct Connect gateways
- Creating a transit virtual interface between the MCR and each Direct Connect gateway
- Configuring BGP between the MCR and each Direct Connect gateway
- Creating a transit gateway
- Attaching your VPCs to the transit gateway
- Attaching your transit gateway to the Direct Connect gateway
- Verifying route tables
Prerequisites
Before proceeding, ensure you have the following:
- One or more VPCs in each region.
The VPCs cannot have overlapping CIDRs. - AWS account number(s) associated with the transit gateways
-
Five private, non-overlapping autonomous system numbers (ASNs).
The supported range is 64512 to 65534 for 16-bit ASNs and 4200000000 to 4294967294 for 32-bit ASNs.The examples in this topic use these values:
MCR/Gateway ASN mcr-va-01 65001 dx-gwy1 65101 dx-gwy2 65102 tgw-us-west2 65103 tgw-us-east1 65104
Creating an MCR
For this example, you will create a 2.5 Gbps MCR in the Coresite VA1 data center.
For more information about this process, see Creating an MCR.
To create an MCR
-
Log in to the Megaport Portal and choose Services.
-
Click Add Services, then select MCR.

-
Select the preferred data center location for the MCR and click Next. For this example, in the Search field enter Reston, choose Coresite VA1, and click Next.
-
Specify the MCR details.
- Rate Limit – Select 2.5 Gbps.
- MCR Name – Enter a name. This example configuration uses mcr-va-01.
- Minimum Term – Choose 12 months.
- Service Level Reference (optional) – Specify a unique identifying number for your Megaport service to be used for billing purposes, such as a cost center number, unique customer ID, or purchase order number. The service level reference number appears for each service under the Product section of the invoice. You can also edit this field for an existing service.
- MCR ASN – Override the default ASN and enter 65001.
- BGP Default State – Leave as Enabled.
- Resource Tags – Add your own reference information if required.
-
Click Next.
-
Confirm the selected options and click Add MCR.
-
Click Review Order to proceed through the checkout process, or click Save to save the configured services before placing the order.
-
Review the Important Information section and confirm agreement with the Service Agreements.
If you do not have a promotion code, skip to the Order Now step. If you do have a promotion code, enter it into the Enter discount code field then click Apply. Alternatively, if a code already appears in the Discounts field, verify it is correct and click Apply.
The promotional discount appears below the Standard Term discount. This discount is not reflected in the Monthly Rate shown here, it is applied at the time of billing. If an invalid or expired code causes an error with your order, contact your Megaport Account Manager for a replacement code.
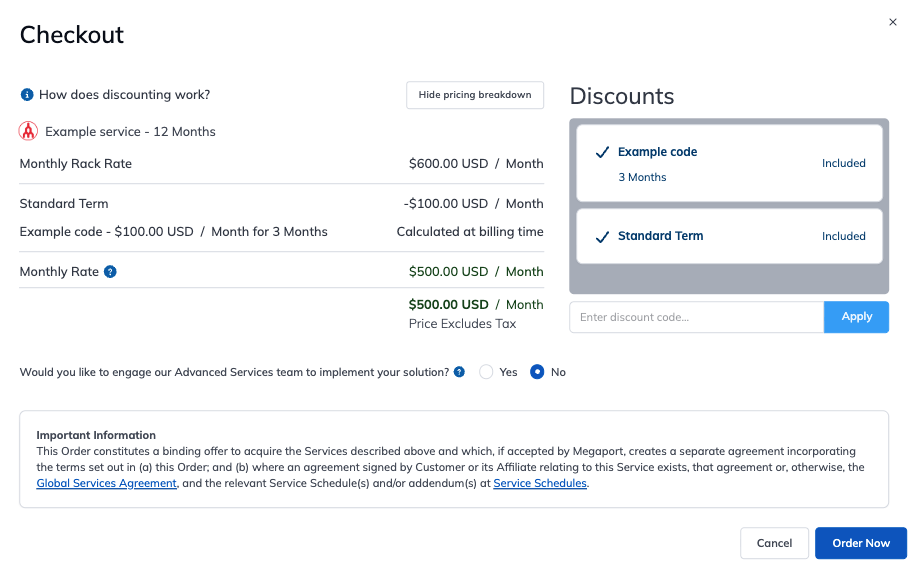
If you entered an incorrect promotion code, you can remove it by clicking Remove.
-
Click Order Now.
Wait a few moments for the MCR to be deployed. When deployed, the MCR icon changes to green indicating the MCR is ready for Virtual Cross Connects (VXCs).
Creating VXCs to AWS Hosted Connect
With the new MCR, you want to create two VXC connections: one for each diversity zone.
For more information about this process, see Creating an MCR VXC.
To create a VXC to AWS Hosted Connect
- From the Services page of the Megaport Portal, select the newly created MCR.
- Click the Amazon Web Services tile.
- Select Hosted Connection as the AWS Connection Type.
A list of available AWS Hosted Connect locations appear. - Enter USA in the Select Destination Port search field, click the red diversity zone icon, then select US East (N. Virginia) CoreSite VA1, Reston, USA.
- Click Next.
- Specify the details for the VXC.
- Connection Name - Name the connection mcr-va-01 to dxgwy1.
- Rate Limit - Choose 1 Gbps.
- Minimum Term - Choose 12 months.
- Resource Tags - Add your own reference information if required.
- Click Next.
- For now, skip the MCR Connection detail (we will come back to it later) and click Next.
- Enter your account ID in the AWS Account ID field then click Next.
- Click Add VXC.
Repeat these steps to create a second VXC, but instead click the blue Diversity Zone icon and select US East (N. Virginia) Coresite VA1. Name the connection mcr-va-01 to dxgwy2.
On the right side of the Services page, the two VXCs appear as Configured Services. Click Review Order, review the Megaport Global Services Agreement, then click Order Now.
The Megaport Portal displays the Services page, where both VXCs appear and transition from a deployable to configured state. Once the VXCs are provisioned, their icons change to green, signifying they are ready for service.
The next steps are in the AWS console to:
- Accept the Hosted Connections
- Create the Direct Connect Gateways
- Create the transit gateways
- Create the transit VIF
- Attach your VPCs to each transit gateway
Accepting the Hosted Connection
You must accept a Hosted Connection before you can begin using it. Follow the steps for accepting a Hosted Connection from the AWS Direct Connect User Guide.
-
Open the Amazon Direct Connect console.
-
Go to Services > AWS Direct Connect > Connections.
- Click the ID of the connection named mcr-va-01 to dxgwy1.
- Click Accept on the top right and Confirm in the Accept Hosted connection confirmation window.
- Repeat the steps to accept the second connection named mcr-va-01 to dxgwy2.
Each connection will transition from a pending to available state.
Creating the Direct Connect gateways
Direct Connect gateways are global resources, which means they can be used by resources in any commercial AWS region. Each Direct Connect gateway is its own ASN. In our sample configuration, we create multiple Direct Connect gateways with unique ASNs to allow routing between transit gateways in the different regions.
We will follow the steps for creating a Direct Connect gateway.
-
Choose Direct Connect Gateways from the navigation pane on the left, and then click Create Direct Connect Gateway.
-
Enter the Name and Amazon side ASN: our example uses dx-gwy1 and 65101.
-
Click Create.
-
Repeat this process for a second Direct Connect gateway with dx-gwy2 for the name and 65102 for the Amazon-side ASN.
Creating a transit virtual interface between the MCR and each Direct Connect gateway
These steps follow those outlined for creating a transit virtual interface to the Direct Connect gateway from the AWS Direct Connect User Guide.
- In the AWS console, choose Connections from the navigation pane on the left, and then click the ID of the connection for mcr-va-01 to dxgwy1.
- In the navigation pane, choose Virtual interfaces.
- Click Create virtual interface.
- Choose Transit as your Virtual interface type.
- Under Transit virtual interface settings, enter tvif-dxgwy1 for the Virtual interface name.
The Connection and VLAN fields are pre-populated. - Under the Virtual interface owner, select My AWS account.
- In the Direct Connect gateway drop-down, select dx-gwy1.
The BGP ASN field is the ASN of the MCR, which is 65001. You do not need to change the other settings. - Scroll to the bottom and click Create virtual interface. A message appears confirming that the virtual interface was created successfully.
- Click the ID of the newly created Virtual interface to display the Peerings information. Take note of the values for the BGP authentication key, your router IP, and the Amazon router IP. You will need these to finish configuring the MCR.
Repeat these steps for the transit virtual interface between the MCR and dx-gwy2 and name the virtual interface tvif-dxgwy2.
Configuring BGP between the MCR and each Direct Connect gateway
- In the Megaport Portal, go to the Services page.
-
Select the MCR you want to use.
-
Locate the VXC titled mcr-va-01 to dxgwy1, click the green VXC icon, and click Next.
-
In the Interface IP Addresses field, enter the value for the router IP (subnet mask included) that you previously copied from the AWS Direct Connect console.
- Click Add BGP Connection.
-
Enter the following values:
- Local IP – Select the value you just entered from the drop-down list.
- Peer IP – Enter the Amazon router IP value (without the subnet mask).
- Peer ASN – Enter the ASN of dxgwy1, which is 65101.
- BGP Password – Enter the BGP authentication key from the AWS console.
-
Click Add, click Save, and then click Close.
Note
It can take a couple minutes for the updates to be reflected in the Portal.
Repeat these steps for the VXC to dxgwy2 and tvif-dxgwy2. Use the ASN value of 65102.
-
Locate the VXC titled mcr-va-01 to dxgwy2, click the green VXC icon, and click Next.
-
In the Interface IP Addresses field, enter the value for the router IP (subnet mask included) that you previously copied from the AWS Direct Connect console.
- Click Add BGP Connection.
-
Enter the following values:
- Local IP – Select the value you just entered from the drop-down list.
- Peer IP – Enter the Amazon router IP value (without the subnet mask).
- Peer ASN – Enter the ASN of dxgwy2, which is 65102.
- BGP Password – Enter the BGP authentication key from the AWS console.
-
Click Add, click Save, and then click Close.
Within 3 to 5 minutes, check the AWS Direct Connect console, and review the details of each transit virtual interface for the BGP status.
Creating a transit gateway
These steps follow those outlined for creating a transit gateway from the Amazon Virtual Private Cloud Transit Gateways Guide.
-
Open the Amazon VPC management console.
-
Select the region for your VPC.
For our example, select us-west2. - Choose Transit Gateways from the navigation pane on the left.
- Click Create Transit Gateway.
- Specify the following transit gateway details:
- Name tag – Give your transit gateway a friendly name. This example uses the name tgw-us-west2.
- Description – This field is optional.
- Amazon side ASN – Enter the autonomous system number for your transit gateway. Following the values defined in prerequisites, we will use 65103.
The rest of the settings are optional. You can modify the default settings if you want to disable DNS support, or you don’t want to use the default route table. Leave the default values as they are.
- Click Create Transit Gateway.
- Wait for the request to succeed and click Close.
The initial state of the transit gateway is Pending.
Repeat these steps for the transit gateway in us-east1, with the name tgw-us-east1, and Amazon-side ASN 65104.
Attaching your VPCs to the transit gateway
These steps follow those outlined for attaching your VPCs to the transit gateway from the Amazon Virtual Private Cloud Transit Gateways Guide.
Before you complete these steps, wait for the state of your transit gateway to change to available. This might take 15 to 20 minutes to complete.
- Make sure that the us-west2 region is selected.
- From the VPC console, scroll to the bottom and select Transit Gateway Attachments.
- Choose Transit Gateway Attachments from the navigation pane on the left.
- Select the transit gateway you created for the attachment from the Transit Gateway ID drop-down list.
- Select VPC as the Attachment type.
- Optionally, enter an attachment name.
- DNS support is enabled by default; keep this setting.
- Ensure that the IPv6 support check box is cleared.
- Select the VPC to attach from the VPC ID drop-down list.
- For Subnet IDs, select one subnet for each Availability Zone to be used by the transit gateway to route traffic.
You can select only one subnet per Availability Zone. - Click Create attachment.
- Wait for the request to succeed, and then click Close.
- Repeat these steps for the VPC in us-east1.
Attaching your transit gateway to the Direct Connect gateway
These steps follow those outlined for Transit Gateway Associations from the AWS Direct Connect User Guide.
- Open the Amazon VPC management console.
- Select Direct Connect gateways from the navigation pane on the left.
- Select the ID for the dx-gwy1 Direct Connect gateway.
- Choose Gateway associations.
- Select the transit gateway you created (tgw-us-west2) from the Gateways drop-down list.
- Enter the CIDR prefix of your VPCs in Allowed prefixes.
This tells the TGW what prefixes to advertise to the Direct Connect gateway. Up to 20 prefixes are permitted per transit gateway. - Click Associate gateway.
- Repeat these steps for dx-gwy2 and tgw-us-east1.
When complete, the state of the transit gateway association changes from associating to available.
Verifying route tables
As the final step, verify the routing tables on each transit gateway. These steps follow those outlined for View Transit Gateway Route Tables from the Amazon Virtual Private Cloud Transit Gateways Guide.
- Open the Amazon VPC management console.
- Select the region for your VPC (our example uses us-west2).
- Choose Transit Gateway Route Tables from the navigation pane on the left.
- Select the Routes tab to see the route for the corresponding transit gateway learned from Direct Connect Gateway.
- Repeat these steps for the transit gateway in us-east1.
Using a service key
You can create a service key that allows you to share your service with another Megaport account holder. For more information, see Setting up Service Keys.