Integrating Megaport with SAP on AWS
You can use Megaport to create an AWS Direct Connect Layer 2 connection between your on-premises or colocation-based infrastructure and your SAP environment on AWS. You can also use Direct Connect to connect to a cloud-only instance of SAP on AWS.
Before you begin, ensure that you have created a Megaport connection, or Port. After you create the Port, you can connect a Virtual Cross Connect (VXC) from the Port to the virtual gateway associated with the AWS VPC infrastructure. A VXC is a point-to-point Ethernet connection between an A-End (your Port) and a B-End (in this case, your SAP on AWS instance).
If you aren’t a Megaport customer, you can create a 1 Gbps, 10 Gbps, or 100 Gbps Port in one of our global data centers/Points of Presence. If your company isn’t located in one of our PoPs, you can procure a last mile circuit to one of the sites to connect to Megaport. Contact Megaport for more information.
Note
If you require a Port in a different location to physically separate this solution from other existing traffic traversing your Ports, we recommend that you create a new one before proceeding.
To integrate Megaport with SAP on AWS
-
In the Megaport Portal, go to the Services page and select the Port you want to use.
If you haven’t already created a Port, see Creating a Port.
-
Add an AWS connection for the Port.
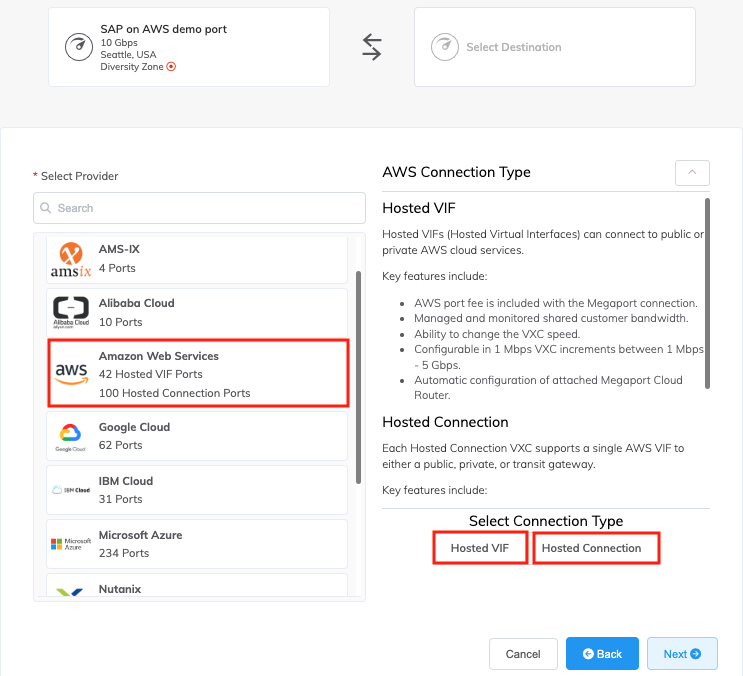
If this is the first connection for the Port, click the AWS tile. The tile is a shortcut to the configuration page. Alternatively, click +Connection, click Cloud, and click AWS.
-
For AWS Connection Type, click Hosted VIF or Hosted Connection and click Next.
For this example, you will click Hosted VIF.
Next, create a new VXC.
-
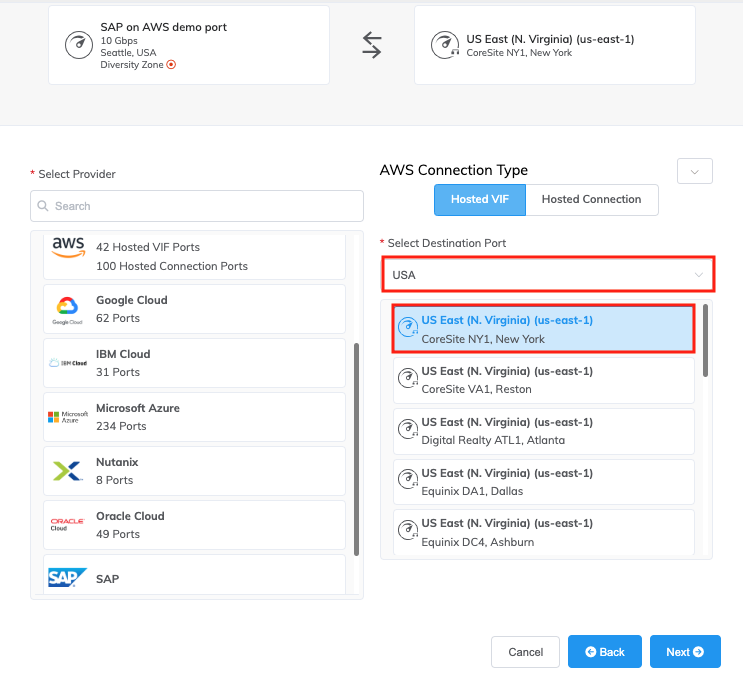
In the Select Destination Port list, select the AWS region and the interconnection point for your connection and click Next. You can use the Search field to find the Port name, Country, Metro City, or address of your destination Port. You can also filter by diversity zone.
-
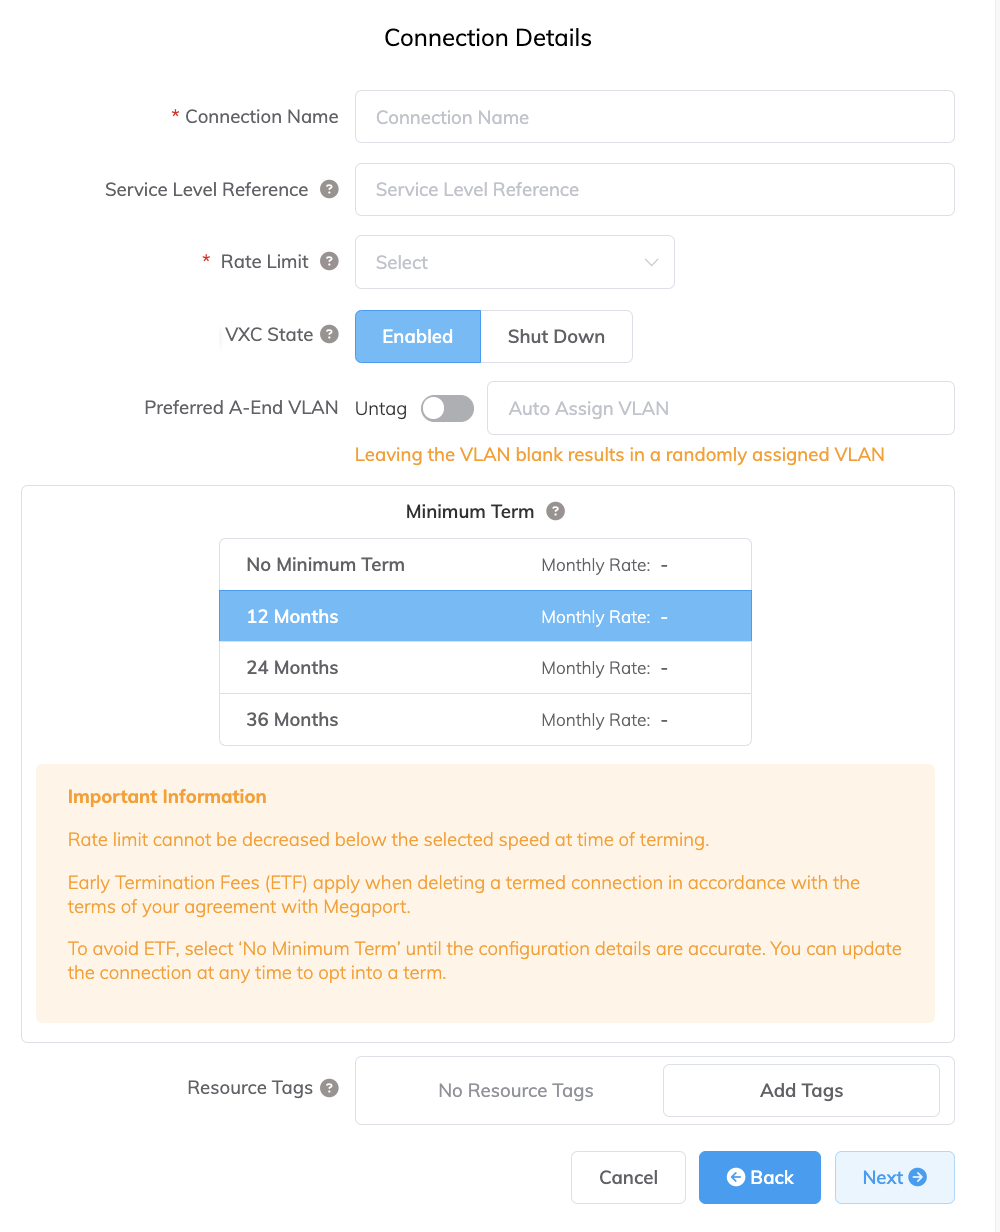
Specify the connection details:
-
Connection Name – The name of your VXC to be shown in the Megaport Portal.
Tip
Match this to the VXC name on the next screen for easy mapping.
-
Service Level Reference (optional) – Specify a unique identifying number for the VXC to be used for billing purposes, such as a cost center number or a unique customer ID. The service level reference number appears for each service under the Product section of the invoice. You can also edit this field for an existing service.
-
Rate Limit – The speed of your connection in Mbps. Accepted values range from 1 Mbps to 5 Gbps in 1 Mbps increments. Note the sum of all hosted virtual VXCs to a service can exceed the Port capacity (1 or 10 Gpbs) but the total aggregate will never burst beyond the Port capacity.
-
VXC State – Select Enabled or Shut Down to define the initial state of the connection. For more information, see Shutting Down a VXC for Failover Testing.
Note
If you select Shut Down, traffic will not flow through this service and it will behave as if it was down on the Megaport network. Billing for this service will remain active and you will still be charged for this connection.
-
Preferred A-End VLAN (optional) – Specify an unused VLAN ID for this connection.
This must be a unique VLAN ID on this Port and can range from 2 to 4093. If you specify a VLAN ID that is already in use, the system displays the next available VLAN number. The VLAN ID must be unique to proceed with the order. If you don’t specify a value, Megaport will assign one. -
Minimum Term – Select No Minimum Term, 12 Months, 24 Months, or 36 Months. Longer terms result in a lower monthly rate. 12 Months is selected by default.
Take note of the information on the screen to avoid early termination fees (ETF). For more information, see VXC Pricing and Contract Terms and VXC, Megaport Internet, and IX Billing. -
Resource Tags – You can use resource tags to add your own reference metadata to a Megaport service.
To add a tag:- Click Add Tags.
- Click Add New Tag.
- Enter details into the fields:
- Key - string maximum length 128. Valid values are a-z 0-9 _ : . / \ -
- Value - string maximum length 256. Valid values are a-z A-Z 0-9 _ : . @ / + \ - (space)
- Click Save.
If you already have resource tags for that service, you can manage them by clicking Manage Tags.
Warning
Never include sensitive information in a resource tag. Sensitive information includes commands that return existing tag definitions and information that will identify a person or company.
-
-
Click Next.
-
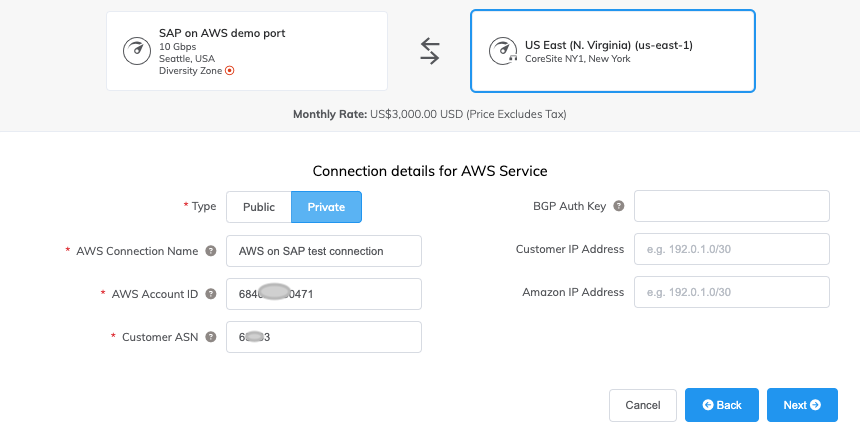
Specify the cloud details.
-
Type – This refers to your destination within the AWS cloud infrastructure, either Public or Private resources. For this example, choose Private.
-
AWS Connection Name – This is a text field and will be the name of your virtual interface that appears in the AWS console. For easy mapping, use the same name for this field as you did for the VXC name on the previous screen.
-
AWS Account ID – This is the ID of the account you want to connect. You can find this value in the Account Details section of your AWS console.
-
Customer ASN – Your network’s Autonomous System Number. For Private Direct Connects, this must be a private ASN and the supported private ASN range is 64512 - 65535.
-
BGP Auth Key (optional) – Specify the BGP MD5Sometimes known as an MD5 hash or BGP key. The message-digest (MD5) algorithm is a widely used cryptographic function producing a string of 32 hexadecimal digits. This is used as a password or key between routers exchanging BGP information.
key. If you leave this blank, Megaport negotiates a key automatically for you with AWS which will be displayed in the Megaport Portal. The key is not displayed in the AWS console.Note
The BGP Auth Key is generated during the ordering process when this field is left blank. It will not be displayed on the Summary page when ordering. To see the key, view the Connection Settings after the service has been deployed and is live.
-
Customer IP Address – The IP Address space (in CIDR format) you will use on your network for peering. For private connections, this field is optional and if left blank, Megaport assigns a private /30 address.
-
Amazon IP Address – The IP address space in CIDR format assigned in the AWS VPC network for peering. For private connections, this field is optional and if left blank, Megaport automatically assigns a private /30 address. For public connections, this field is required and needs public IPs (/30) allocated by you for BGP connectivity. You must own the public IPs.
-
-
Click Next.
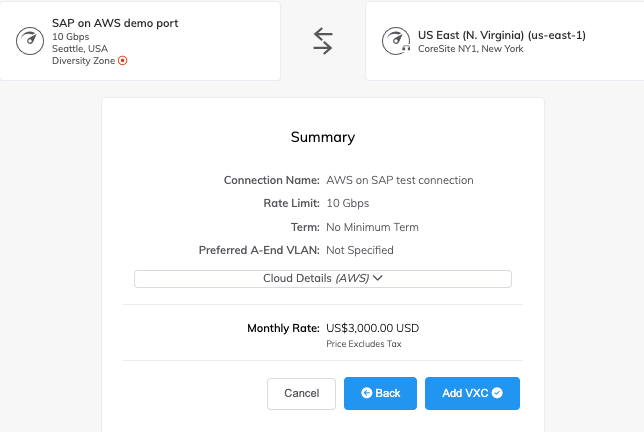
- Click Add VXC.
-
Click Order.
-
Click Order Now.
-
Connect the new VXC to the SAP on AWS instance.
In approximately 2 minutes, log in to your AWS account. The VIF will appear in your Direct Connect under Virtual Interfaces. Accept the VIF and attach it to either a Virtual Gateway (VGW) or a Direct Connect Gateway (DGW), depending on your particular solution’s design.
Redundancy
To achieve redundancy for the connectivity portion of this solution, you can establish additional VXCs to the AWS environment. For additional physical redundancy, you can implement the VXCs on separate Ports.
Background information
Planning for deployment of SAP on AWS
SAP on AWS can be operated as a hybrid model with on-premises (global) and cloud resources working in tandem or entirely as a cloud-based solution.
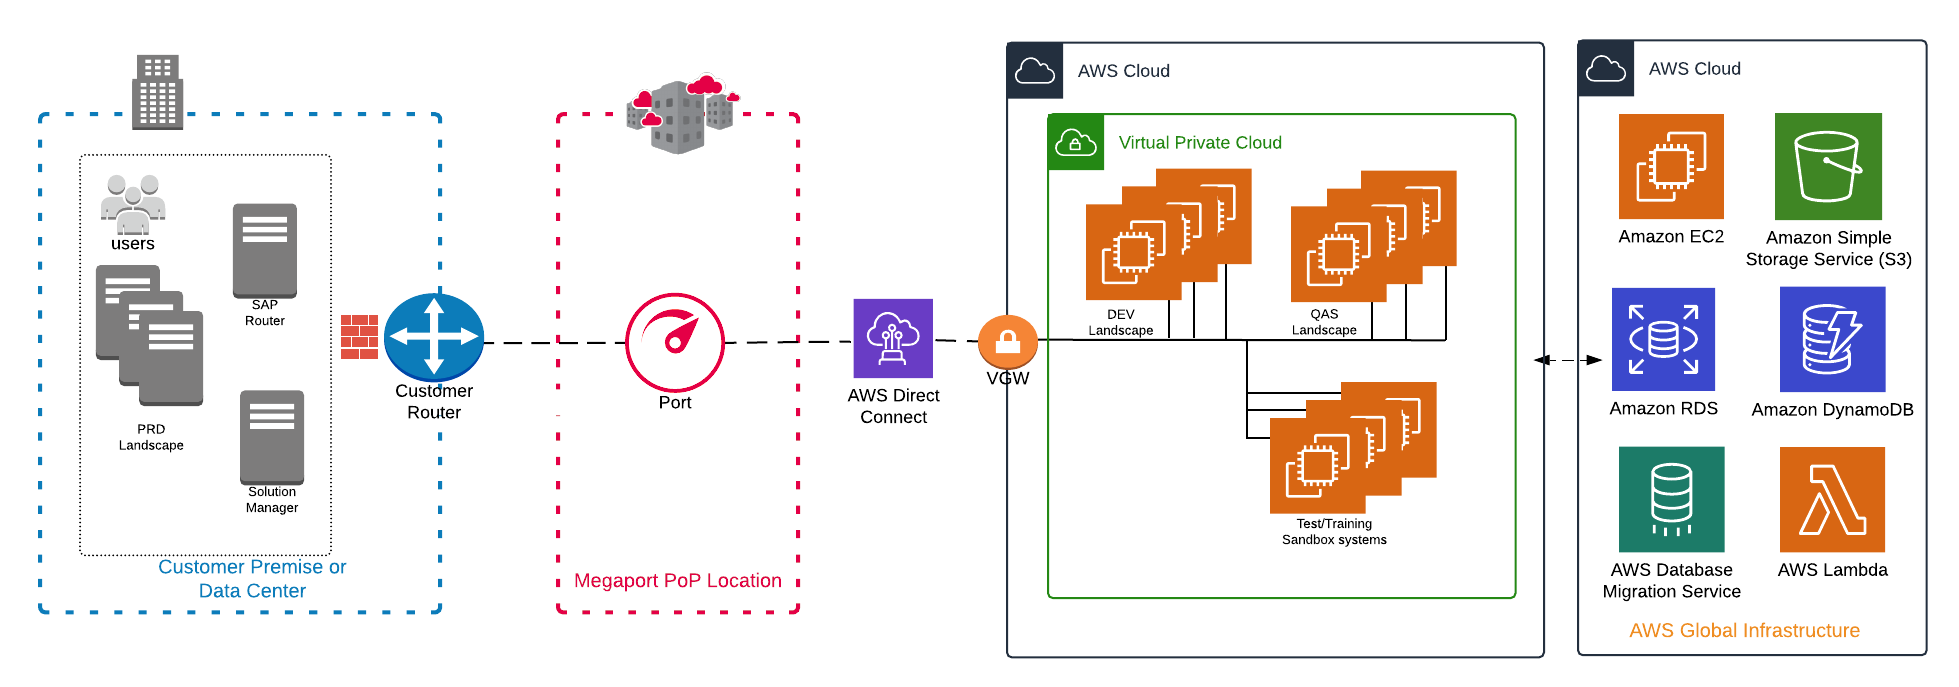
This image shows a hybrid solution showing the QAS, DEV, and SAP test, training and Sandbox environment in the AWS cloud. As shown here, the VPC can connect to a wide array of AWS resources. The on-premise infrastructure is connected to the AWS cloud via a Direct Connect Layer 2 connection, enabled through Megaport.
Helpful references
For more information about how to migrate, implement, configure, and operate SAP solutions on AWS: