Creating an AWS Hosted VIF for an MVE with Fortinet SD-WAN
Hosted VIFs can connect to public or private AWS cloud services: a Hosted VIF cannot connect to a transit virtual interface. These connections share bandwidth.
Note
AWS Hosted Virtual Interfaces (Hosted VIF) do not support diversity zones. To ensure connection diversity for Hosted VIFs, create VXCs to two destination ports in different data centers, instead of two ports in separate diversity zones.
To create a Hosted VIF from an MVE to AWS
-
In the Megaport Portal, go to the Services page and select the MVE for the connection.
-
Click +Connection then click Cloud.
-
Select AWS as the service provider, select Hosted VIF as the AWS Connection Type, select the destination port, then click Next.
You can use the Select Destination Port search field to narrow the selection.

-
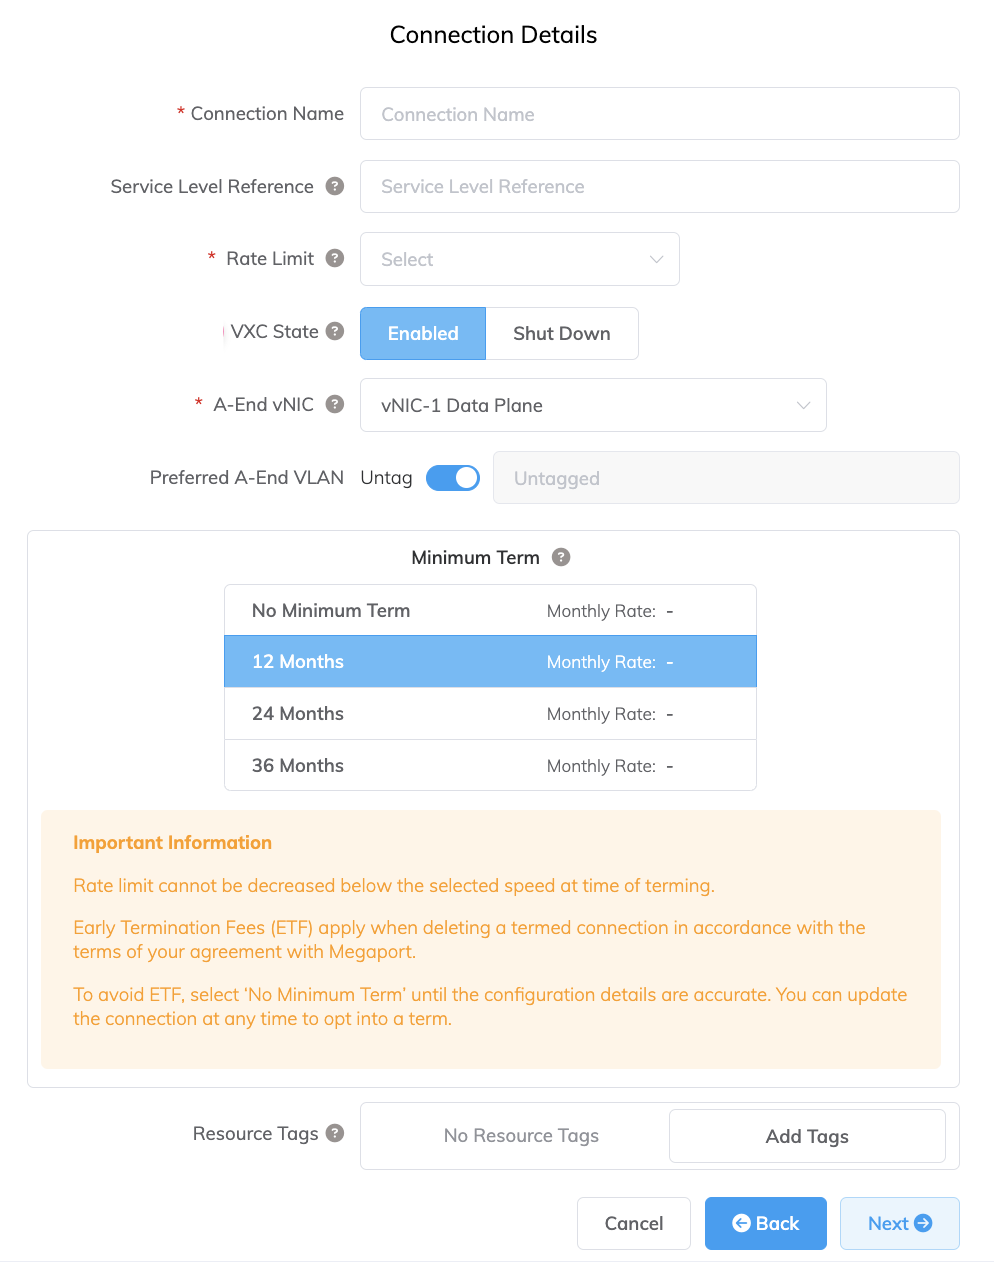
Specify the connection details:
-
Connection Name – The name of your VXC to be shown in the Megaport Portal.
Tip
Match this to the AWS Connection Name on the next screen for easy mapping.
-
Service Level Reference (optional) – Specify a unique identifying number for your Megaport service to be used for billing purposes, such as a cost center number, unique customer ID, or purchase order number. The service level reference number appears for each service under the Product section of the invoice. You can also edit this field for an existing service.
-
Rate Limit – The speed of your connection in Mbps. Accepted values start at 1 Mbps and scale in 1 Mbps increments. Maximum available speed depends on location and service availability. Note the sum of all hosted virtual VXCs to a service can exceed the MVE capacity, but the total aggregate will never burst beyond the MVE capacity.
-
VXC State – Select Enabled or Shut Down to define the initial state of the connection. For more information, see Shutting Down a VXC for Failover Testing.
Note
If you select Shut Down, traffic will not flow through this service and it will behave as if it was down on the Megaport network. Billing for this service will remain active and you will still be charged for this connection.
-
A-End vNIC – Select an A-End vNIC from the drop-down list. For more information about vNICs, see Creating an MVE in the Megaport Portal.
-
Preferred A-End VLAN (optional) – Specify an unused VLAN ID for this connection.
This must be a unique VLAN ID on this MVE and can range from 2 to 4093. If you specify a VLAN ID that is already in use, the system displays the next available VLAN number. The VLAN ID must be unique to proceed with the order. If you don’t specify a value, Megaport will assign one. -
Minimum Term – Select No Minimum Term, 12 Months, 24 Months, 36 Months, 48 Months, or 60 Months. Longer terms result in a lower monthly rate. 12 Months is selected by default. Take note of the information on the screen to avoid early termination fees (ETF).
Enable the Minimum Term Renewal option for services with a 12, 24, 36, 48 or 60-month term to automatically renew the contract at the same discounted price and term length at the end of the contract. If you don’t renew the contract, at the end of the term, the contract will automatically roll over to month-to-month contract for the following billing period, at the same price, without term discounts.
For more information, see VXC Pricing and Contract Terms and VXC, Megaport Internet, and IX Billing.
-
Resource Tags – You can use resource tags to add your own reference metadata to a Megaport service.
To add a tag:- Click Add Tags.
- Click Add New Tag.
- Enter details into the fields:
- Key – string maximum length 128. Valid values are a-z 0-9 _ : . / \ -
- Value – string maximum length 256. Valid values are a-z A-Z 0-9 _ : . @ / + \ - (space)
- Click Save.
If you already have resource tags for that service, you can manage them by clicking Manage Tags.
Warning
Never include sensitive information in a resource tag. Sensitive information includes commands that return existing tag definitions and information that will identify a person or company.
-
-
Click Next.
-
Specify the details for the AWS service.
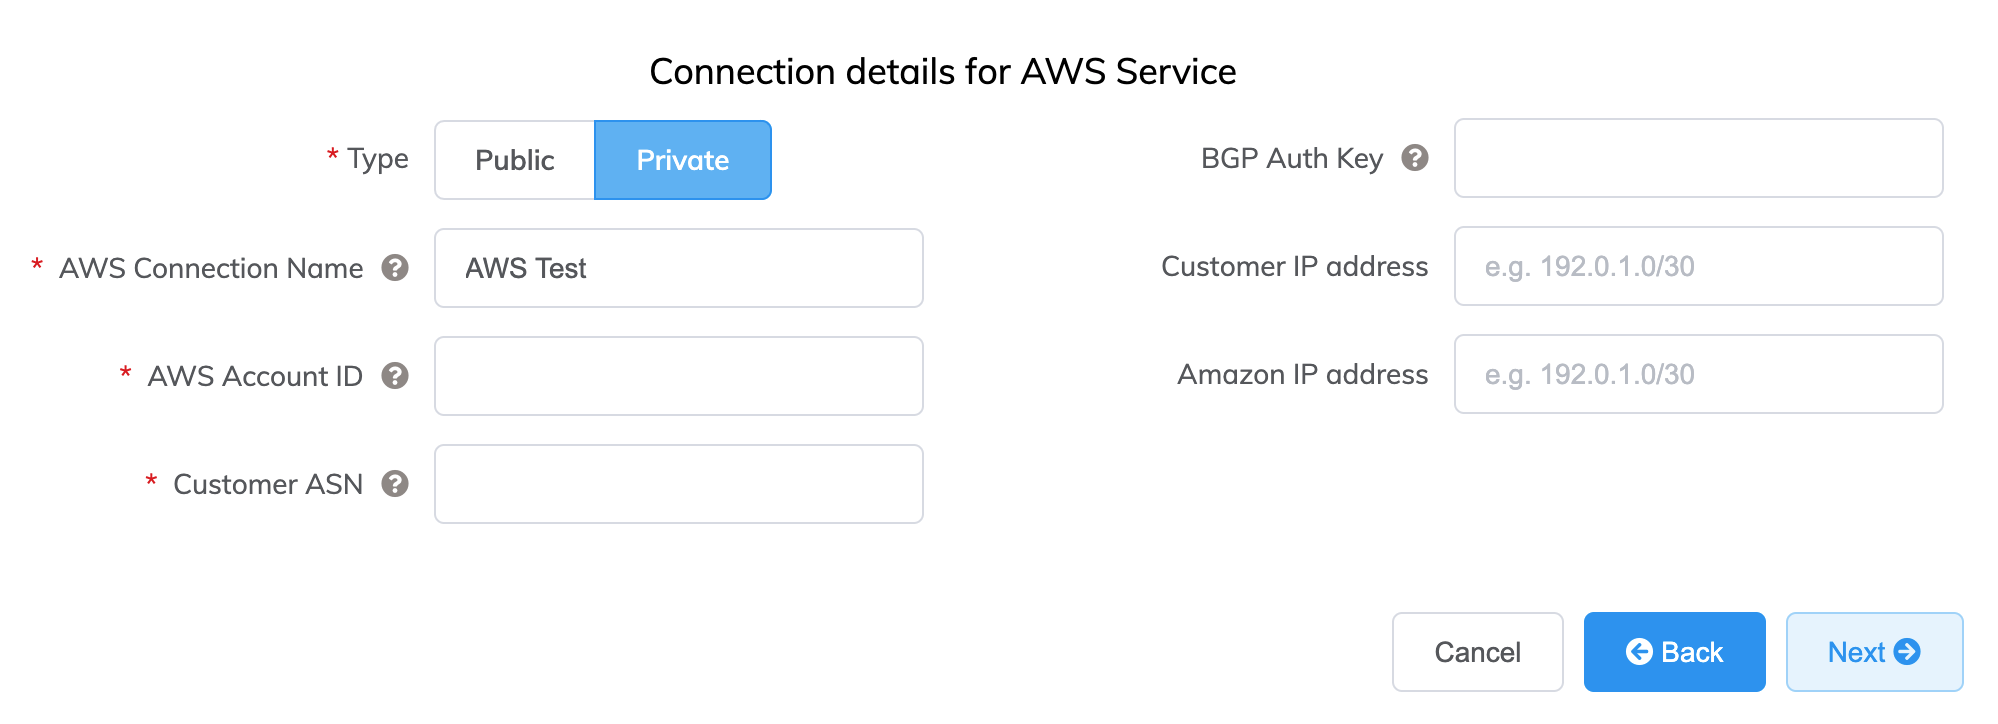
Here are details for each field:
-
Select Public or Private.
- Private – Access private AWS services such as a VPC, EC2 instances, load balancers, RDS DB instances, on private IP address space.
-
Public – Access public AWS services such as Amazon Simple Storage Service (S3), DynamoDB, CloudFront, and Glacier. You will also receive Amazon’s global IP prefixes (approximately 2,000 prefixes).
Note
Public VIFs require manual intervention from Amazon and could take up to 72 hours. For more information, see Configuring Public AWS Connections with IP Addresses Provided by AWS.
-
AWS Connection Name – This is a text field and will be the name of your virtual interface that appears in the AWS console. The AWS Connection Name is automatically populated with the name specified in a previous step.
-
AWS Account ID – This is the ID of the account you want to connect. You can find this value in the management section of your AWS console.
-
Customer ASN (optional) – Specify the ASN used for BGP peering sessions on any VXCs connected to the MVE. This value is defined when you configure the MVE and, once defined, it cannot be changed.
-
BGP Auth Key (optional) – Specify the BGP MD5Sometimes known as an MD5 hash or BGP key. The message-digest (MD5) algorithm is a widely used cryptographic function producing a string of 32 hexadecimal digits. This is used as a password or key between routers exchanging BGP information.
key. If you leave this blank, Megaport negotiates a key automatically for you with AWS which will be displayed in the Megaport Portal. The key is not displayed in the AWS console.Note
The BGP Auth Key is generated during the ordering process when this field is left blank. It will not be displayed on the Summary page when ordering. To see the key, view the Connection Settings after the service has been deployed and is live.
-
Customer IP Address – The IP address space (in CIDR format) used on your network for peering. This field is optional for private connections and if left blank, Megaport assigns an address.
-
Amazon IP Address – The IP address space in CIDR format assigned in the AWS VPC network for peering. This field is optional for private connections and if left blank, Megaport automatically assigns an address.
-
Prefixes (optional) – (visible for Public connections only) Specify IP Prefixes to announce to AWS. Specify the prefixes you will advertise when deploying a Public Direct Connect (RIR-assigned IPv4 addresses only).
Once you configure Prefixes for a Public connection, you cannot change them and the field is grayed out. To change this value, create a support ticket with AWS so they can make this change in a non-impacting way. Or, you can cancel the Hosted VIF and reorder. In both cases, you need to wait for AWS to manually approve the request.
-
-
Click Next to proceed to the connection detail summary, add the VXC to the cart, and order the connection.
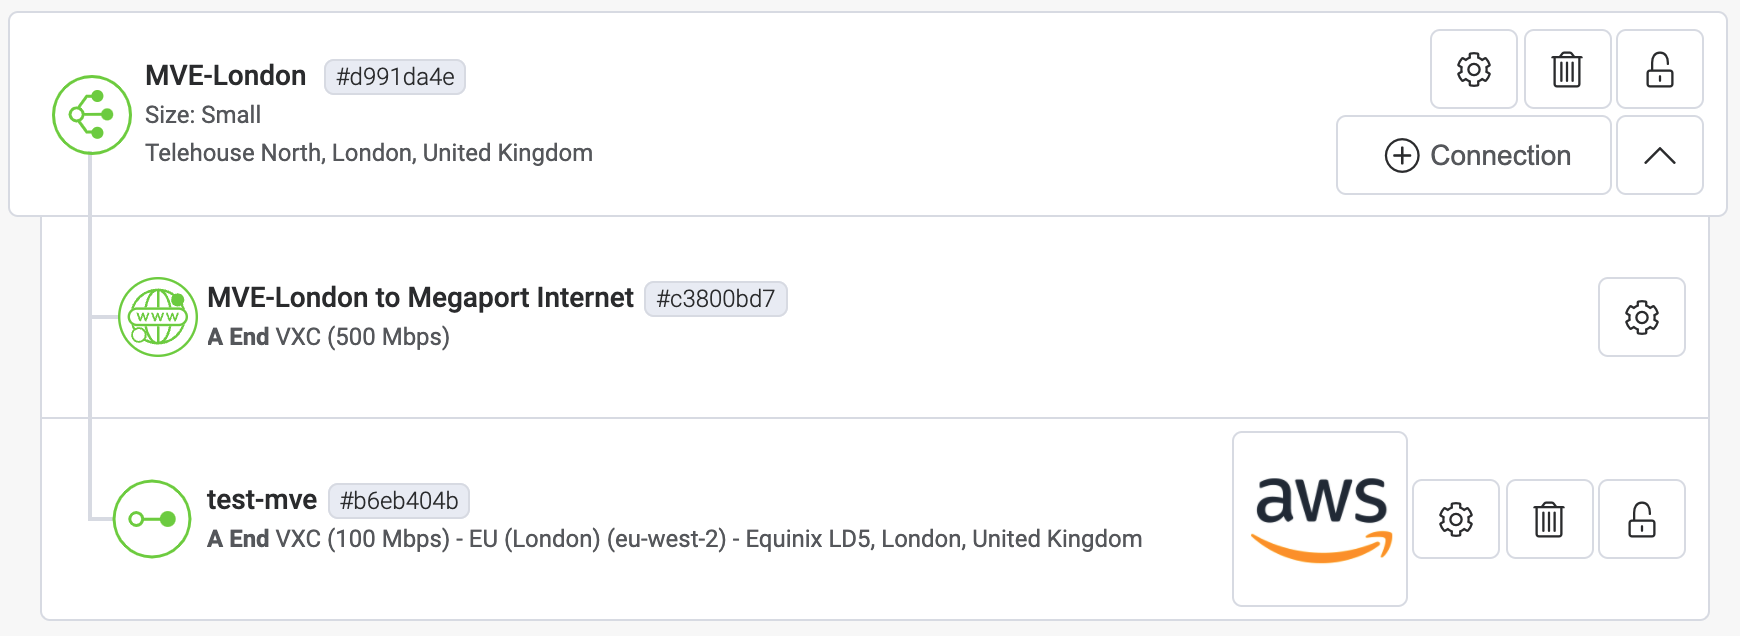
The AWS VXC appears as a connection for the MVE in the Megaport Portal.
Next, accept the connection in AWS.
Accepting the Virtual Interface for Private Connections
A few minutes after ordering a private Hosted VIF VXC, the corresponding inbound VIF request is visible on the AWS Direct Connect > Virtual Interfaces page in the AWS console. (This is specific to the region associated with the target AWS port.) If your VIF doesn’t appear after a few minutes, confirm that you are viewing the correct region.
To review and accept the private virtual interface
-
From the AWS Direct Connect > Virtual Interface page, click the ID of the interface to display the configuration and peering details.
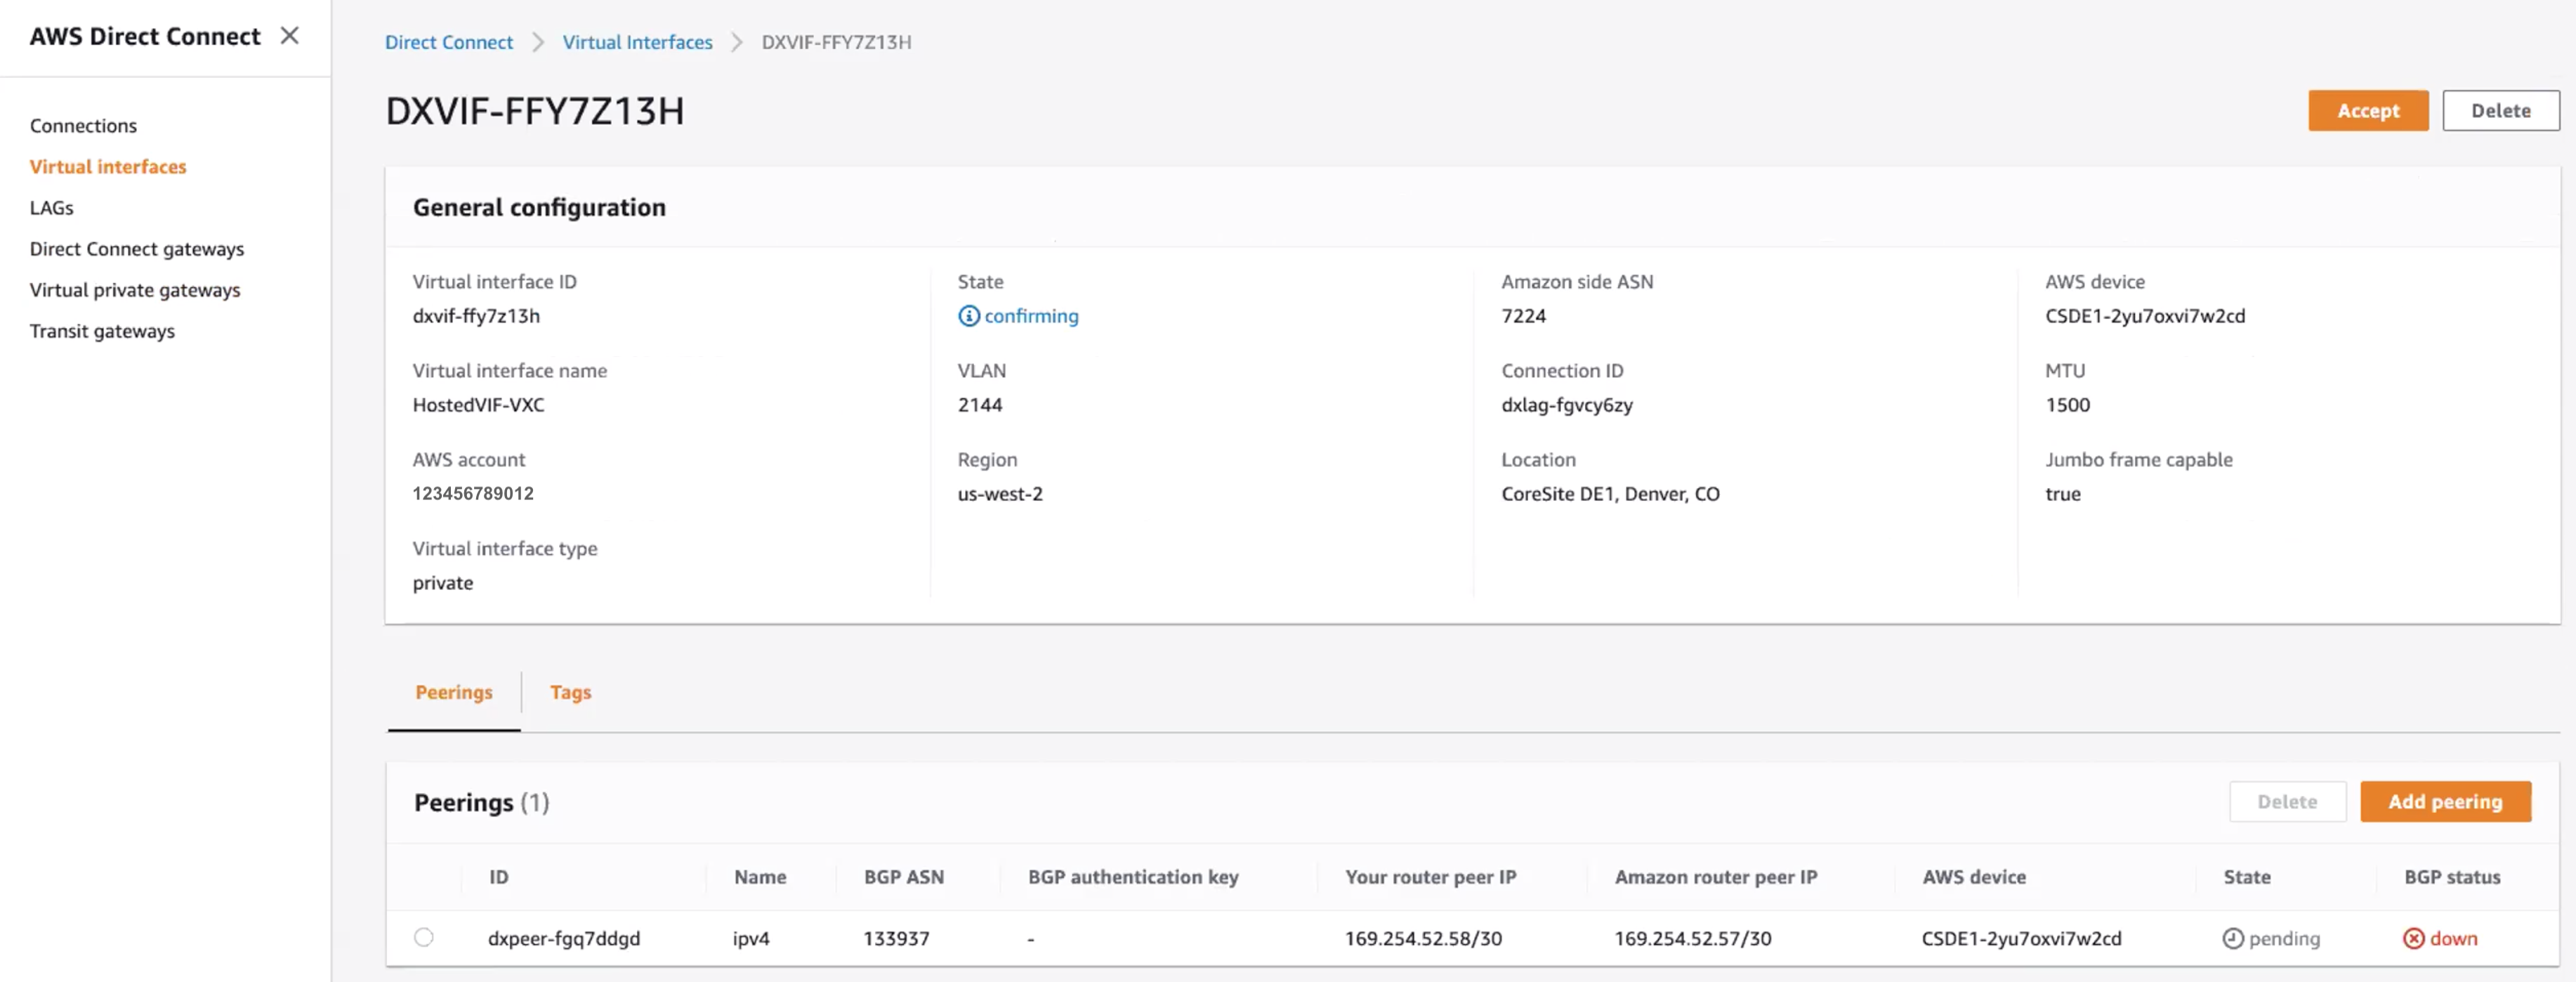
The name and account ID of the VIF should match the values supplied in the Portal and the BGP ASN should match the Customer ASN configured with the VXC. The Amazon ASN is the default region’s AWS ASN and not the value specified during the configuration - this is updated when the virtual interface is accepted and assigned.
-
Click Accept.
-
Select the gateway type and then the specific gateway for this new virtual interface.
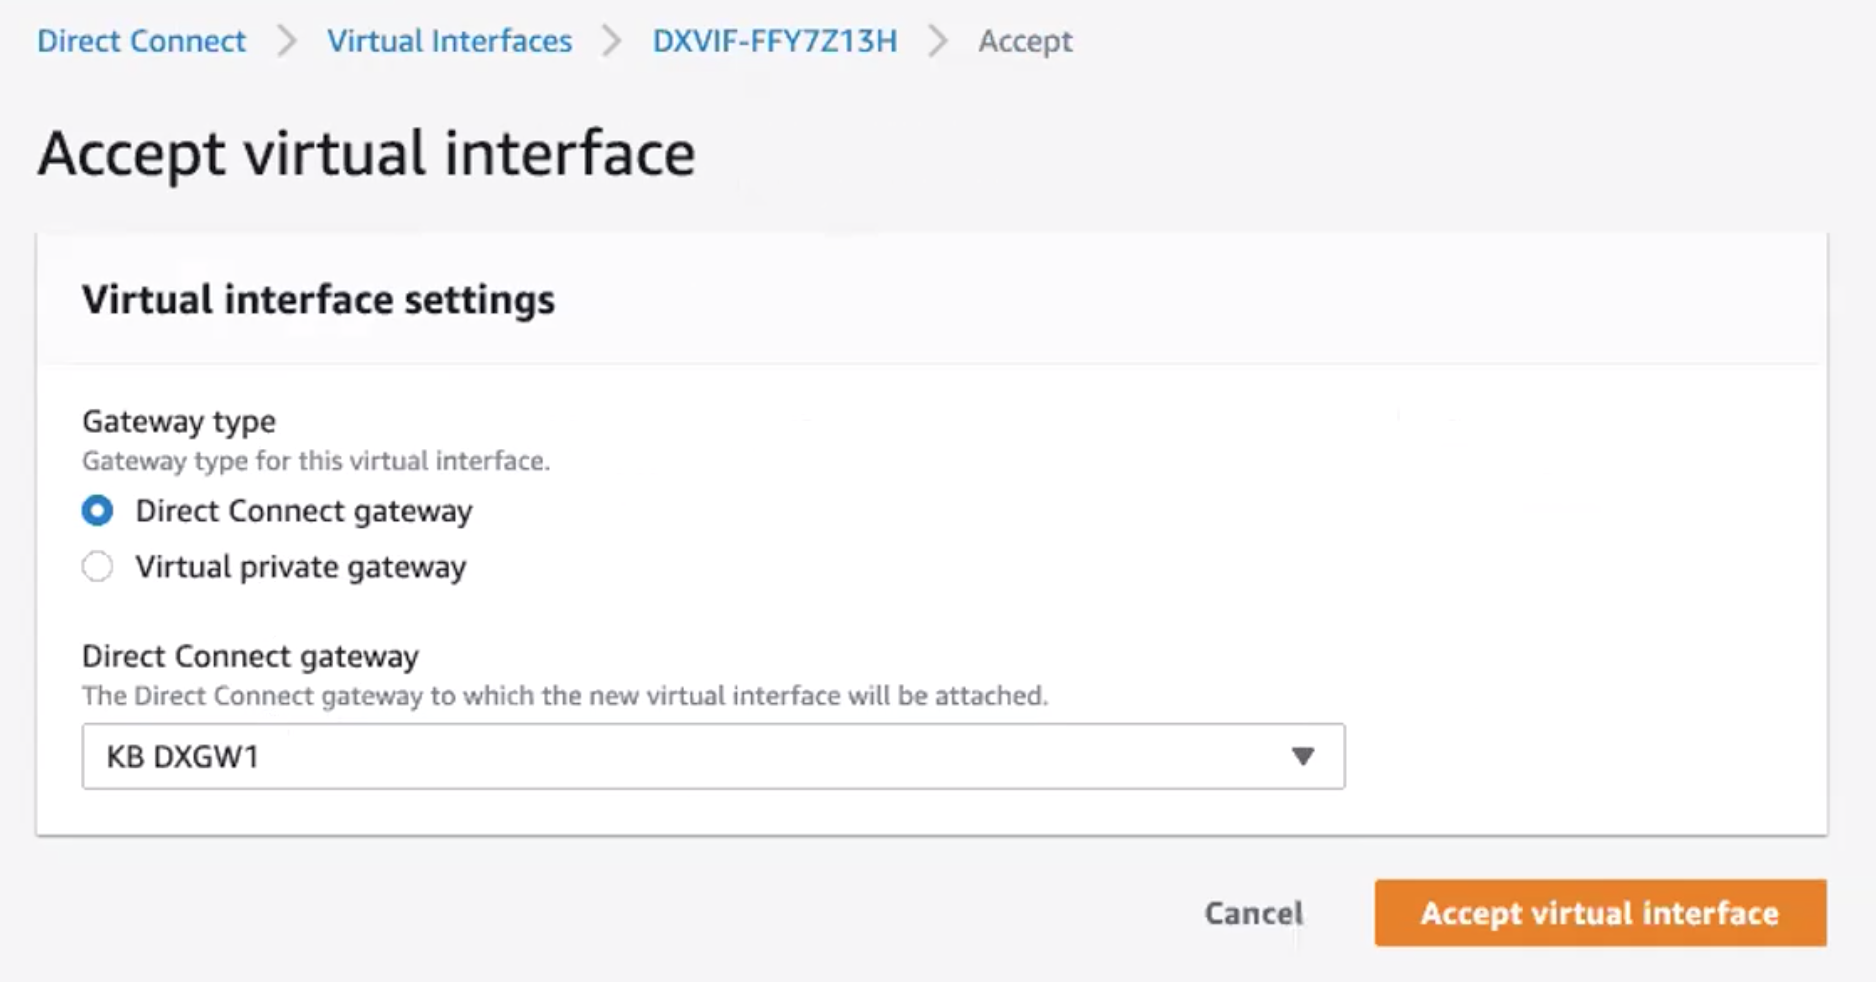
-
Click Accept virtual interface.
The state of the connection changes from confirming to pending, and then changes to available once BGP is established. Note that sometimes there is a delay in the available BGP status appearing on the AWS end, though you can confirm the current state of the Layer 3 link through the Portal view.
Accepting the Virtual Interface for Public Connections
Several minutes after ordering a public Hosted VIF VXC, the corresponding inbound VIF request appears on the AWS Direct Connect > Virtual Interfaces page in the AWS console (This is specific to the region associated with the target AWS port).
To review and accept the public virtual interface
- From the AWS Direct Connect > Virtual Interface page, click the ID of the interface to display the configuration and peering details.
- Review the configuration details and click Accept, and when prompted, click Confirm.
The state of the connection changes from confirming to verifying. At this point, the connection needs to be verified by Amazon - a process that can take up to 72 hours. When verified, the state changes to available.
Adding AWS connection details to FortiManager
After you create the connection from your MVE to AWS and set up the connection in the AWS console, you need to configure it in FortiManager. This involves adding a device interface and configuring BGP settings, ASNs, VLANs, and MD5 values.
To configure an AWS connection between a Fortinet MVE and AWS
-
Collect the connection details from the Megaport Portal.
To display the details, click the gear icon for the AWS connection from your MVE and click the Details view. Note the values for the A-End VLAN, Customer Address (and CIDR), Amazon Address, and Customer ASN. -
Log in to the FortiManager.
Note
You can also log in on your MVE instance: https://<mve-ip-address>
-
From your managed device, go to the System menu and choose Interface.
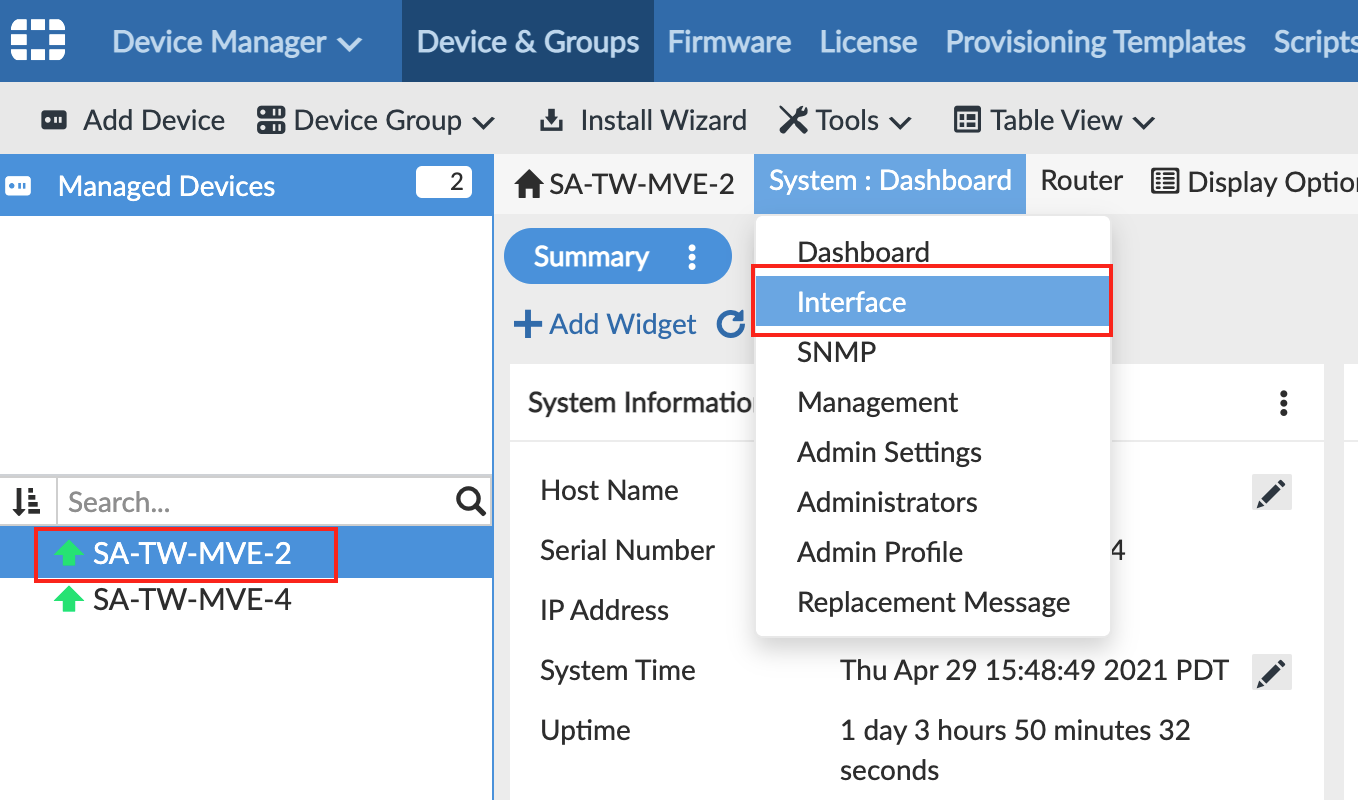
The page displays port1 as your physical interface. -
Click +Create New > Interface and provide this information:
- Interface Name – Specify a meaningful name for the interface.
- Alias Name (optional) – Enter an alternate name. For easy reference, use the AWS Virtual Interface ID for this connection as the alias.
- Type – Choose VLAN.
- Interface – Choose the parent interface:
port1. - VLAN ID – Specify the A-End VLAN listed for this AWS Connection in the Megaport Portal.
- Role – Choose Undefined.
- Addressing Mode – Select Manual.
- IP/Netmask – Specify the Customer Address from the VXC details in the Megaport Portal.
- Administrative Access - Select how you want to access this interface, such as HTTPS, PING, and SSH.
- DHCP Server - Click OFF.
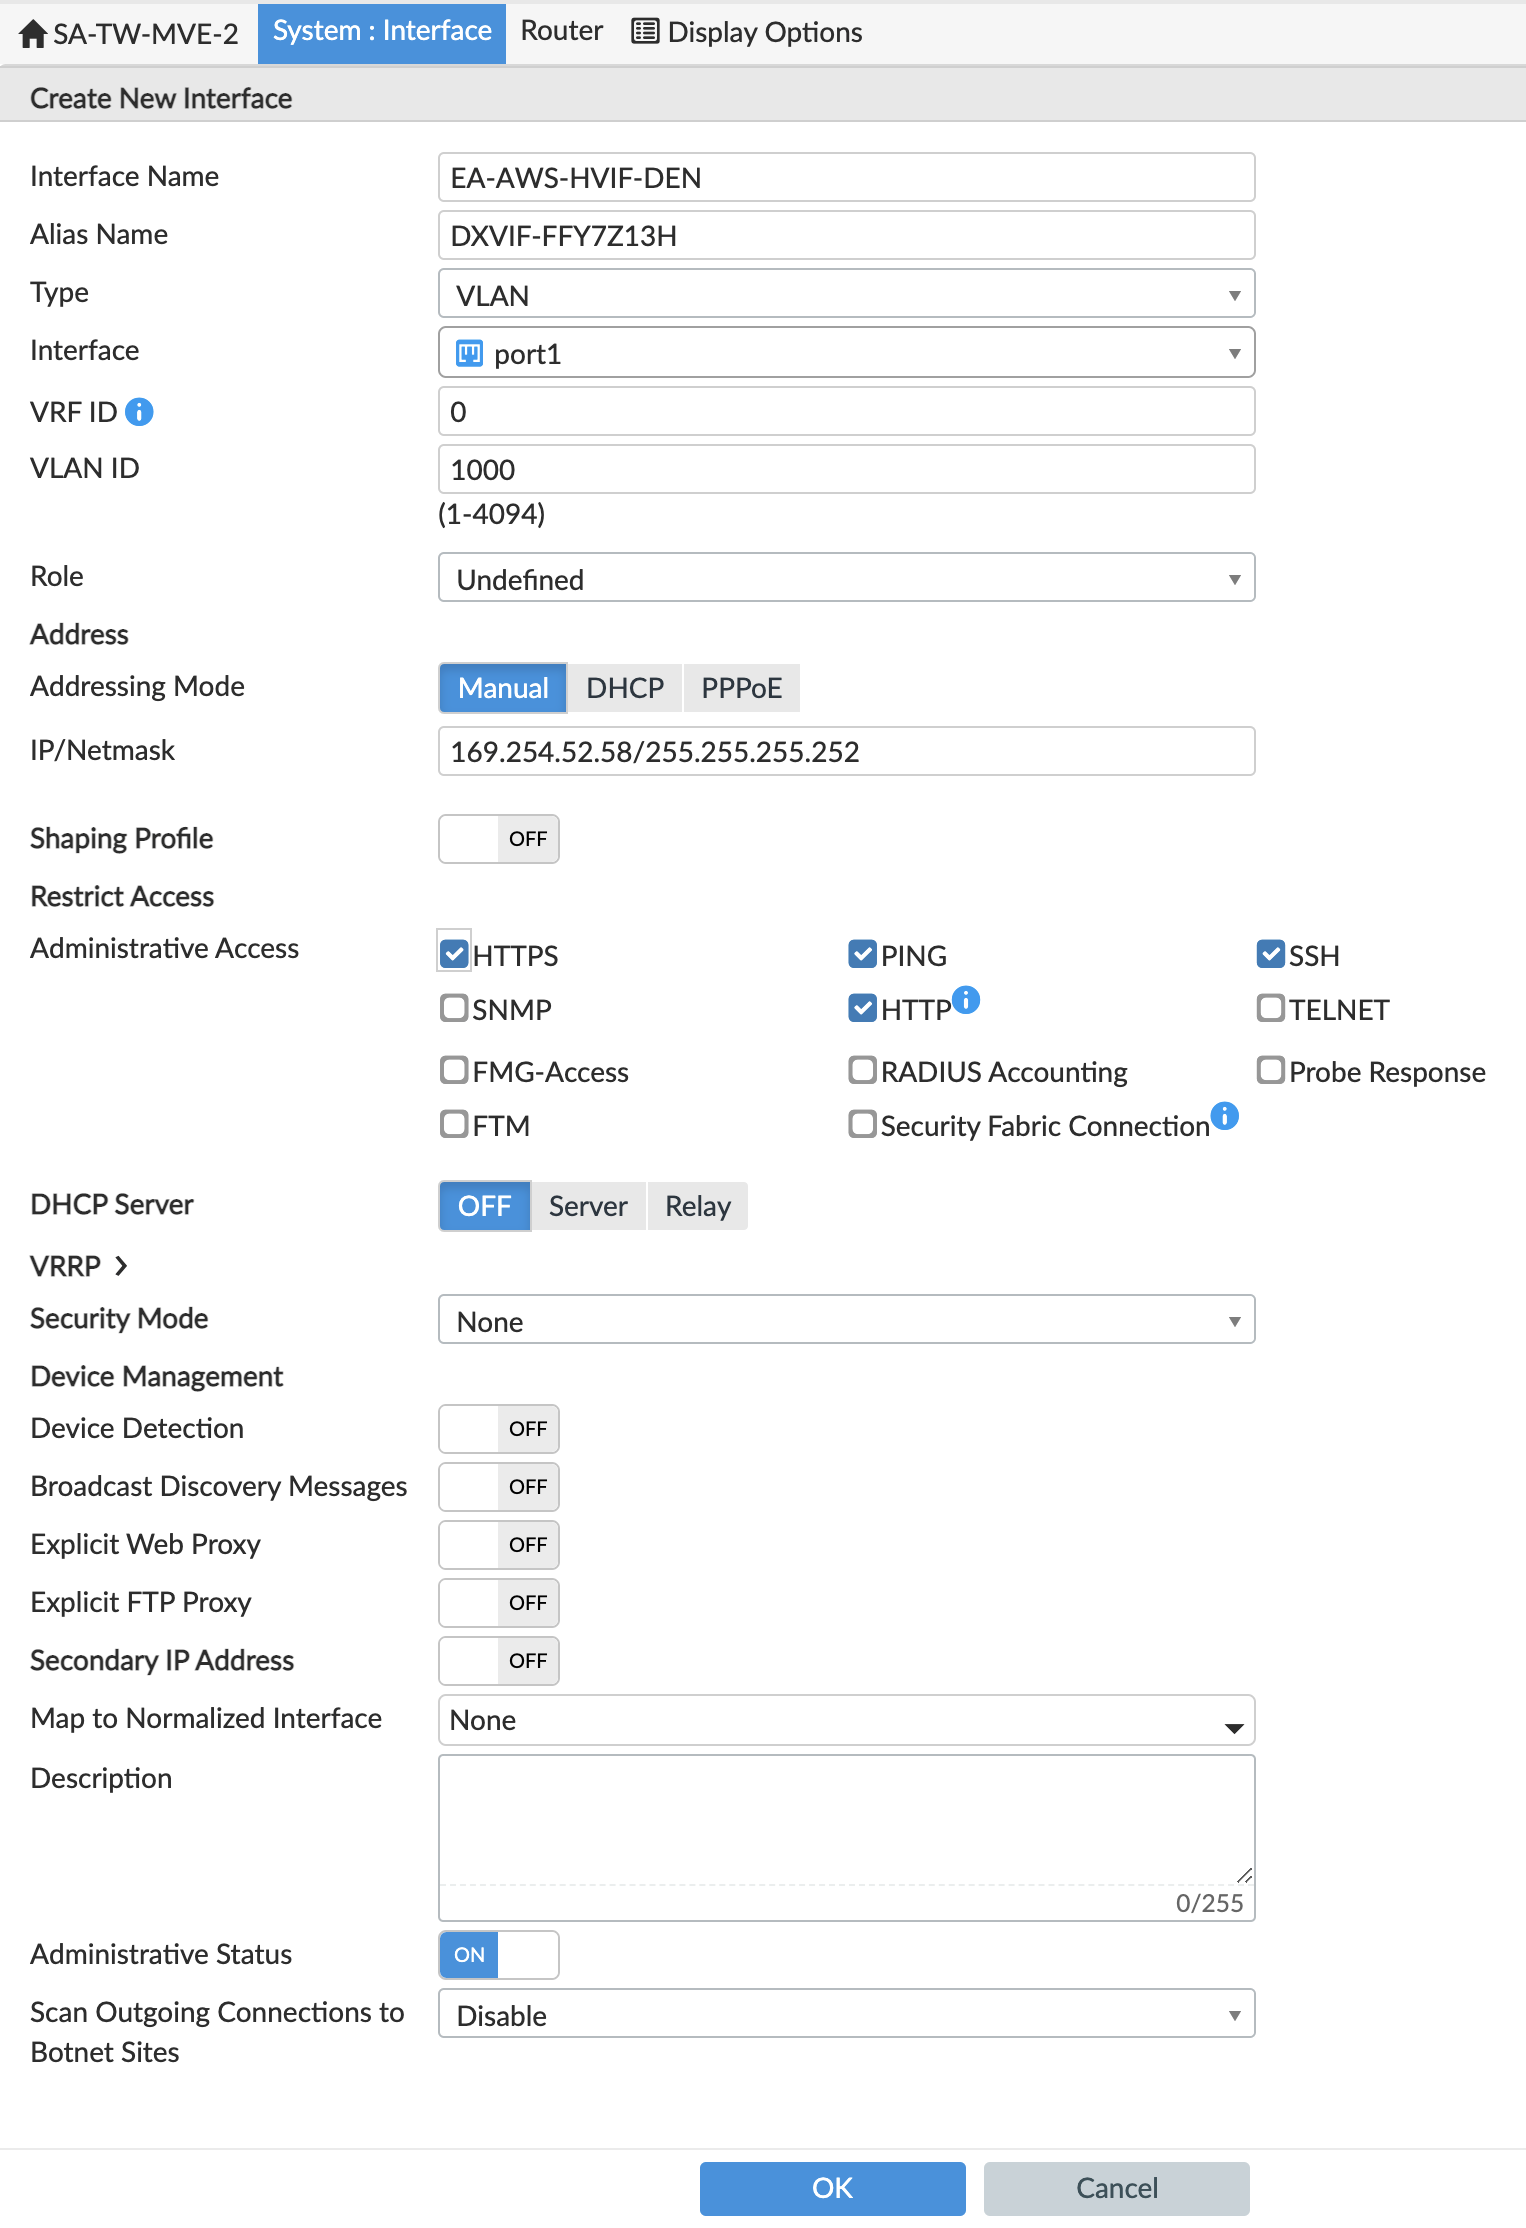
-
Click OK.
The new VLAN interface appears with yourport1physical interface.
You can run an execute ping command from FortiOS to verify the connection.
Note
You need to push the configuration to the MVE, which happens when you have AutoUpdate configured. If you cannot successfully ping the connection, go to Manage Devices in FortiManager, select the MVE, and choose Refresh Device from the More menu. If prompted, select AutoUpdate for the Config Status.
At this point, we have created the interface and next we need to create the BGP session.
To create the BGP session
-
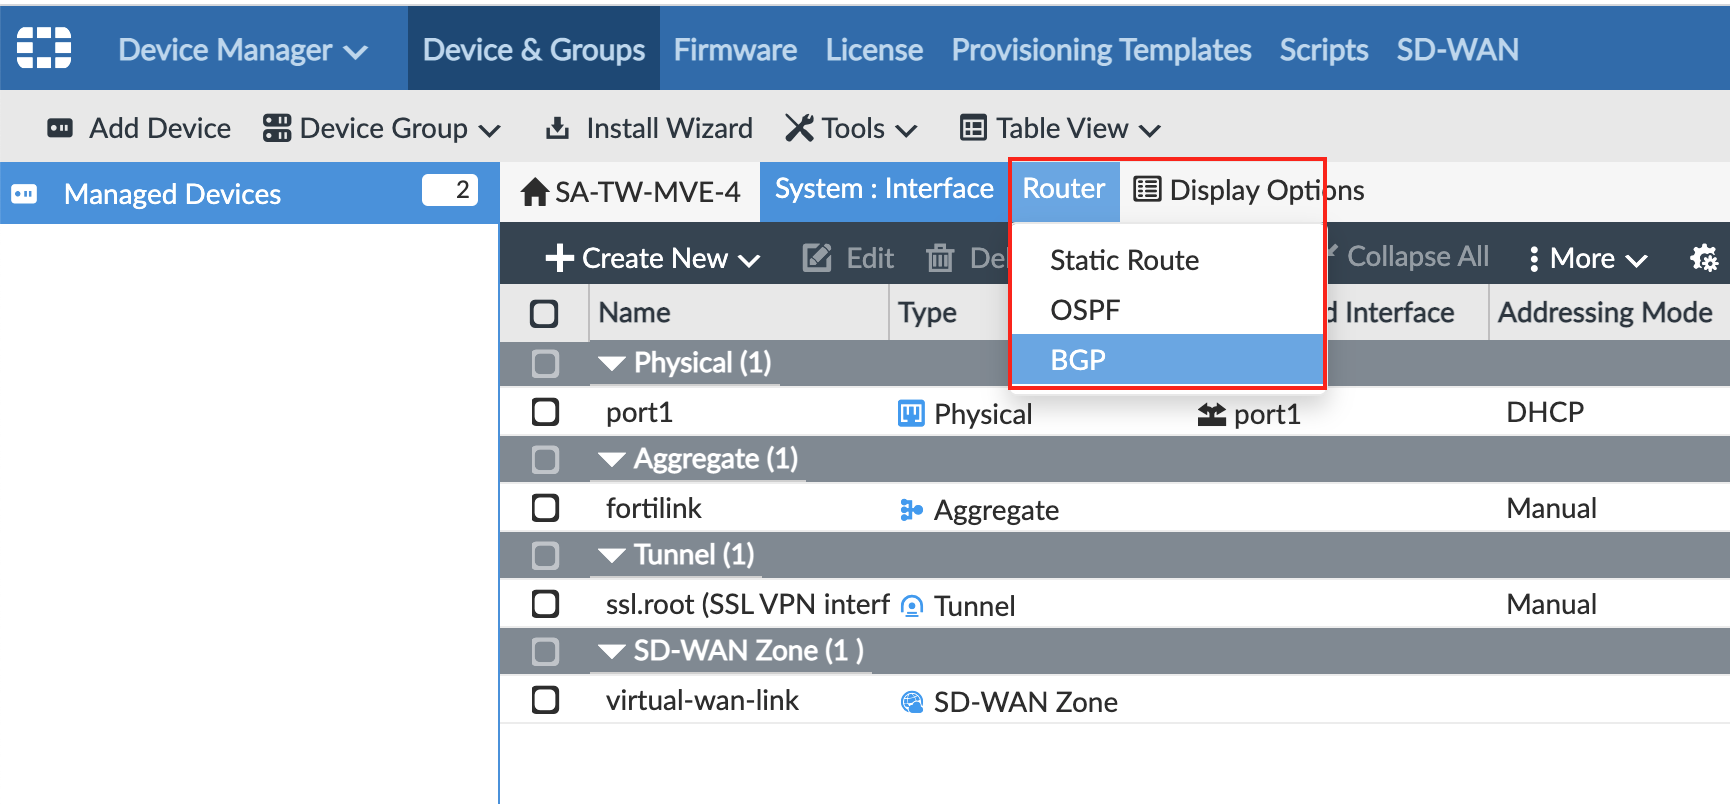
In FortiManager, go to Router > BGP.
-
Provide this information:
- Local AS – Add the Customer ASN value from the Megaport connection details.
- Router ID – Add the Customer Address value from the Megaport connection details.
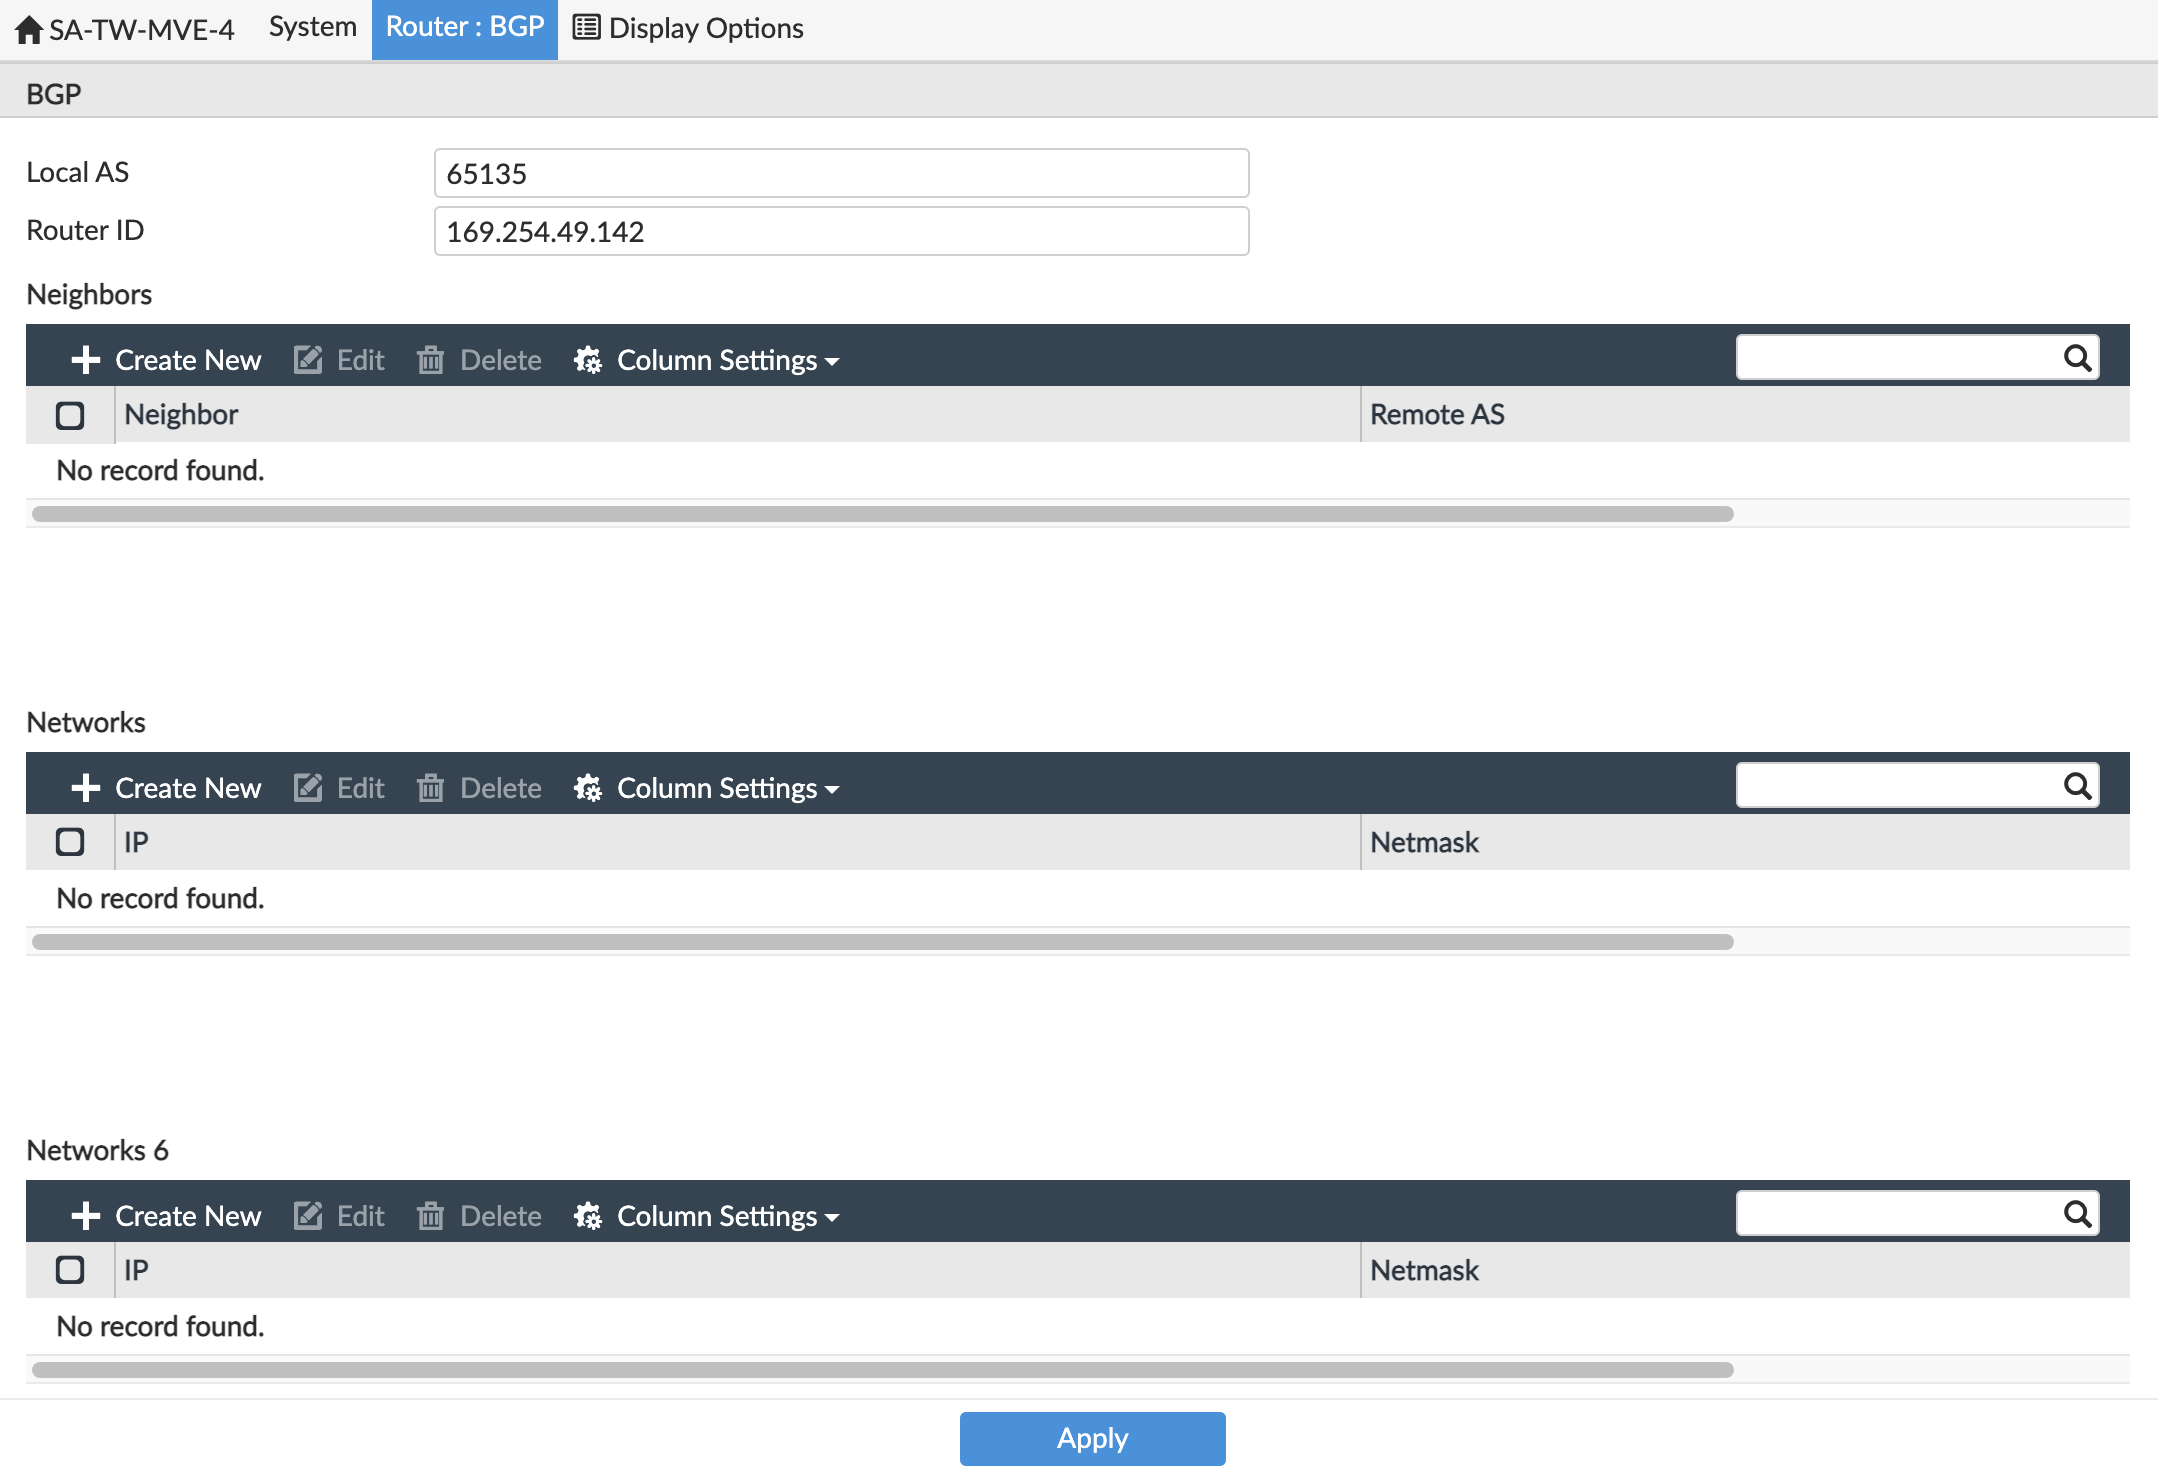
-
In Neighbors, click +Create New.

-
For the neighbor IP, add the Amazon Address from the Megaport connection details.
-
For Remote ASN, enter the Amazon-side ASN.
By default this is 64512. -
Click OK.
-
Click Apply.

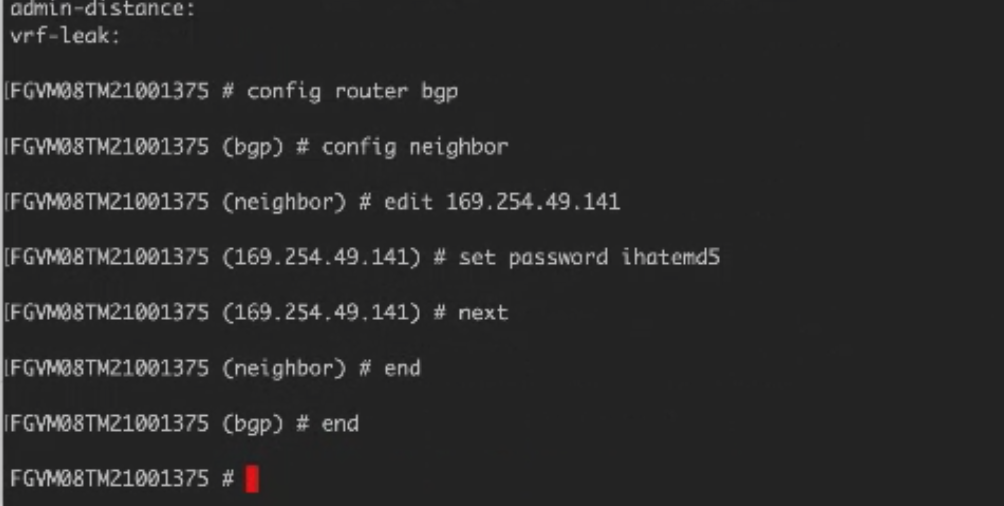
The neighbor is configured but you need to add the BGP Auth information. The web interface does not let you define this and you need to use the command line to add the BGP details.
To add the BGP authorization
-
SSH to the MVE instance using your private key file.
For example
ssh -i ~/.ssh/megaport-mve-instance-1-2048 admin@162.43.143.XX -
Use these commands to add a password for the BGP neighbor.
Validating your AWS connection
You can review connection details, including the connection state, from the CLI with these commands:
get system interface– Displays configuration details and current status for the device interfaces.get router info bgp neighbor <ip-address>– Displays configuration details and current status for the BGP neighbors.