Understanding the Services Page
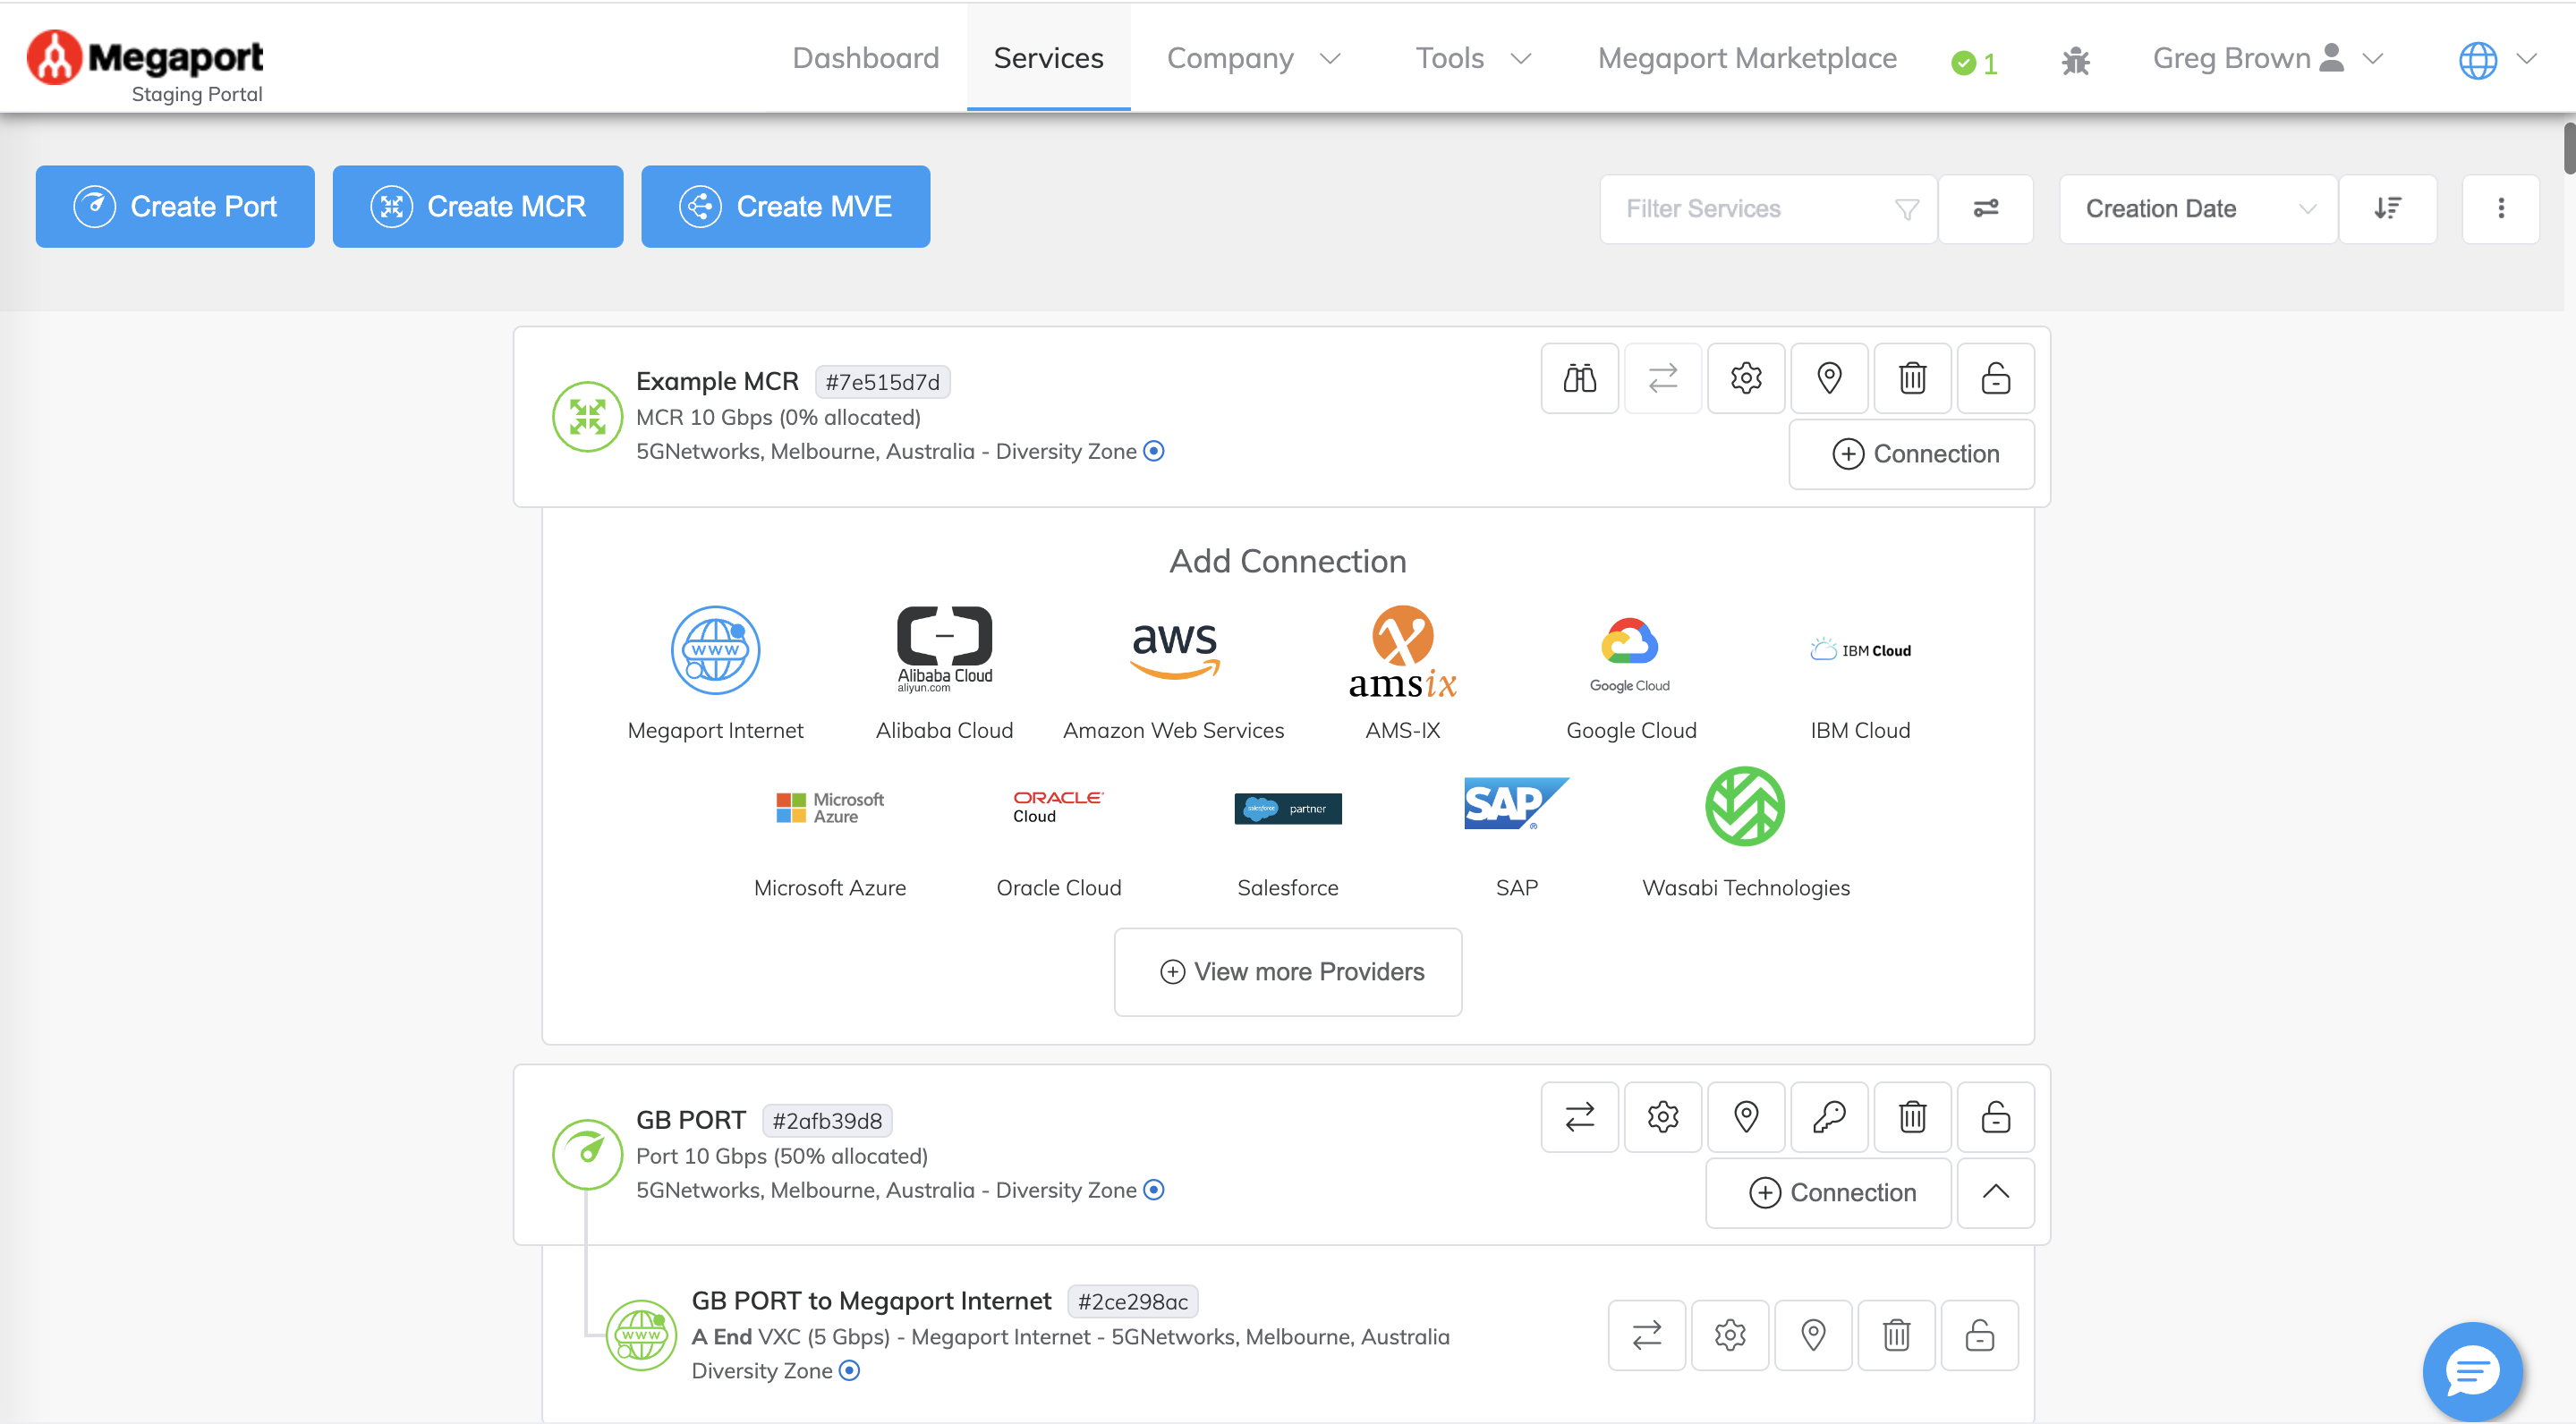
The Services page provides an overview of all your Megaport services. You can view, configure, and edit your Ports, MCRs, MVEs, and their connections (VXCs, IXs, and Megaport Internet connections). Each connection is grouped under its associated Port, MCR, or MVE.
Creating services
Click Add Services in the top-right of the page header to open the Add Services page, then select a Port, MCR, MVE, or NAT Gateway to configure and order.
The Add Services page groups options by category to help you quickly choose what to deploy.
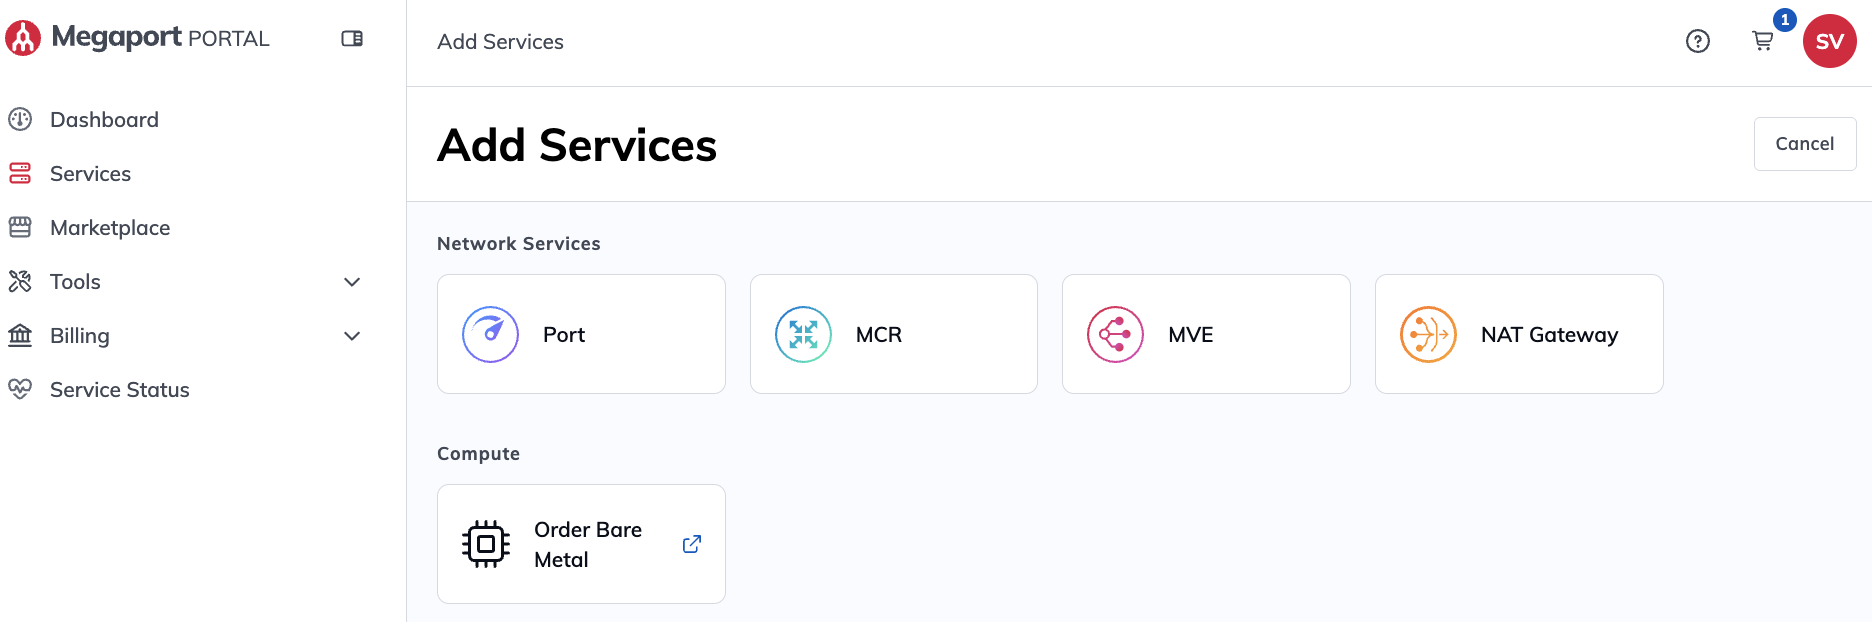
- Network Services – Includes cards for Port, MCR, MVE, and NAT Gateway
- Compute – Includes Order Bare Metal, which opens the Latitude.sh ordering flow in a new tab
- Cancel – Returns you to the Services page without starting a new order
After you select a service card, the Portal opens the workflow for that service type.
Connecting to Latitude.sh
Click Order Bare Metal to create a bare metal service with Latitude.sh.
For more information, see Connecting to Latitude.sh.
Filtering and sorting services
The filtering and sorting tools allow you to customize the Services page to help you find the information you need.

Filtering services
To narrow the services shown on the page, enter your text search in the Filter Services field. The filter will match against the name, location, and ID of the services. Any services matching your search will be highlighted.
Click ![]() (View Additional Filters) to filter services by service type and contract term length, in addition to the text filter. For example, you can filter on Ports on a 12 month term. The filters will persist if you navigate away and return to the Services page in the same session.
(View Additional Filters) to filter services by service type and contract term length, in addition to the text filter. For example, you can filter on Ports on a 12 month term. The filters will persist if you navigate away and return to the Services page in the same session.
The number of matching services is displayed below the Filter Services field. Click Clear Filters to remove all filters and display all services in the Services page.
Sorting services
You can change the order of the items on the Services page according to the following criteria:
- Creation Date – Sorts by the date they were created.
- Name – Sorts by name, in alphabetic order.
- Location – Sorts by country, and then by the location within that country.
You can sort in either ascending or descending order.
Note
You can only sort Ports, MCRs, and MVEs, not their connections (such as VXCs or IXs), which are displayed in the order they were added.
You can also hide or show all the connections for a Port, MCR, or MVE. By default, the Portal shows all the connections unless there are more than 10, in which case they are collapsed initially. Click the Extra Actions kebab menu and select Expand All Services to expand all connections under a service, or select Collapse All Services to hide them.
Downloading a service inventory
The Services page provides a convenient way to get an inventory of all services associated with your account. The inventory includes all live and configured services, along with any services that have been decommissioned.
To download an inventory of services
- On the Services page, click
 (Extra Actions) > Download Inventory Report.
The service inventory is saved in the comma-separated values (CSV) file format and downloaded to your Downloads folder.

- You can import the CSV data into spreadsheets and databases.
- You can open the CSV file in any text editor.
Viewing and editing services
By default, services are listed by the date they were created. VXCs, IXs, and Megaport Internet connections are grouped under each Port, MCR, or MVE.
Service status
The icons for each Megaport service change color to indicate their provisioning status. Any important information relating to the status is shown under each service, such as a pending approval, a cancellation, or a missing billing market.
| Icon | Color | Service Status Description |
|---|---|---|
 |
Green | The service is configured and live. |
 |
Gray | The service is not live. This can happen for several reasons, for example, the service could be in the process of being deployed, or a Port could be waiting for connection approval from the data center. |
 |
Orange | The status of this service is unknown. |
 |
Red | The service is down. |
Each service on the page provides icons so you can modify Port, MCR, MVE, VXC, IX, and Megaport Internet connection configurations at any time.
Service details
Ports
Each Port displays its speed, location, diversity zone (if applicable), and allocation percentage. This percentage reflects the amount of bandwidth defined for the Port that has been assigned to VXCs. For more information, see Creating a Port.

- Service ID – A unique alphanumeric reference associated with each service. The service ID appears next to the Port name. Click the service ID to copy it to the clipboard, which can be useful when using the Megaport API to automate your Megaport service provisioning.
-
Service Diagnostics – Click the diagnostics icon to view the current operational status of the Port, including whether it is up or down, any scheduled maintenance, and any active outages. The diagnostic displays the total number of attached connections and highlights any that are down or shut down.
-
Optical Levels
For Ports with optical monitoring, the diagnostics panel includes an Optical Levels section that displays the current signal strength readings for the Port. The diagnostics panel also provides a health status indicator based on the signal readings, which can help you identify potential issues with the optical connection. The signal strength readings include:-
TX Power – The transmit power level measured in dBm.
-
RX Power – The receive power level measured in dBm.
The health status indicator shows:
-
Optical Signals Healthy – Signal strength is within normal operating parameters.
-
Signal Strength Low – One or more signal readings are below the recommended threshold. If you see this status, check your Cross Connect and contact Support for troubleshooting assistance.
-
-
-
Move Connections – Move any connections on the Port to a different Port.
For more information, see Moving VXCs. - Details – Click the gear icon to view or edit the configuration details, monitoring logs, usage, and billing information for this Port.
- View Service on Map – Click the drop pin icon to view the Port on the map in the Megaport Portal dashboard. You can also create connections and maintain the Port. For more information, see Megaport Portal Dashboard.
- Service Keys – Click the key icon to generate and manage keys to connect Ports in separate Megaport accounts or deploy a VXC between two businesses. This icon is shown only when the Port is ready for a service key.
For more information, see Setting up Service Keys. - Delete – Click the trash icon to terminate a Port and its associated connections. Port termination is immediate.
For more information, see Terminating a Port. - Lock – A Company Admin can click the padlock icon to lock a Port and prevent accidental modification or deletion. If an administrator has locked the Port, other users will see that it has been locked but only an administrator can unlock it. For more information, see Locking Megaport Services.
- +Connection – Click to establish a connection to a CSP, the internet (where available), an IX, a service provider on the Megaport Marketplace, or deploy a private VXC to another Port (local to the current company account). If you have a service key, you can connect Ports in separate Megaport accounts or enable a business-to-business VXC. For more information, see Connections Overview.
- Hide/Show – Click the Hide/Show toggle to hide or show the connections on this Port.
MCRs
Each MCR displays its rate limit, location, and allocation percentage. This percentage reflects the amount of bandwidth defined for the Port or MCR that has been assigned to VXCs. For more information, see Creating an MCR.

- Service ID – A unique alphanumeric reference associated with each service. The service ID appears next to the MCR name. Click the service ID to copy it to the clipboard, which can be useful when using the Megaport API to automate your Megaport service provisioning.
- Service Diagnostics – Click the diagnostics icon to view the current operational status of the MCR, including whether it is up or down, any scheduled maintenance, and any active outages. The diagnostic displays the total number of attached connections and highlights any that are down or shut down, with links to troubleshooting resources.
- BGP Sessions
If your MCR has BGP sessions that are down, a drop-down BGP Sessions section will appear. Expand the BGP Sessions section, and click the BGP session name to link to the details page of the VXC associated with that session. Use this page to view the BGP configuration and monitoring logs for troubleshooting. - Ping and Traceroute
If your MCR is experiencing a routing issue, use the Ping and Traceroute tabs to test network connectivity and identify routing problems. For more information, see Troubleshooting an MCR Routing Issue.
- BGP Sessions
- Looking Glass – Click the binoculars icon for single-screen visibility into traffic routing. This visibility helps you troubleshoot connections by showing the status of protocols and routing tables in the MCR. For more information, see Viewing Traffic Routing through MCR Looking Glass.
- Move Connections – Move any connections on the MCR to a different MCR.
For more information, see Moving VXCs. - Details – Click the gear icon to view and edit configuration details, service logs, and usage metrics for this MCR.
- View Service on Map – Click the drop pin icon to view the MCR on the map in the Megaport Portal dashboard. You can also create connections and maintain the MCR. For more information, see Megaport Portal Dashboard.
- Delete – Click the trash icon to terminate an MCR and its associated VXCs. MCR termination is immediate. For more information, see Terminating an MCR.
- Lock – A Company Admin can click the padlock icon to lock an MCR and prevent accidental modification or deletion. If an administrator has locked the MCR, other users will see that it has been locked but only an administrator can unlock it. For more information, see Locking Megaport Services.
- +Connection – Click to establish a connection to a CSP, the internet (where available), a service provider on the Megaport Marketplace, or deploy a private VXC to another Port (local to the current company account). If you have a service key, you can connect to Ports in separate Megaport accounts or enable a business-to-business VXC. For more information, see Connections Overview.
- Hide/Show – Click the Hide/Show toggle to hide or show the connections on this MCR.
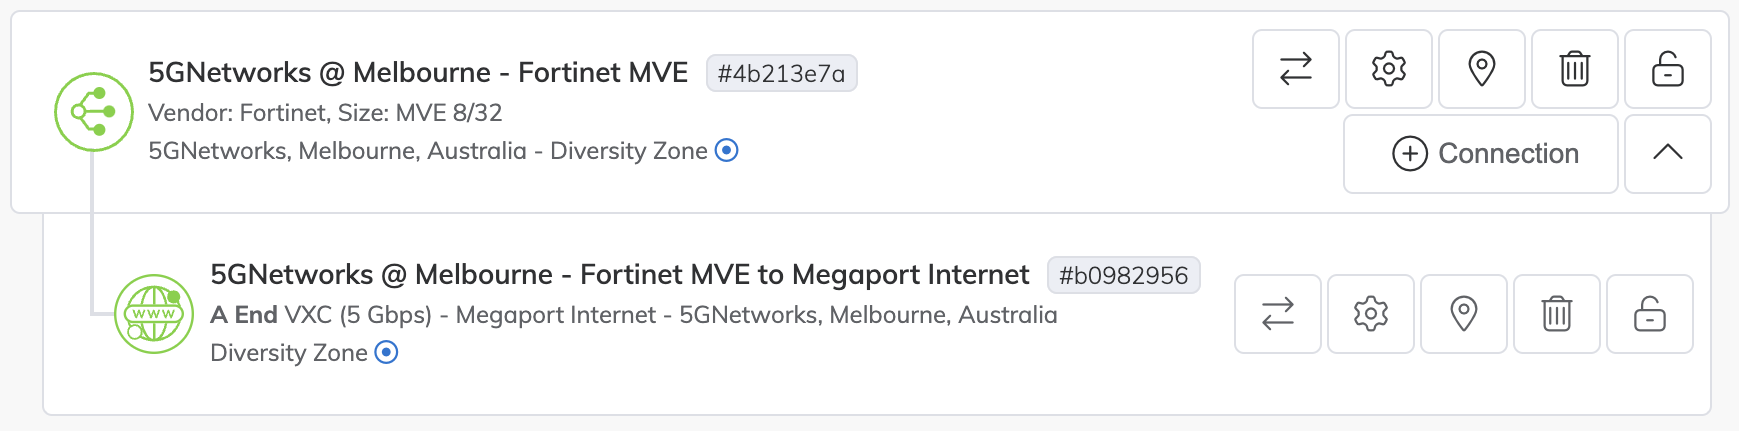
MVEs
Each MVE displays its SD-WAN vendor, configured size, and location.
As part of the MVE provisioning, you create a Megaport Internet connection to provide connectivity and to allow MVE to register and communicate with the SD-WAN overlay network. You can also create a Megaport Internet connection at any time after the MVE has been provisioned. The Megaport Internet icon differs from a standard VXC icon in the Megaport Portal.
For more information, see the Megaport documentation for your SD-WAN provider: MVE Overview.
- Service ID – A unique alphanumeric reference associated with each service. The service ID appears next to the MVE name. Click the service ID to copy it to the clipboard, which can be useful when using the Megaport API to automate your Megaport service provisioning.
- Service Diagnostics – Click the diagnostics icon to view the current operational status of the MVE, including whether it is up or down, any scheduled maintenance, and any active outages. The diagnostic displays the total number of attached connections and highlights any that are down or shut down.
- Move Connections – Move any connections on the MVE to a different MVE.
For more information, see Moving VXCs. - Details – Click the gear icon to view and edit configuration details, service logs, and usage metrics.
- View Service on Map – Click the drop pin icon to view the MVE on the map in the Megaport Portal dashboard. You can also create connections and maintain the MVE. For more information, see Megaport Portal Dashboard.
- Delete – Click the trash icon to terminate the MVE and its associated VXCs. MVE termination is immediate. For more information, see the Megaport documentation for your SD-WAN provider: MVE Overview.
- Lock – A Company Admin can click the padlock icon to lock an MVE and prevent accidental modification or deletion. If an administrator has locked the MVE, other users will see that it has been locked but only an administrator can unlock it. For more information, see Locking Megaport Services.
- Console Access – Click to open the MVE Console in a new full-screen view. The console provides direct browser-based access to your MVE instance for troubleshooting, configuration, and system administration. For more information, see Using the MVE Console.
-
Restart MVE – Click to restart the MVE instance. Restarting performs a clean shutdown and startup of the virtual machine, preserving its configuration. A confirmation screen is displayed before the restart proceeds. You can monitor the restart progress using the Service Diagnostics tool.
Note
You must have at least Company Admin, Technical Admin, or Technical Contact privileges to perform this action. For more information, see Managing User Roles.
-
+Connection - Click to establish a connection to a CSP, the internet (where available), a service provider on the Megaport Marketplace, or deploy a private VXC to another Port (local to the current company account). If you have a service key, you can connect to Ports in separate Megaport accounts or enable a business-to-business VXC. For more information, see Connections Overview.
- Hide/Show – Click the Hide/Show toggle to hide or show the connections on this MVE.
VXCs
Each VXC displays its name, rate limit, location, diversity zone, and whether the Port/MCR/MVE is at the A-End or B-End of the connection. For more information, see Connections Overview.
If you are at the A-End of the connection, and the connection is to a company on the Megaport Marketplace, it will display the logo, have a tooltip of the company name, and allow you to click the icon to view the details on the Megaport Marketplace. In this example, the VXC at the A-End is connected to AWS.

If you are at the B-End of the connection (and don’t own the A-End), it will show the generic Megaport Marketplace logo (not clickable) and have a tooltip that says that you are at the B-End of a connection owned by another company.
![]()
- Service ID – A unique alphanumeric reference associated with each service. The service ID appears next to the VXC name. Click the service ID to copy it to the clipboard, which can be useful when using the Megaport API to automate your Megaport service provisioning.
- Service Diagnostics – Click the diagnostics icon to view the current operational status of the VXC, including whether it is up or down, any scheduled maintenance, and any active outages. The diagnostic displays the total number of attached connections and highlights any that are down or shut down.
- Move Connection – Move the VXC to a different location. The move can only be to a service of the same type. For example, Port to Port, MCR to MCR, or MVE to MVE. For more information, see Moving VXCs.
- Details – Click the gear icon to view the configuration details, monitoring logs, usage, and billing information. The gear icon will be displayed in blue if the VXC has been shut down. For more information, see Shutting Down a VXC for Failover Testing.
- View Service on Map – Click the drop pin icon to view and maintain the VXC on the map in the Megaport Portal dashboard. For more information, see Megaport Portal Dashboard.
- Delete – Click the trash icon to terminate a VXC. VXCs can be individually terminated or are terminated as part of terminating the attached Port, MCR, or MVE. For more information, see Terminating a VXC.
- Lock – A Company Admin can click the padlock icon to lock a VXC and prevent accidental modification or deletion. If an administrator has locked the VXC, other users will see that it has been locked but only an administrator can unlock it. For more information, see Locking Megaport Services.
Megaport Internet connections
Each Megaport Internet connection displays its name, rate limit, location, diversity zone, and shows that the Port/MCR/MVE is at the A-End of the connection. For more information, see Megaport Internet Overview.

- Service ID – A unique alphanumeric reference associated with each service. The service ID appears next to the Megaport Internet connection name. Click the service ID to copy it to the clipboard, which can be useful when using the Megaport API to automate your Megaport service provisioning.
- Service Diagnostics – Click the diagnostics icon to view the current operational status of the Megaport Internet connection, including whether it is up or down, any scheduled maintenance, and any active outages. The diagnostic displays the total number of attached connections and highlights any that are down or shut down.
- Move Connection – Move the Megaport Internet connection to a different location. The move can only be to a service of the same type. For example, Port to Port, MCR to MCR, or MVE to MVE. For more information, see Moving VXCs.
- Details – Click the gear icon to view the configuration details, monitoring logs, usage, and billing information.
- View Service on Map – Click the drop pin icon to view and maintain the Megaport Internet connection on the map in the Megaport Portal dashboard. For more information, see Megaport Portal Dashboard.
- Delete – Click the trash icon to terminate a Megaport Internet connection. Megaport Internet connections can be individually terminated or are terminated as part of terminating the attached Port, MCR, or MVE. For more information, see Terminating a Megaport Internet Connection.
- Lock – A Company Admin can click the padlock icon to lock a Megaport Internet connection and prevent accidental modification or deletion. If an administrator has locked the connection, other users will see that it has been locked but only an administrator can unlock it. For more information, see Locking Megaport Services.
IXs
Each IX displays its name, rate limit, and location. For more information, see Internet Exchange Overview.

- Service ID – A unique alphanumeric reference associated with each service. The service ID appears next to the IX name. Click the service ID to copy it to the clipboard, which can be useful when using the Megaport API to automate your Megaport service provisioning.
- Service Diagnostics – Click the diagnostics icon to view the current operational status of the IX, including whether it is up or down, any scheduled maintenance, and any active outages. The diagnostic displays the total number of attached connections and highlights any that are down or shut down, with links to troubleshooting resources.
- IX Telemetry – Click the telemetry icon to view the peering rates of the IX. Use IX Telemetry to view and analyze your network traffic flow statistics, check whether a peer is using a lot of network traffic, and diagnose and troubleshoot any configuration or networking issues. For more information, see IX Telemetry.
- Move Connection – Move the A-End of the IX to a different Port.
For more information, see Moving IXs. - Details – Click the gear icon to view the configuration details, monitoring logs, usage, and billing information. The gear icon will be displayed in blue if the IX has been shut down. For more information, see Shutting Down an IX for Failover Testing.
- View Service on Map – Click the drop pin icon to view and maintain the IX on the map in the Megaport Portal dashboard. For more information, see Megaport Portal Dashboard.
- Delete – Click the trash icon to terminate an IX. IXs can be individually terminated or are terminated as part of terminating the attached Port. For more information, see Terminating an IX.
- Lock – A Company Admin can click the padlock icon to lock an IX and prevent accidental modification or deletion. If an administrator has locked the IX, other users will see that it has been locked but only an administrator can unlock it. For more information, see Locking Megaport Services.