Creating an MVE Integrated with Palo Alto Prisma SD-WAN
This topic describes how to create and configure a Megaport Virtual Edge (MVE) with Palo Alto Prisma SD-WAN.
Before you begin, you need user accounts with ordering permissions that provide access to the Megaport Portal. You also need a Strata Cloud Manager console account for licensing.
For details on setting up a Megaport account, see Creating an Account.
Tip
Palo Alto Networks provides documentation in the Prisma SD-WAN Administrator’s Guide.
Basic steps
This section summarizes the configuration steps using the Megaport Portal. Detailed procedures follow this basic step summary.
The basic steps are:
- Create a Prisma SD-WAN license key
- Obtain an ION Key and Secret Key (Authorization token) from Palo Alto Networks
- Enter the MVE details
- Order the Prisma MVE in the Megaport Portal
Licensing
You bring your own Prisma license for the model that you want to deploy with MVE. It is your responsibility to have the appropriate licenses for the endpoints created on the Megaport network.
To create a Palo Alto Networks Prisma MVE in the Megaport Portal, you also need a valid ION Key and Secret Key (Authorization token) from Palo Alto Networks. Tokens are generated through the Strata Cloud Manager console by a Palo Alto Networks customer administrator. Tokens can be single use or multi use, are valid for 96 hours, and will be assigned to the virtual appliance during deployment.
For more information, see the Prisma SD-WAN Administrator’s Guide.
Creating an MVE in the Megaport Portal
When creating an MVE, select a location that supports the MVE and is in a compatible metro area for your network design. You can connect multiple locations to an individual MVE. For more information about location details, see Planning Your Deployment.
You can deploy multiple MVEs within the same metropolitan area for redundancy or capacity reasons. As part of the MVE creation process, you will also create a Megaport Internet connection.
To create an MVE
- In the Megaport Portal, go to the Services page.
-
Click Add Services, then select MVE.

-
Select the required Palo Alto Prisma SD-WAN product.
-
Select the software version.
The MVE will be configured to be compatible with that version of Prisma.
-
Click Next.
-
Specify the MVE details:
-
Location – Select the MVE location.
Select a location geographically close to your target branch and/or on-premises locations.
The country you choose must be a market in which you have already registered.
If you haven’t registered a billing market in the location where you will deploy the MVE, follow the procedure in Enabling Billing Markets.
You can use the Search field to find the Port name, Country, Metro City, or address of your destination Port. You can also filter by diversity zone.
-
Diversity Zone – Select a diversity zone.
You can select either Red or Blue, or select Auto and have Megaport select the zone for you. The selected or allocated diversity zone will be displayed on the location details through the rest of the provisioning, and on the Summary page at the end.
For more information, see MVE Diversity. -
Size – Select a size from the list of available sizes. Available sizes are highlighted in green and labeled Available. The sizes support varying numbers of concurrent connections, and individual partner product metrics vary slightly.
Note
If the MVE size you want is not in the list, then there is not enough capacity at the selected location. You can either select another location with enough capacity or contact your Account Manager to discuss requirements.
-
Minimum Term – Select No Minimum Term, 12 Months, 24 Months, 36 Months, 48 Months, or 60 Months. Longer terms result in a lower monthly rate. 12 Months is selected by default. Take note of the information on the screen to avoid early termination fees (ETF).
Enable the Minimum Term Renewal option for services with a 12, 24, 36, 48 or 60-month term to automatically renew the contract at the same discounted price and term length at the end of the contract. If you don’t renew the contract, at the end of the term, the contract will automatically roll over to month-to-month contract for the following billing period, at the same price, without term discounts.
For more information, see MVE Pricing and Contract Terms.
-
-
Click Next.
-
Specify the Prisma-specific settings:
-
ION Key – Enter the ION Key that was generated from the authorization token in the Prisma SD-WAN portal.
-
Secret Key – Enter the Secret Key that was generated from the authorization token in the Prisma SD-WAN portal.
-
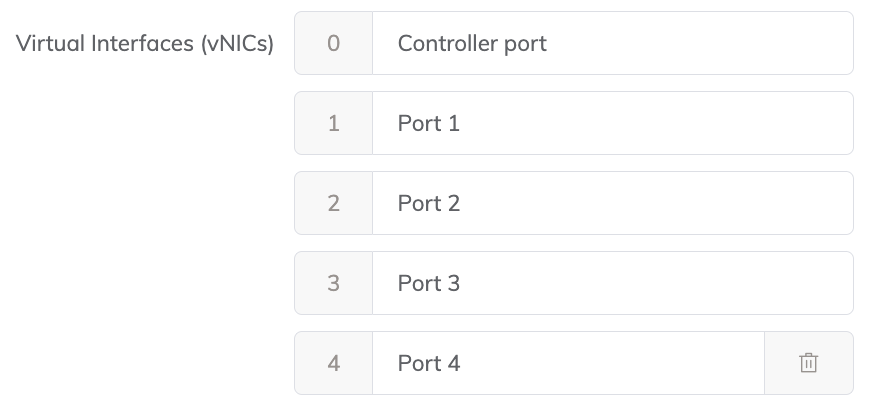
Virtual Interfaces (vNICs) – Each MVE is configured with vNICs by default. The 3108v, 3104v, and 3102v models contain four vNICs and the 7108v model contains three vNICs by default, each with the first vNIC (vNIC 0) configured for the management/controller interface. The remaining vNICs can be assigned roles such as Public WAN, WAN, LAN, and so on. To change the name, type over the name text in the box. You can also change the vNIC name later, after the MVE has been deployed.
You can add a total of five vNICs to the MVE. For more information, see Types of vNIC Connections.
To add a vNIC:
-
Click + Add.
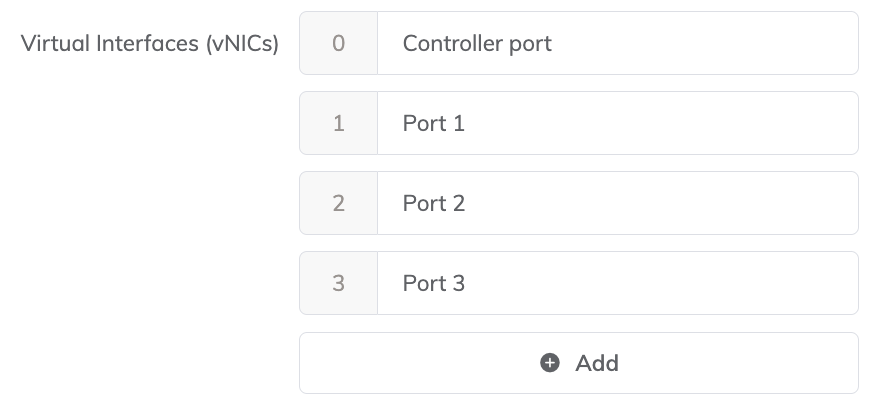
-
Enter a name for the vNIC.
Note
If you want to increase or decrease the number of vNICs on this MVE after it has been deployed, you will have to delete the entire MVE and recreate it. You cannot add or delete vNICs on a deployed MVE.
-
-
Megaport Marketplace – By default, each service is private to your enterprise and consumes services from the Megaport network for your own internal company, team, and resources. When set to private, the service is not searchable in the Megaport Marketplace, however, others can still connect to you using a service key. Megaport Marketplace visibility is controlled on your Megaport Marketplace profile. For more information about how to make your service visible to the Megaport Marketplace, see Adding services to your profile.
-
-
Click Next.
-
Specify optional settings:
-
MVE Name – Enter a name for the MVE that is easily identifiable, particularly if you plan on provisioning more than one. This name appears in the Megaport Portal.
The MVE name is auto-generated based on the location name and shown on the Summary page. You can override it by entering your own.
-
Service Level Reference (optional) – Specify a unique identifying number for your Megaport service to be used for billing purposes, such as a cost center number, unique customer ID, or purchase order number. The service level reference number appears for each service under the Product section of the invoice. You can also edit this field for an existing service.
-
Resource Tags – You can use resource tags to add your own reference metadata to a Megaport service.
To add a tag:- Click Add Tags.
- Click Add New Tag.
- Enter details into the fields:
- Key – string maximum length 128. Valid values are a-z 0-9 _ : . / \ -
- Value – string maximum length 256. Valid values are a-z A-Z 0-9 _ : . @ / + \ - (space)
- Click Save.
If you already have resource tags for that service, you can manage them by clicking Manage Tags.
Warning
Never include sensitive information in a resource tag. Sensitive information includes commands that return existing tag definitions and information that will identify a person or company.
-
-
Confirm the configuration and pricing on the Summary page.
The monthly rate is based on location and size.
-
Click Add MVE.
You are prompted to create a Megaport Internet connection. A Megaport Internet connection provides connectivity and allows MVE to register and communicate with Prisma SD-WAN.
To create the Megaport Internet connection
-
Click Create Megaport Internet to proceed (recommended), or click Not now to provision internet access at a later time.
Note
MVE requires connectivity to the internet onto the management plane virtual interface. You can either provision a Megaport Internet connection or configure a third-party internet connection using a private VXC. We strongly recommend that you create a Megaport Internet connection for the initial MVE startup and deployment to ensure that the MVE is provisioned and functioning correctly.
-
Select the target Port (the internet router).
The B-End of a Megaport Internet connection can be anywhere that Megaport Internet is available.
You can use the Search field to find the Port name, Country, Metro City, or address of your destination Port. You can also filter by diversity zone. -
Click Next.
-
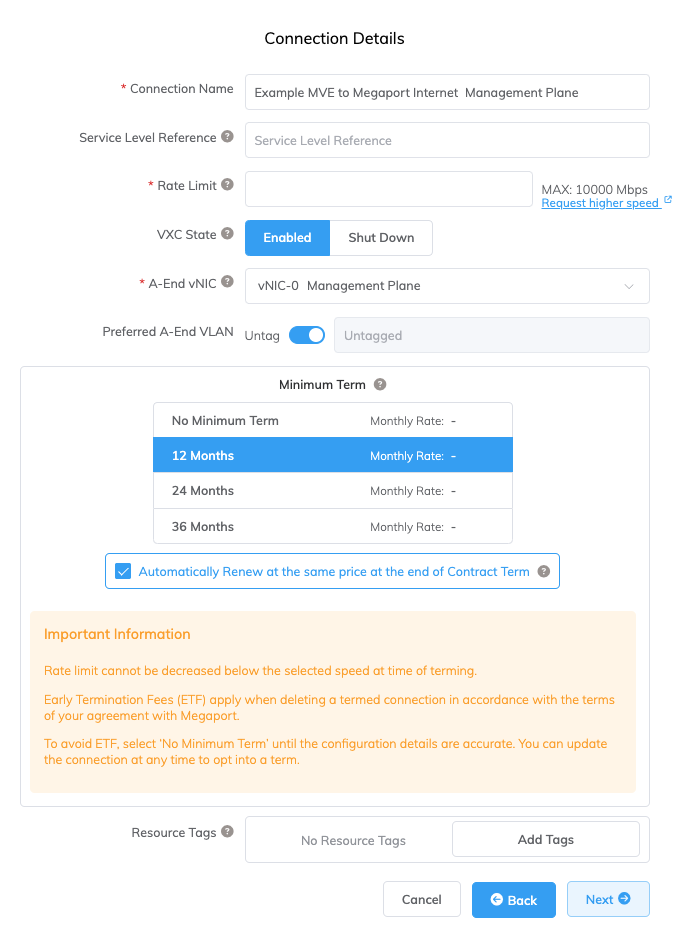
Specify the connection details:
-
Connection Name – The name of your Megaport Internet connection to be shown in the Megaport Portal.
-
Service Level Reference (optional) – Specify a unique identifying number for your Megaport service to be used for billing purposes, such as a cost center number, unique customer ID, or purchase order number. The service level reference number appears for each service under the Product section of the invoice. You can also edit this field for an existing service.
Tip
Use the same Service Level Reference numbers for the Megaport Internet connection and MVE to help identify the matching pair in your invoice.
-
Rate Limit – The speed of your connection in Mbps. The rate limit is configurable starting from 20 Mbps and can scale to several Gbps or more, in 1 Mbps increments. Available speed tiers might vary by location and service type. You can change the speed as required after you create the Megaport Internet connection. Monthly billing details appear based on location and rate limit.
-
VXC State – Select Enabled or Shut Down to define the initial state of the connection. For more information, see Shutting Down a VXC for Failover Testing.
Note
If you select Shut Down, traffic will not flow through this service and it will behave as if it was down on the Megaport network. Billing for this service will remain active and you will still be charged for this connection.
-
A-End vNIC – Select vNIC-0 for initial management access.
-
Preferred A-End VLAN (optional) – Select Untagged to remove VLAN tagging and allow first-time administrative login to the device.
-
Minimum Term – Select No Minimum Term, 12 Months, 24 Months, 36 Months, 48 Months, or 60 Months. Longer terms result in a lower monthly rate. 12 Months is selected by default. Take note of the information on the screen to avoid early termination fees (ETF).
Enable the Minimum Term Renewal option for services with a 12, 24, 36, 48 or 60-month term to automatically renew the contract at the same discounted price and term length at the end of the contract. If you don’t renew the contract, at the end of the term, the contract will automatically roll over to month-to-month contract for the following billing period, at the same price, without term discounts.
For more information, see Megaport Internet Pricing and Contract Terms and VXC, Megaport Internet, and IX Billing.
-
Resource Tags – You can use resource tags to add your own reference metadata to a Megaport service.
To add a tag:- Click Add Tags.
- Click Add New Tag.
- Enter details into the fields:
- Key – string maximum length 128. Valid values are a-z 0-9 _ : . / \ -
- Value – string maximum length 256. Valid values are a-z A-Z 0-9 _ : . @ / + \ - (space)
- Click Save.
If you already have resource tags for that service, you can manage them by clicking Manage Tags.
Warning
Never include sensitive information in a resource tag. Sensitive information includes commands that return existing tag definitions and information that will identify a person or company.
-
-
Click Next to proceed to the connection detail summary.
-
Click Add VXC to move this configuration to your cart.
-
Repeat these steps to provision any additional VXCs.
-
Click Review Order to proceed through the checkout process, or click Save to save the configured services before placing the order.
-
Review the Important Information section and confirm agreement with the Service Agreements.
If you do not have a promotion code, skip to the Order Now step. If you do have a promotion code, enter it into the Enter discount code field then click Apply. Alternatively, if a code already appears in the Discounts field, verify it is correct and click Apply.
The promotional discount appears below the Standard Term discount. This discount is not reflected in the Monthly Rate shown here, it is applied at the time of billing. If an invalid or expired code causes an error with your order, contact your Megaport Account Manager for a replacement code.
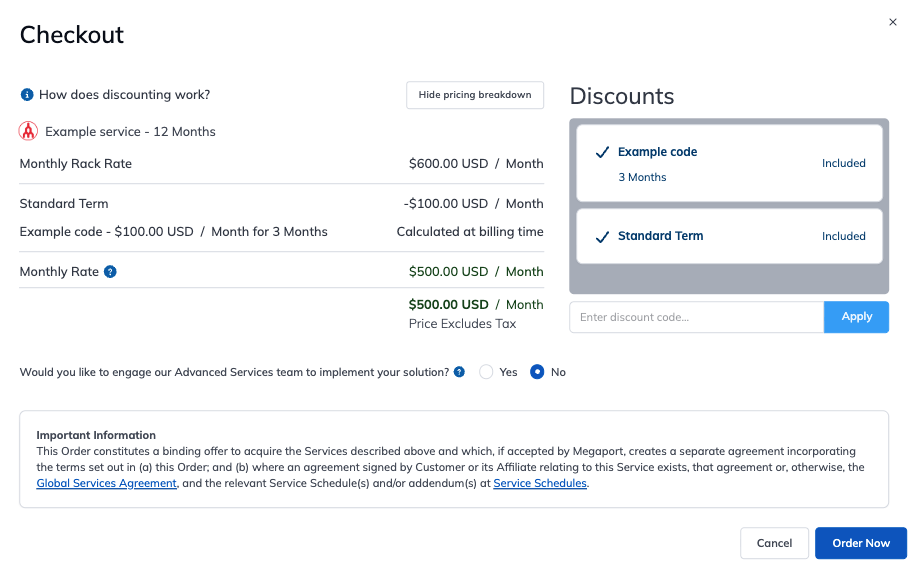
If you entered an incorrect promotion code, you can remove it by clicking Remove.
-
Click Order Now.
Ordering MVE provisions the appliance and assigns IP addresses from the Megaport SDN. The MVE provisioning takes only a few minutes to complete. The provisioning process spins up a Palo Alto Prisma SD-WAN.
Configuring the MVE in Strata Cloud Manager
After creating the MVE, you need to configure the device in Strata Cloud Manager. In Strata Cloud Manager, perform the following configuration tasks.
For full details on these tasks, see the Strata Cloud Manager documentation.
-
Claim the device
-
Assign the device to the data center site
-
Set the data center site to Control Mode – This allows you to configure routing features for the device.
-
Give the device a name – As a recommended practice, name the device the same as the MVE in the Megaport Portal.
Next steps
Once the MVE is provisioned with an Active status, the next step is to connect a VXC to a Cloud Service Provider (CSP), a local port, or a third-party network. You can optionally connect a physical Port to the MVE through a private VXC or connect to a service provider in the Megaport Marketplace.
For more information, see Creating a VXC.