Using Packet Filters with NAT Gateway
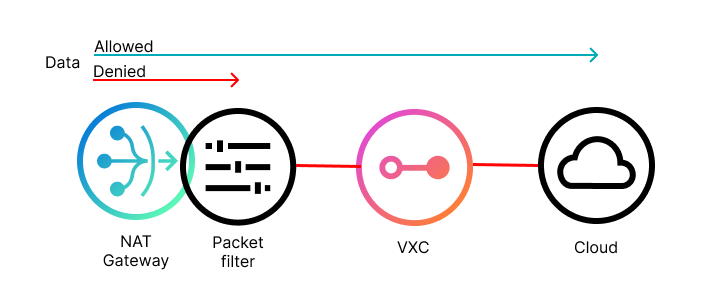
Packet filters control which traffic flows through your Megaport NAT Gateway (NAT Gateway). Packet filters allow data from defined IP addresses to pass through, and deny access to data from other defined IP addresses.
Packet filters are defined on a NAT Gateway after it has been ordered and has gone live. You then edit the configuration of your NAT Gateway to add the packet filters that you need. When you configure a connection to your NAT Gateway, you can add your packet filters to either the A-End or B-End of the connection, depending on your NAT Gateway’s location.
Packet filter rules
- Packet filter lists are defined on a deployed NAT Gateway.
- Packet filter lists are applied to the VXC interface - either A-End or B-End, depending where your NAT Gateway is located.
- If no packet filters are applied to the connection, then all traffic is allowed to flow through your NAT Gateway.
- When a packet filter is applied to the connection, any traffic not permitted by the packet filter is denied.
- Packet filters support the following matches:
- Source IP Address
- Destination IP Address
- IP Protocol
- Source Port/Port Range (for TCP and UDP protocols)
- Destination Port/Port Range (for TCP and UDP protocols)
- Packet filters support both IPv4 and IPv6.
- You can create up to 20 packet filter lists.
- Each packet filter list can contain up to 50 entries.
Creating packet filters
You can only create packet filters on a deployed NAT Gateway. You can create a maximum of 20 packet filter lists per NAT Gateway.
To create a packet filter list
-
Create, order, and deploy a NAT Gateway.
For more information, see Creating a NAT Gateway. -
On the Services page, find your new NAT Gateway and click the gear icon next to the NAT Gateway in the Portal.
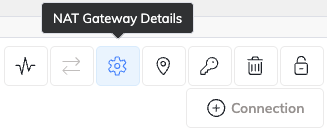
The NAT Gateway Configuration page appears.
-
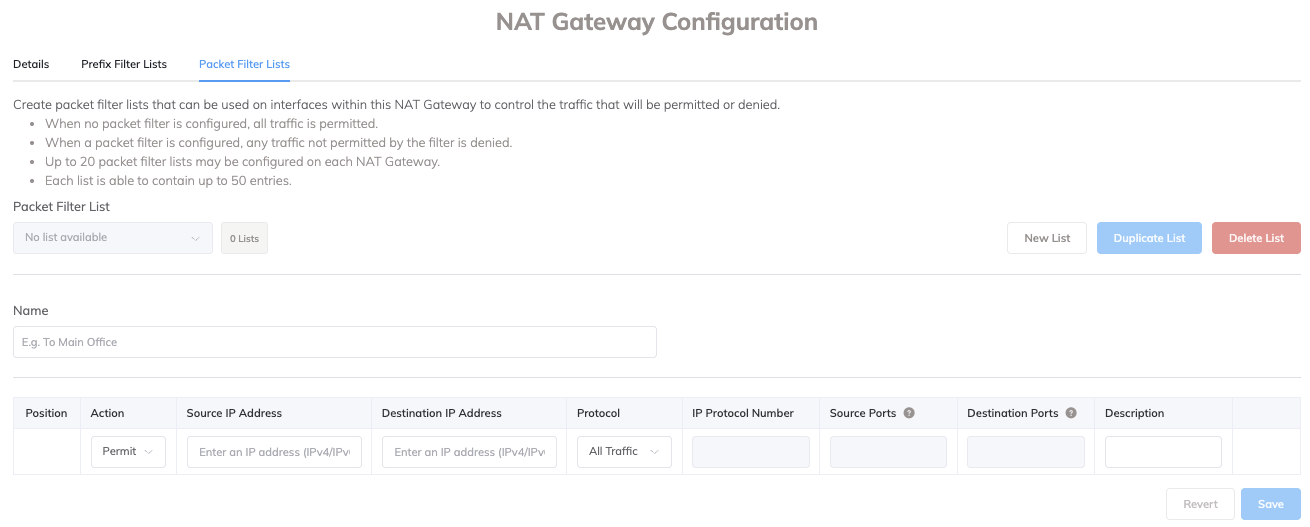
Select the Packet Filter Lists tab.
The Packet Filter List page appears.
-
Click New List to add a new list.
-
Enter a name for your packet filter list in the Name field.
-
Enter your filter details.
- Action – Select Permit or Deny from the drop-down list.
- Source IP Address – Enter the source IP address you want to filter traffic from.
-
Destination IP Address – Enter the destination IP address of your filter.
Note
The source IP address and destination IP address must be the same format. For example, they must both be IPv4 or IPv6.
-
Protocol – Select the protocol to filter traffic on. If the protocol you require is not on the list, you can select Custom.
- IP Protocol Number – This will be populated automatically when you choose a protocol from the drop-down list. If you choose Custom, you must enter a number from the list of assigned internet protocol numbers.
- Source Ports – You can specify a source port or a range of ports in the format 1111-9999.
- Destination Ports – Specify a destination port or a range of ports.
- Description (optional) – Add a description.
Use the position icon at the beginning of the row to reorder the list using drag and drop.
Click the trash icon at the end of the row to delete an entry in a list.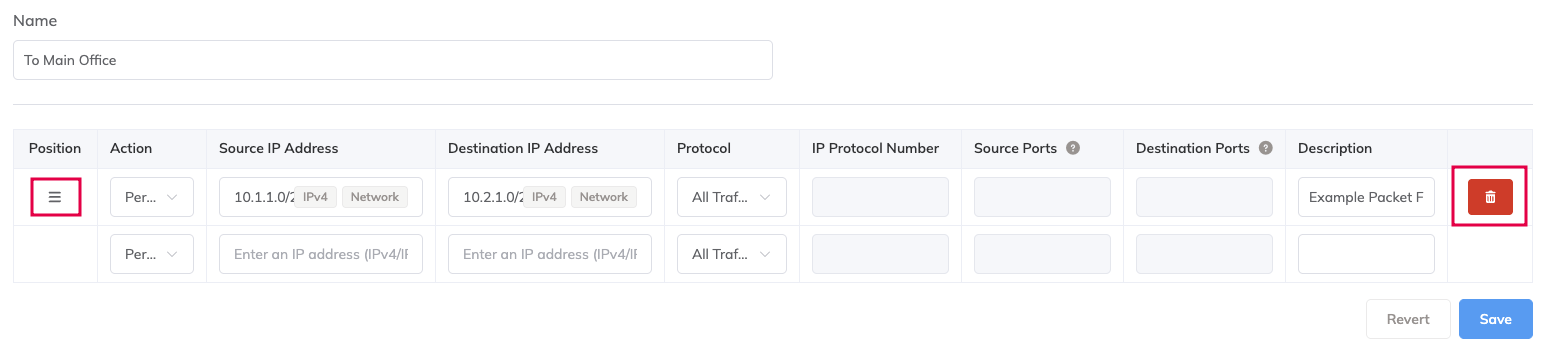
-
Add as many entries to the list as you need, up to a maximum of 50 per list.
-
Click Save.
Editing a packet filter list
Add or delete entries from a packet filter list, or update the settings of each entry.
To edit a packet filter list
-
Select the list you want to edit from the drop-down list.
-
Make your changes.
You can change any part of the list. -
Click Save.
Duplicating a packet filter list
You can duplicate a list to speed up filter configuration.
To duplicate a packet filter list
-
Select the list you want to duplicate from the drop-down list.
-
Click Duplicate List.
-
Enter a name for the list in the Name field.
-
Edit the required details in the list to make it unique.
-
Click Save.
Deleting a packet filter list
You can delete entire lists if they are not required any more or are out of date.
To delete a packet filter list
-
Select the list you want to delete from the drop-down list.
-
Click Delete List.
-
Click OK to confirm.
Applying a packet filter list
You can apply a packet filter list to the VXC when you create a connection from your NAT Gateway.
To apply a packet filter list
-
Create a connection from the NAT Gateway with the packet filter lists defined.
For more information, see Creating a NAT Gateway VXC. -
In the VXC definition, enter the connection details then click Next.
-
On the NAT Gateway A-End page, enter these details:
-
Interface IP Addresses – Enter the A-End interface IP address and subnet mask as required for your network.
-
Packet Filters – Select a packet filter list from the Inbound or Outbound drop-down list, as required for your configuration.
Note
You can also fill in other fields here, such as IP addresses or BGP connections.
For more information, see Configuring a NAT Gateway VXC. -
-
Click Next.
-
Read the Summary page and click Add VXC.