Megaport NAT Gateway BGP Prefix Filtering
This topic describes Megaport NAT Gateway (NAT Gateway) BGP prefix filtering, which provides advanced control over route advertisements using CIDR-based prefix lists.
For an overview of route filtering concepts, see Megaport NAT Gateway Route Filtering.
Before you begin
Before configuring a route filter, plan the implementation by determining your requirements. Then create a route filter based on these requirements.
Deployment considerations
- You need to create a NAT Gateway, as described in Creating a NAT Gateway.
- You can configure route filters before or after configuring BGP, as route filters work on existing or new BGP connections.
- You might want to shut down BGP route exchange if you plan to add several BGP sessions across your Virtual Cross Connects (VXCs) before they exchange route information and route filters are applied. When you are finished configuring, you can then go into the relevant BGP sessions and enable them. For more information, see Configuring a NAT Gateway VXC.
Important
NAT Gateway route filtering supports and relies on the BGP Route Refresh mechanism to update routes using a soft reset when filters change the routing. If Route Refresh is not enabled on all active BGP connections, you need to shut down and re-enable the connection in the Megaport Portal to update routes. If you have enabled the BGP Shut Down option, routes will be updated when you disable BGP Shut Down, that is, re-enable BGP.
Filtering by BGP prefix
A prefix is the destination network of the route. An IP network is a group of IP addresses. The network address is the prefix.
- IPv4 address: 192.0.2.1
- IPv4 network prefix: 192.0.2.0/24 (includes 192.0.2.0 - 192.0.2.255)
A prefix filter is a named list of IP networks. Each entry consists of an IPv4 or IPv6 CIDR prefix or range of prefixes that you define and manage. A CIDR range means that you can filter several networks using a single routing entry.
A prefix filter can be applied to a BGP connection to selectively identify routes to advertise or receive from neighboring routers. You can also make a list of routes not to advertise or receive, allowing everything else. When you define a prefix filter, the NAT Gateway accepts only routes matching the prefix information. This filter type is useful in environments with a large list of prefixes and peers to manage. You can apply the same prefix filter to more than one BGP peer, reducing manual work and eliminating potential errors.
A prefix filter contains:
- A list of IPv4 or IPv6 prefixes (for example, 10.0.0.0/16) and a name associated with the list.
- A match condition. You can specify exact matches with specific routes or less precise matches based on prefix length.
- An action that is carried out if the prefix and the match condition are both true (for example, Permit).
In a prefix filter, rules are evaluated from the top down. Evaluation stops with the first match. An implicit deny is applied to routes that don’t match any prefix list entry.
Prefix filter list actions
-
Inbound prefix filtering using a permit action – NAT Gateway applies the prefix filter to inbound BGP route advertisements from the neighbor. Routes not matching the prefixes on this list are denied at the earliest possible point and are never used by the NAT Gateway.
-
Inbound prefix filtering using a deny action – NAT Gateway applies the prefix filter to inbound BGP route advertisements from the neighbor. Routes matching the prefixes on this list are blocked. All other prefixes are allowed to enter the NAT Gateway routing table.
-
Outbound prefix filtering using a permit action – NAT Gateway applies the prefix filter to outbound routes. Routes matching the prefix list are advertised to the BGP neighbor and all other routes are filtered.
-
Outbound prefix filtering using a deny action – NAT Gateway applies the prefix filter to outbound routes. Routes matching the prefix list are blocked from the BGP neighbor and all other routes are advertised.
Creating a BGP prefix filter
Each NAT Gateway can manage up to 50 prefix filters. Each prefix filter can contain up to 200 prefix entries. Each prefix filter is independent and you can apply only one list per BGP neighbor at a time.
To create a prefix filter
-
On the Megaport Portal Services page, select a NAT Gateway.
The NAT Gateway must have a Live status before you can create a prefix filter.
The NAT Gateway Configuration page appears. -
Under NAT Gateway Configuration, select the Prefix Filter Lists tab.
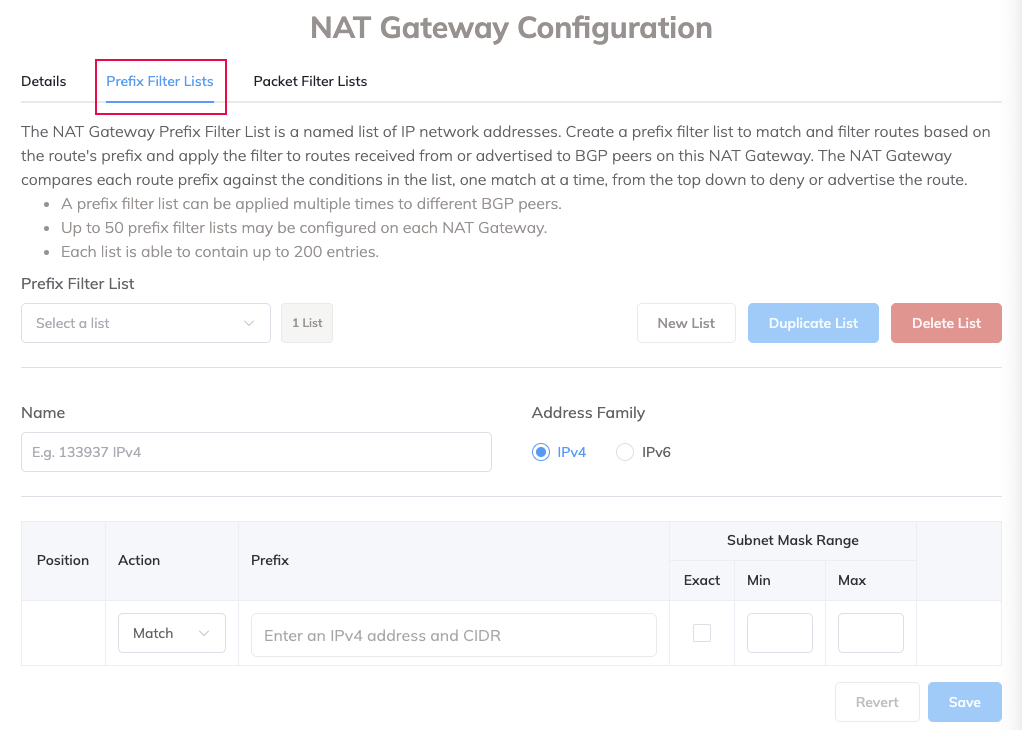
-
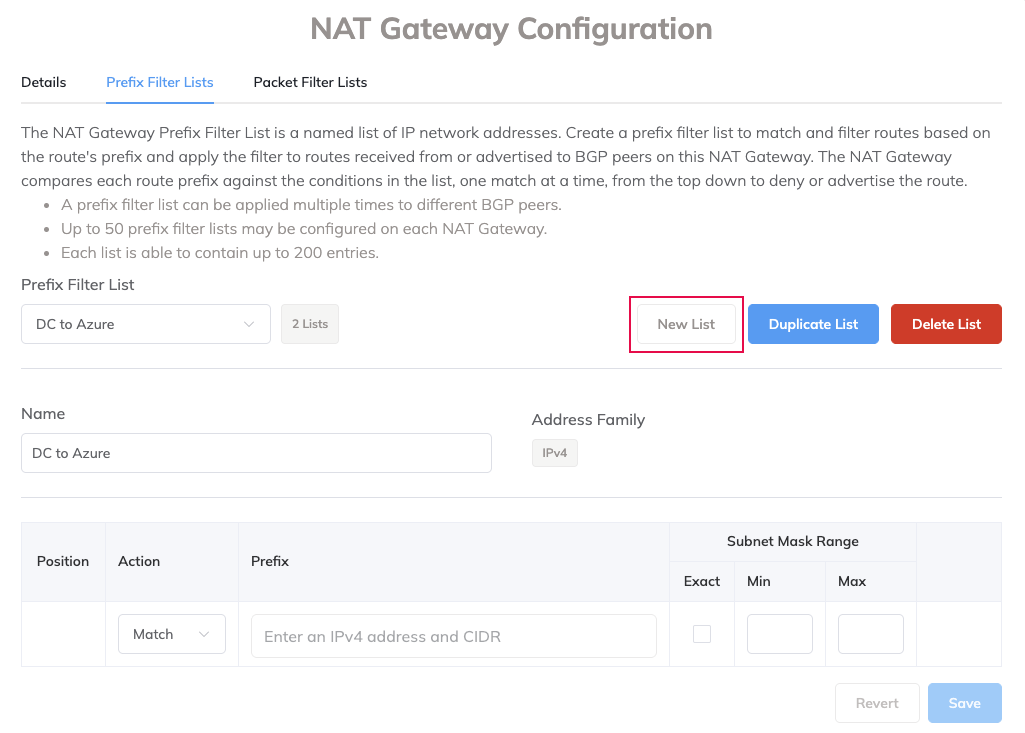
Click New List.
-
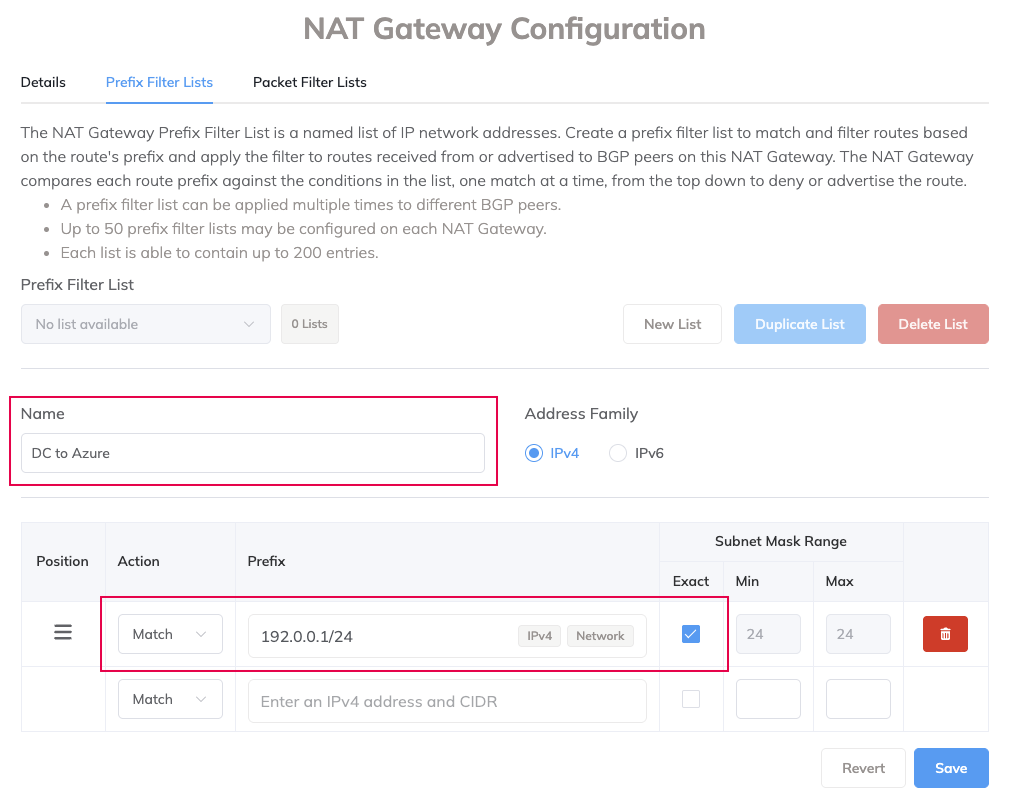
Enter a unique descriptive name to identify the filter. The description length can range between 1 and 100 characters.
This prefix name will appear in the drop-down list of prefix lists in the Filters tab of the BGP Configuration screen.Note
Prefix filters cannot be shared among NAT Gateways. You must re-create prefix filters for each NAT Gateway.
-
Select either IPv4 or IPv6 format.
The prefixes must use the same address format. A warning appears if you try to mix the two formats within the same list. - Select a position for the rule.
The rule position is critical because evaluation stops with the first match and the rest of the list is ignored. If no conditions match, NAT Gateway applies an implicit deny. -
Select the action to take for the filter: Match or Don’t Match.
-
Enter the prefix subnets in CIDR notation. For IPv4, use a.b.c.d/x, where a.b.c.d is the exact prefix and x is the exact prefix length.
Note
This field also accepts a dotted-quad notation for the subnet mask (for example, 255.255.255.0 instead of /24).
-
Prefixes can be exact-match-only or you can specify the number of bits in the mask to use as matching criteria. Select the subnet mask criteria:
-
Exact – Limits the filter to only this specific prefix. Any smaller prefixes contained within the prefix are not matched.
-
Min and Max – Specify a range of subnet mask lengths to match for more flexibility. Specify how many bits of the subnet mask the filter needs to match, starting with the most significant bit in the leftmost position of the address. When you specify a subnet mask range, the filter now has two conditions to match: the route must be within the a.b.c.d/x boundary and it must have a mask length between the minimum and maximum range. Shorter prefixes match more addresses, while longer prefixes match fewer.
-
Min – The minimum prefix length to be matched. Routes with a prefix length greater than or equal to this value will be matched. Valid values are from 0 to 32 (IPv4), or 0 to 128 (IPv6). The Min must be less than or equal to the Max value.
-
Max – The maximum prefix length to be matched. Routes with a prefix length less than or equal to this value will be matched. Valid values are from 0 to 32 (IPv4), or 0 to 128 (IPv6). The Max must be greater than or equal to the Min value.
For example, 10.0.0.0/8 with a Min of 16 matches 10.0.0.0/16, 10.0.1.0/24, 10.0.0.1/30 but does not match 10.2.0.0/15.
Note
The Min and Max values on a NAT Gateway are similar to Cisco’s ge and le values used with the ip prefix-list CLI command.
When using the Min and Max values, you must satisfy this condition:
Prefix length < Max ≤ Min
-
-
Click Save.
-
Click Next.
Note
Use a CIDR calculator to ensure that all data is valid and within range.
The next step is to apply the filter to the BGP connection, as described in Applying a prefix filter to a BGP connection.
Example filter entries
- Exact match on 1.2.3.0/24 – Exactly matches the prefix 1.2.3.0 with a subnet mask of 255.255.255.0
- Match 192.2.3.0/24 min 32 – Checks the first 24 bits of the prefix 192.2.3.0 that have a subnet mask of 32
- Match 10.0.12.0/24 max 32 – Matches all 10.0.12.x networks that have a subnet mask less than or equal to 32
Creating a prefix filter based on an existing prefix filter
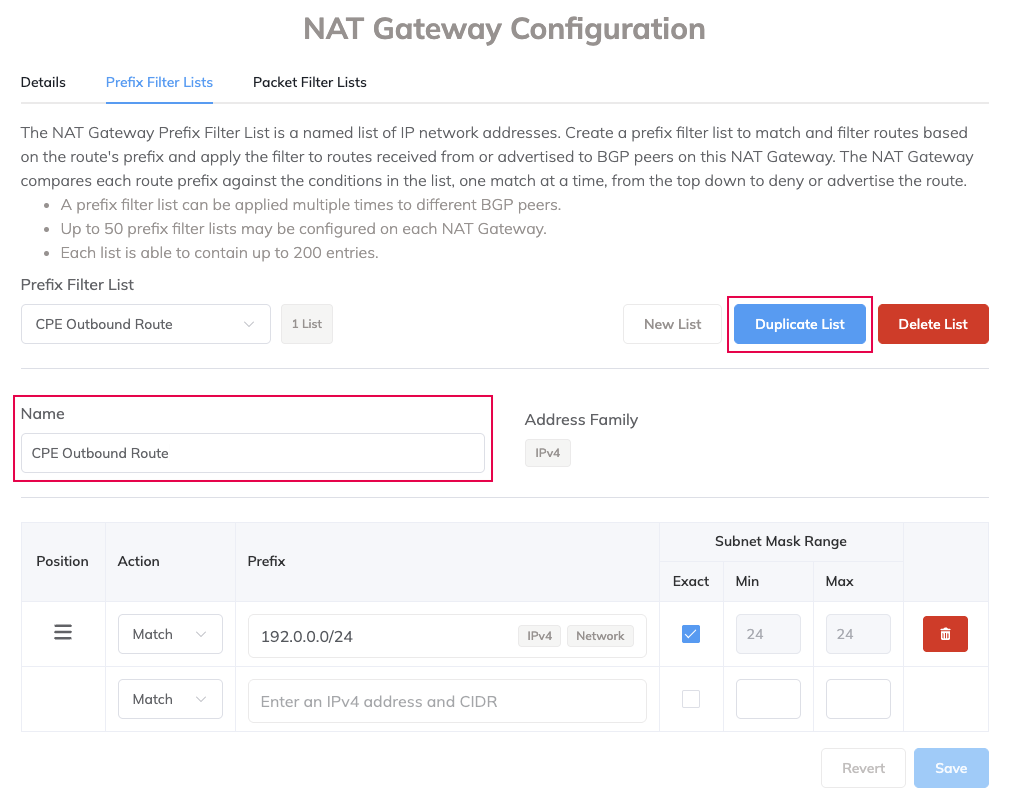
If you want to create a filter that is similar to an existing filter, you can make a copy of the existing filter.
To create a prefix filter based on an existing filter
- Select a NAT Gateway.
The NAT Gateway Details page appears. - Under NAT Gateway Configuration, select the Prefix Filter Lists tab.
- In the Prefix Filter List, select the filter list you want to copy.
-
Click Duplicate List.
-
Enter a unique descriptive name to identify the new filter.
This prefix name will appear in the drop-down list of prefix lists in the Filters tab of the BGP Configuration screen. - Make any changes to the parameters unique to this filter.
- Click Save.
- Click Next.
Applying a prefix filter to a BGP connection
Prefix filters are configured directly on NAT Gateway and then attached to a BGP connection.
To apply a prefix filter
- Select the VXC attached to the NAT Gateway, then select A-End.
- Next to the BGP connection, click Edit.
-
Select the Filters tab.
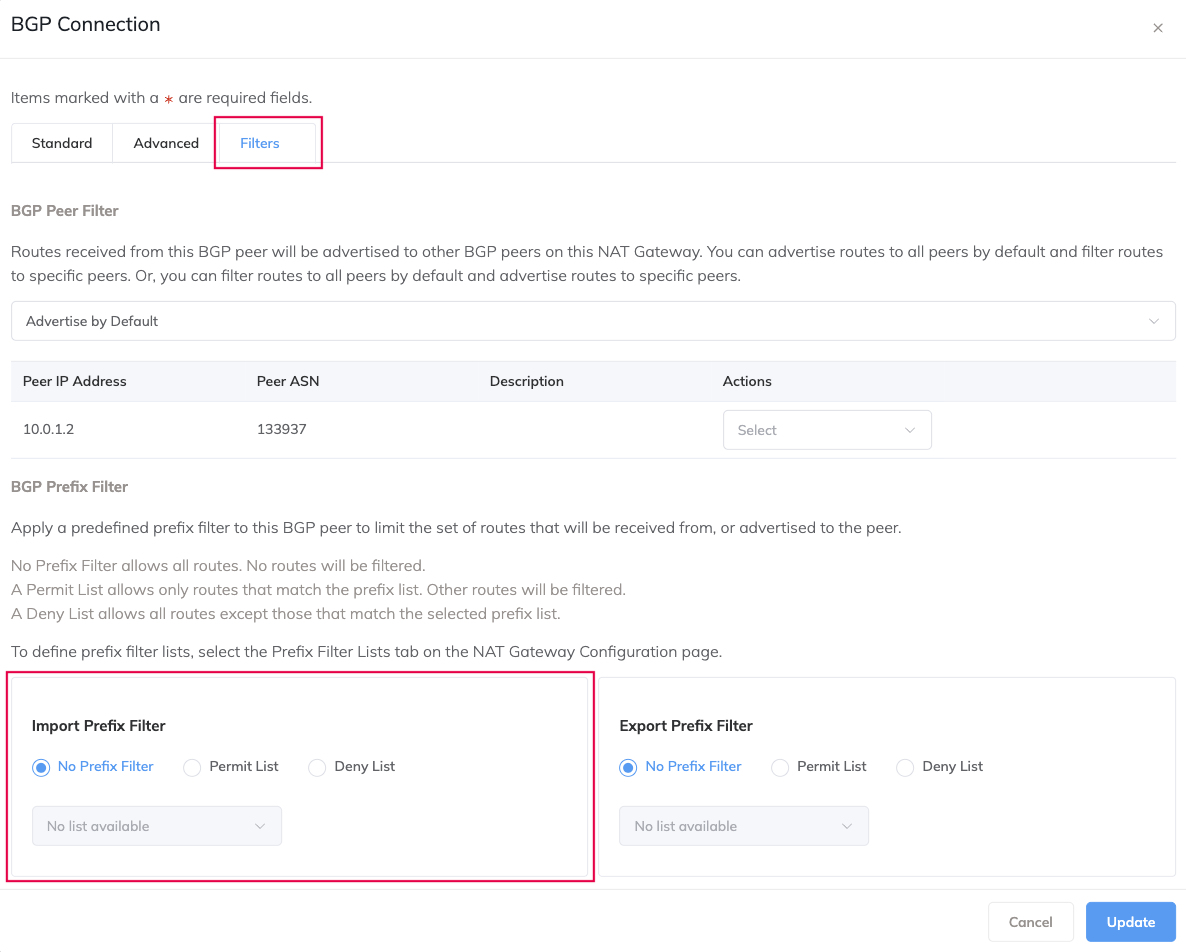
-
Under BGP Prefix Filter, you can apply an import filter and an export filter:
- Import – The NAT Gateway applies the prefix filter to inbound advertisements from the neighbor.
- Export – The NAT Gateway applies the prefix filter to outbound advertisements to the neighbor.
Select whether the filter will limit the set of routes that the NAT Gateway will receive from, or advertise to the peer. These options are available:
- No Prefix Filter – Allows all routes. No routes will be filtered.
- Permit List – Allows only routes that match the prefix list. Other routes will be filtered.
- Deny List – Allows all routes except those that match the selected prefix list.
-
Select the prefix filter you want to apply from the drop-down list.
- Click Update.
- Click Save.
After applying the filter, re-enable route exchange if it is disabled. For more information, see Configuring a NAT Gateway VXC.
A prefix filter can be attached to more than one BGP connection.
Maintaining prefix filters
In a prefix filter list, rules can be added, deleted, and reordered.
Adding a rule to an existing prefix filter
Each prefix filter can contain up to 200 rules. Duplicate rules are not allowed.
To add a rule to an existing filter
- Select a NAT Gateway on the Services page.
The NAT Gateway Details page appears. - Under NAT Gateway Configuration, select the Prefix Filter Lists tab.
- Select a prefix list from the Prefix Filter List drop-down list.
- Add the rule.
-
Click Save.
You must click Save to apply rule changes. Switching to another list without saving prompts a warning that the changes will be lost.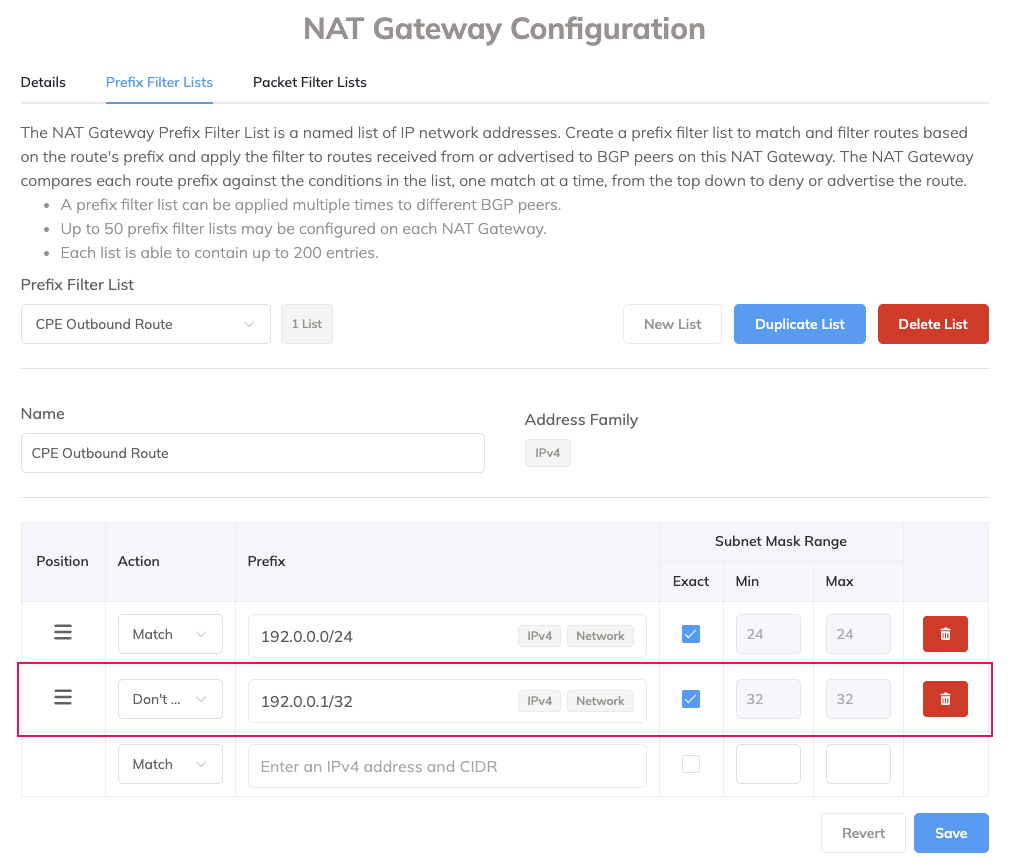
Deleting a rule from a prefix filter
To delete a rule from a filter
- Select a NAT Gateway on the Services page.
The NAT Gateway Details page appears. - Under NAT Gateway Configuration, select the Prefix Filter Lists tab.
- Select a prefix list from the Prefix Filter List drop-down list.
- At the end of the rule row, click the trash icon.
- Click Delete.
- Click Save.
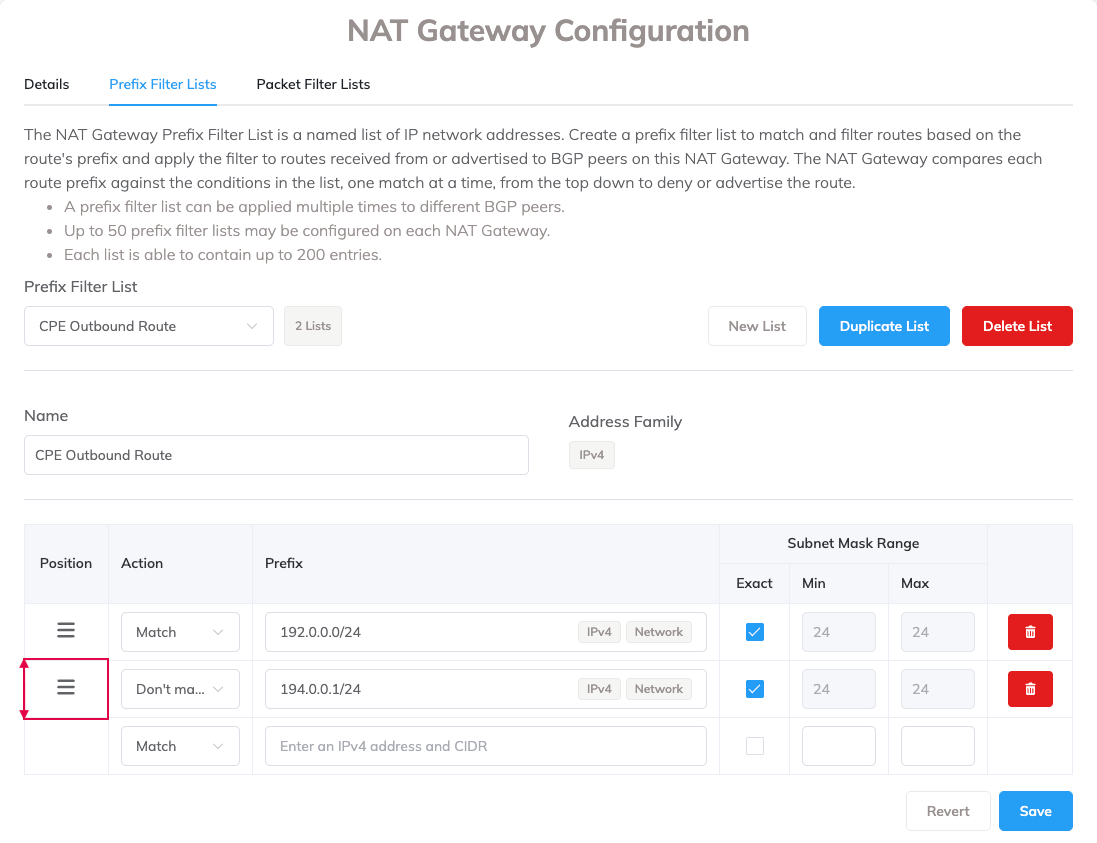
Reordering rules in a prefix filter
In a prefix filter list, the rule position is critical because rules are evaluated one at a time, starting at the top of the list down. Evaluation stops with the first match.
To reorder a rule position
-
Drag the icon in the Position column to a different location and release.
Deleting a prefix filter list
To delete a prefix filter list, you must first remove any other resources that reference it, such as VXCs. If you try to delete a prefix filter list before removing its resources, a dialog lists the resources in use.
Note
All prefix lists are automatically removed from a NAT Gateway when it is terminated.
To delete a prefix filter
- Select a NAT Gateway on the Services page.
The NAT Gateway Details page appears. - Under NAT Gateway Configuration, select the Prefix Filter Lists tab.
- Select a prefix list from the Prefix Filter List drop-down list.
- Click Delete List.
- Click OK.