Creating a NAT Gateway
This topic describes how to create a Megaport NAT Gateway (NAT Gateway). The Megaport Portal guides you through selecting a location, specifying NAT Gateway configuration details, and placing the order.
Before you begin, you need to set up your Portal account. You will only be able to create NAT Gateways in billing markets you are registered in. For more information, see Setting Up a Megaport Account.
To create a Megaport NAT Gateway
- Log in to the Megaport Portal and choose Services.
- Click Add Services, then select NAT Gateway.

- Select a diversity zone.
You can select either Red or Blue, or select Auto and have Megaport select the zone for you. The selected or allocated diversity zone will be displayed on the location details through the rest of the provisioning, and on the summary page at the end.
For more information, see NAT Gateway Diversity.

- Select the preferred data center location for the NAT Gateway. The country you choose must be a market in which you have already registered.
You can use the Search field to find the data center name, Country, Metro City, or address of your preferred data center. - Click Next.
The NAT Gateway configuration page appears.
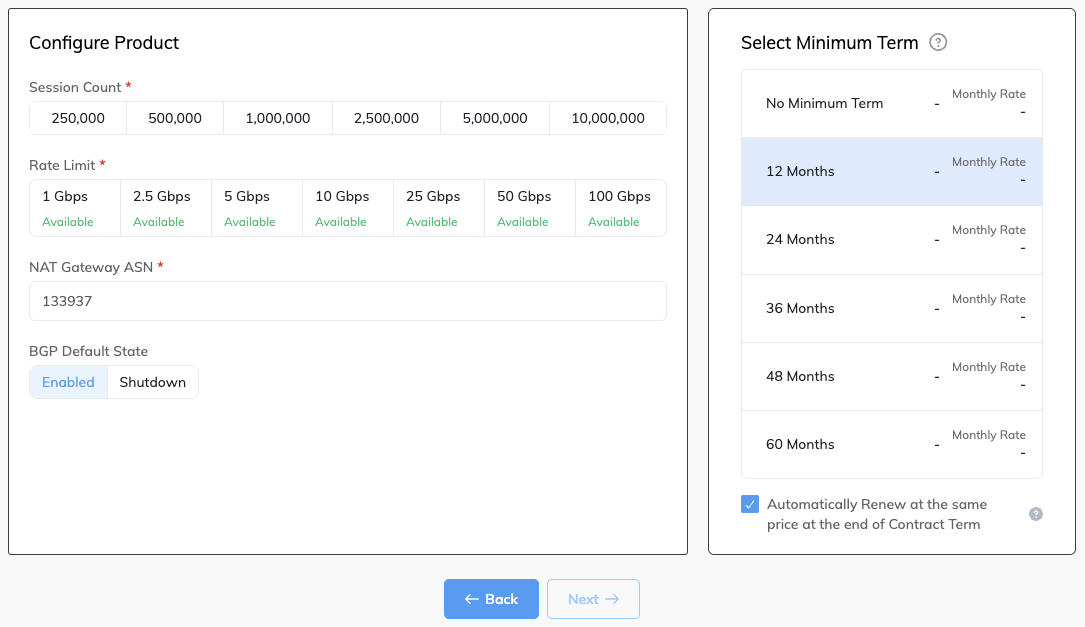
- Select a Session Count.
This is the maximum number of concurrent sessions the NAT Gateway can manage.
The session count is fixed for the life of the service. - Select the Rate Limit.
The rate limit is an aggregate capacity that determines the speed for all connections through the NAT Gateway.
The rate limit is fixed for the life of the service. -
Specify the details for the NAT Gateway:
- NAT Gateway ASN – Specify the autonomous system number (ASN) of this NAT Gateway, or use the default public ASN, 133937, supplied by Megaport. For most configurations, the default ASN is suitable. The ASN is used for BGP peering sessions on any VXCs connected to this NAT Gateway. See the documentation for your cloud providers before overriding the default value. For example, some public cloud services require the use of a public ASN and Microsoft blocks an ASN value of 65515 for Azure connections.
For more information about overriding the NAT Gateway ASN, see Configuring Advanced BGP Settings. - BGP Default State – Select whether BGP connections are enabled or shut down by default. Select Enabled (the default) if you want any new BGP sessions you configure to be live as soon as you save the configuration. Select Shutdown if you want any new BGP sessions you configure to be left in a shut down state when you save the configuration.
For example, you might select Shutdown if you plan to add multiple BGP sessions across your Virtual Cross Connects (VXCs) but want to complete additional router configuration before allowing them to exchange route information. When you are finished configuring your routers, you can then go into the relevant BGP sessions and enable them.
You can override this setting for an individual connection in the BGP setup screen. For more information about overriding the BGP state for an individual connection, see Shutting down a BGP connection. -
Minimum Term – Select No Minimum Term, 12 Months, 24 Months, 36 Months, 48 Months, or 60 Months. Longer terms result in a lower monthly rate. 12 Months is selected by default. Take note of the information on the screen to avoid early termination fees (ETF).
Enable the Minimum Term Renewal option for services with a 12, 24, 36, 48 or 60-month term to automatically renew the contract at the same discounted price and term length at the end of the contract. If you don’t renew the contract, at the end of the term, the contract will automatically roll over to month-to-month contract for the following billing period, at the same price, without term discounts.
For more information about contract terms, see NAT Gateway Pricing and Contract Terms.
- NAT Gateway ASN – Specify the autonomous system number (ASN) of this NAT Gateway, or use the default public ASN, 133937, supplied by Megaport. For most configurations, the default ASN is suitable. The ASN is used for BGP peering sessions on any VXCs connected to this NAT Gateway. See the documentation for your cloud providers before overriding the default value. For example, some public cloud services require the use of a public ASN and Microsoft blocks an ASN value of 65515 for Azure connections.
-
Click Next to finalize the configuration.
-
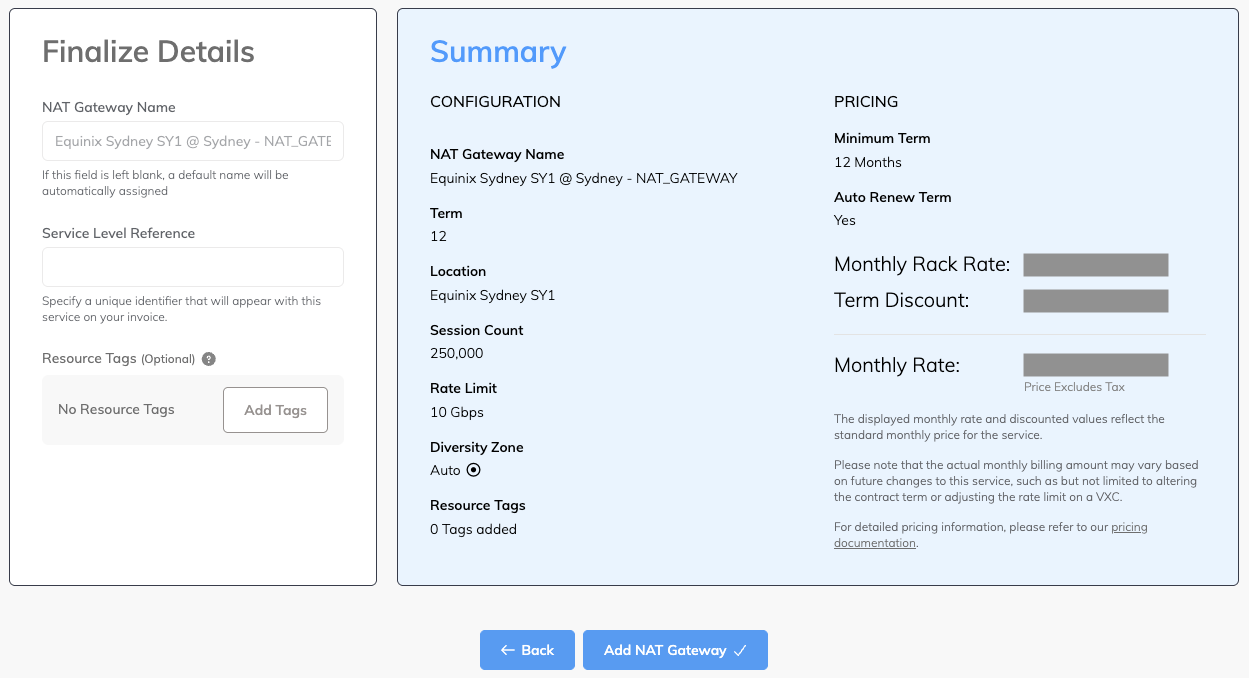
NAT Gateway Name – Specify a name for the NAT Gateway, which will be shown on the Megaport Portal. For example,
gcp-aws-nat-gateway. You can change the name later, if needed. -
Service Level Reference (optional) – Specify a unique identifying number for your Megaport service to be used for billing purposes, such as a cost center number, unique customer ID, or purchase order number. The service level reference number appears for each service under the Product section of the invoice. You can also edit this field for an existing service.
Note
A VXC associated with the NAT Gateway is not automatically updated with the NAT Gateway service level reference number.
-
Resource Tags – You can use resource tags to add your own reference metadata to a Megaport service.
To add a tag:- Click Add Tags.
- Click Add New Tag.
- Enter details into the fields:
- Key – string maximum length 128. Valid values are a-z 0-9 _ : . / \ -
- Value – string maximum length 256. Valid values are a-z A-Z 0-9 _ : . @ / + \ - (space)
- Click Save.
If you already have resource tags for that service, you can manage them by clicking Manage Tags.
Warning
Never include sensitive information in a resource tag. Sensitive information includes commands that return existing tag definitions and information that will identify a person or company.
-
-
Confirm the selected options, then click Add NAT Gateway.
- (Recommended) Create a second NAT Gateway, selecting the alternate diversity zone. For example, if the first NAT Gateway was created in the blue diversity zone, create a second NAT Gateway in the red diversity zone.
- Click Review Order.
- Review the Order Services agreement.
- Click Save to save the configured NAT Gateway before placing the order.
- Click Add Promo Code to enter a promotional code, and click Add Code.
- Click Order Now to order and provision the NAT Gateway.
Note
NAT Gateways are postpaid. For example, if you place your order on the 15th of January, your first invoice will be on the 1st of February, and will have a proportional charge for the period from the 15th of January to the 31st of January.
Now that you have deployed a Megaport NAT Gateway, the next step is to add a Virtual Cross Connect (VXC) to a CSP, a local port, or a third-party network. You can optionally connect a physical Port to the NAT Gateway using a private VXC or connect to a service provider in the Megaport Marketplace. For more information about adding VXCs, see Creating a NAT Gateway VXC.