Creating a NAT Gateway VXC
With a Megaport NAT Gateway (NAT Gateway) configured, you can add a Virtual Cross Connect (VXC) to a cloud service provider, a local port, or a third-party network. You can optionally connect a physical Port to the NAT Gateway using a private VXC or connect to a service provider in the Megaport Marketplace.
A VXC is a point-to-point Layer 2 circuit between two endpoints that is mapped with a VLAN ID on each end. You can order VXCs to reach any destination in the Megaport network just like the VXCs used with the physical Ports. You can connect up to 25 VXCs per NAT Gateway.
Note
The VXC target destination type determines the peering type. The peering type determines which routes are advertised. For more information, see Megaport NAT Gateway Route Advertisement.
To create and connect a VXC
- Log in to the Megaport Portal, select Services, then select the NAT Gateway.
If you haven’t already created a NAT Gateway, see Creating a NAT Gateway. -
If this is the first connection for the NAT Gateway, click the tile that matches the VXC type. The tile is a shortcut to the configuration page.
Alternatively, click +Connection and select a destination type:
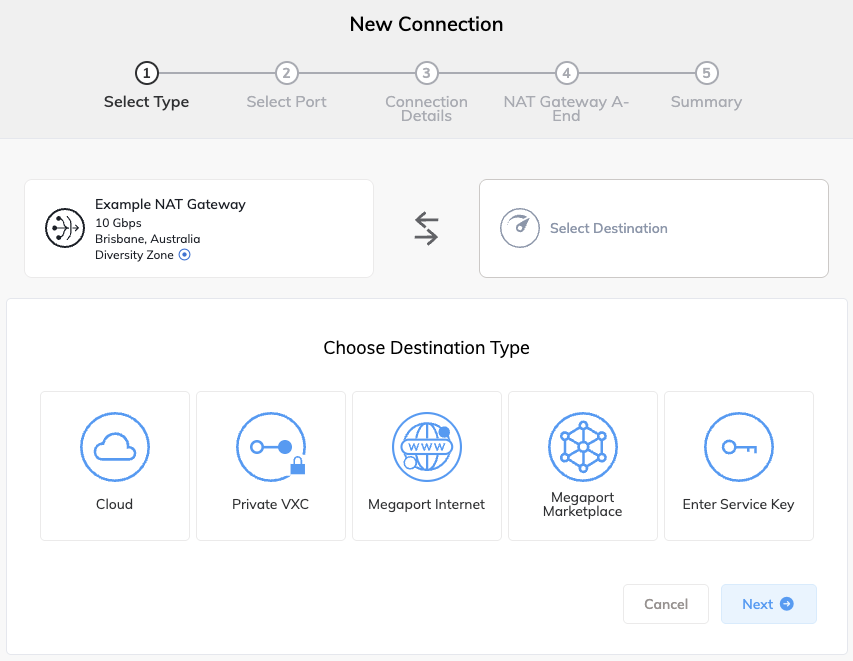
- Cloud – Provision a dedicated interconnect to a public cloud service provider. After selecting Cloud, select a provider. Some providers require a service key.
- Private VXC – Connect to other Ports local to the current company account. After selecting Private VXC, select a destination Port.
For more information, see Creating a Private VXC. - Megaport Internet – Connect to the internet. After selecting Megaport Internet, select a destination port (internet router).
For more information, see Creating a Megaport Internet Connection for a NAT Gateway. - Megaport Marketplace – Connect to any service provider present in the Megaport Marketplace. After selecting Megaport Marketplace, select a provider.
For more information, see Megaport Marketplace. - Enter Service Key – Connect to a third-party on the Megaport network that isn’t publicly listed in the Megaport Marketplace. Select this destination if you have been given a service key, and enter the service key.
For more information, see Creating a Connection using a Service Key.
-
Click Next.
-
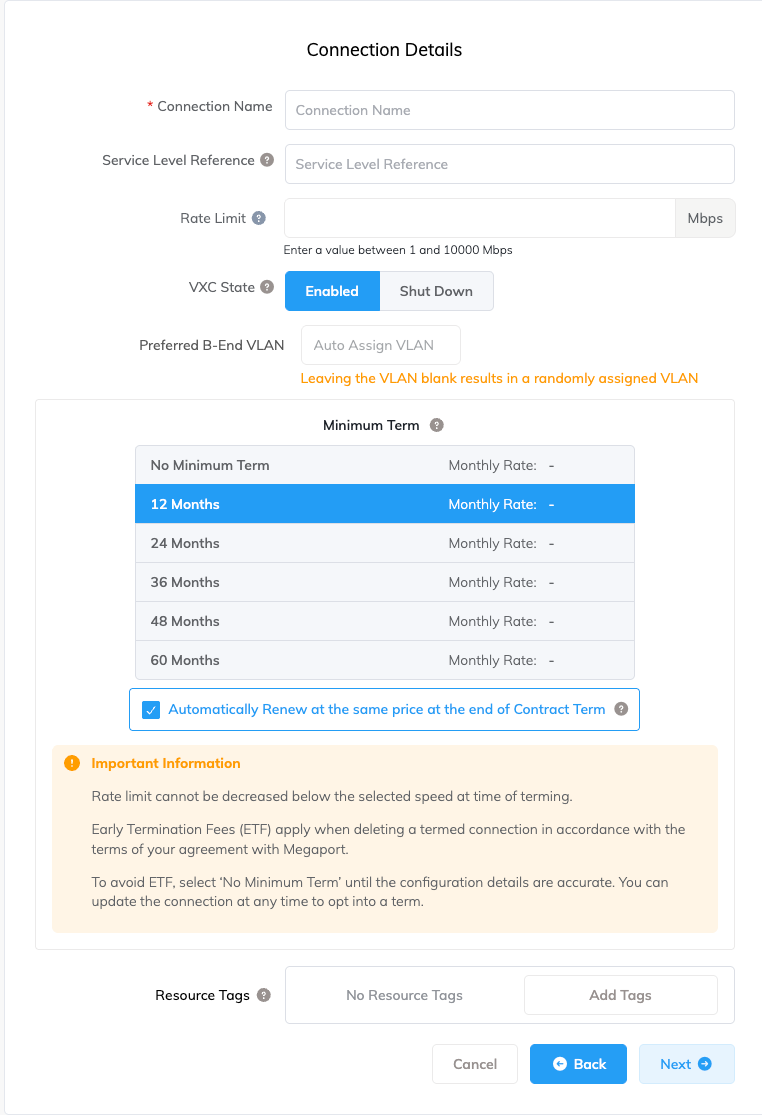
Specify the connection details:
-
Connection Name – The name of your VXC to be shown in the Megaport Portal.
-
Service Level Reference (optional) – Specify a unique identifying number for your Megaport service to be used for billing purposes, such as a cost center number, unique customer ID, or purchase order number. The service level reference number appears for each service under the Product section of the invoice. You can also edit this field for an existing service.
-
Rate Limit – The speed of your connection in Mbps. Specify a rate limit that doesn’t exceed the total rate limit for the NAT Gateway. Allow enough bandwidth for any connections that you might add later.
-
VXC State – Select Enabled or Shut Down to define the initial state of the connection. For more information, see Shutting Down a VXC for Failover Testing.
Note
If you select Shut Down, traffic will not flow through this service and it will behave as if it was down on the Megaport network. Billing for this service will remain active and you will still be charged for this connection.
-
Preferred B-End VLAN – Specify the 802.1q VLAN tag for this connection that you will receive through the B-End VLAN. This field will show if the configuration requires this information.
-
Minimum Term – Select No Minimum Term, 12 Months, 24 Months, 36 Months, 48 Months, or 60 Months. Longer terms result in a lower monthly rate. 12 Months is selected by default. Take note of the information on the screen to avoid early termination fees (ETF).
Enable the Minimum Term Renewal option for services with a 12, 24, 36, 48 or 60-month term to automatically renew the contract at the same discounted price and term length at the end of the contract. If you don’t renew the contract, at the end of the term, the contract will automatically roll over to month-to-month contract for the following billing period, at the same price, without term discounts.
For more information, see VXC Pricing and Contract Terms and VXC, Megaport Internet, and IX Billing.
-
Resource Tags – You can use resource tags to add your own reference metadata to a Megaport service.
To add a tag:- Click Add Tags.
- Click Add New Tag.
- Enter details into the fields:
- Key – string maximum length 128. Valid values are a-z 0-9 _ : . / \ -
- Value – string maximum length 256. Valid values are a-z A-Z 0-9 _ : . @ / + \ - (space)
- Click Save.
If you already have resource tags for that service, you can manage them by clicking Manage Tags.
Warning
Never include sensitive information in a resource tag. Sensitive information includes commands that return existing tag definitions and information that will identify a person or company.
-
-
Click Next.
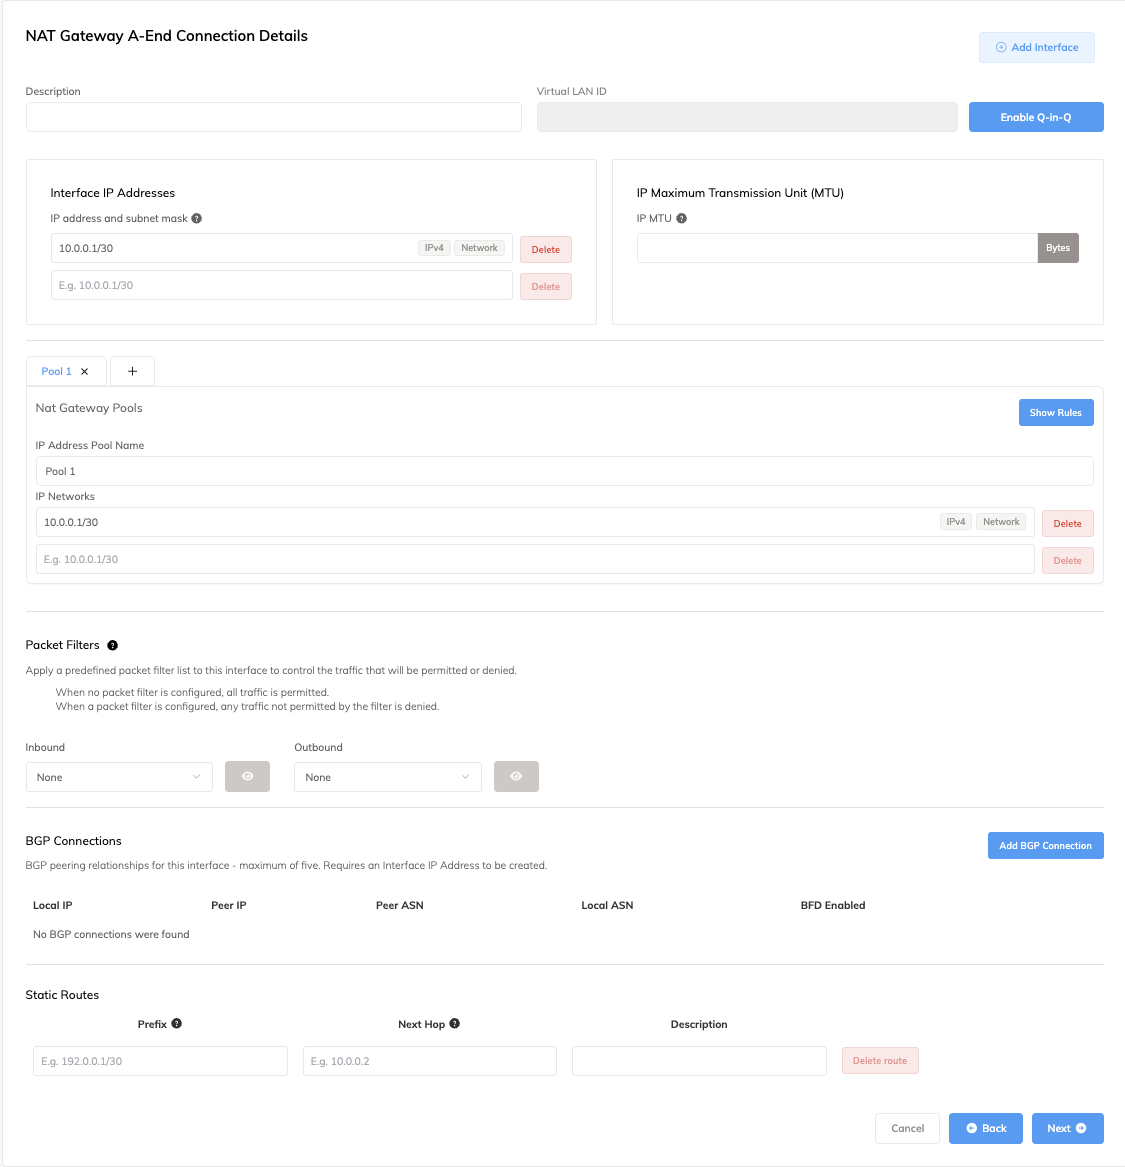
The NAT Gateway A-End Connection Details page appears. For each VXC connected to a NAT Gateway, you can configure one or more interfaces, IP addresses, BGP connections, packet filter lists, and static routes. Most VXCs will use one interface, however, you can configure multiple interfaces by enabling a Q-in-Q802.1Q tunneling (also known as Q-in-Q or 802.1ad) is a technique used by OSI Layer 2 providers for customers. 802.1ad provides for both an inner and an outer tag whereby the outer (sometimes called S-tag for service provider) can be removed to expose the inner (C-tag or customer) tags that segment the data.
connection and specifying an inner VLAN tag for each interface. Each VLAN ID must be unique and you can add up to five VLAN IDs.Note
The NAT Gateway A-End Connection Details page is not displayed during NAT Gateway VXC creation in some situations, and is dependent on the VXC destination. The NAT Gateway VXC configuration will be auto-configured in these situations. If you are creating a single-use service key on a NAT Gateway, the configuration is not auto-configured and the page will be displayed. For information about configuring connection details when they are auto-configured, see Configuring a NAT Gateway.
-
Enter a description for the current interface connection.
-
If required, click Enable Q-in-Q to enable multiple interfaces or click + Add Interface to add an additional interface, automatically enabling Q-in-Q.
-
Enter one or more interface IP addresses and subnet masks to configure on the A-End (or B-End) interface.
-
(Optional) Enter an IP MTU (Maximum Transmission Unit)IP MTU (Maximum Transmission Unit) refers to the largest size (in bytes) of an IP packet that can be sent over a network interface (VXC). Jumbo packets are larger than the standard 1500 bytes (MTU), and are typically used in high-performance networks to reduce overhead and improve efficiency.
value (in bytes) for the VXC.
The IP MTU can range from 1280 to 9070 (9074 if Q-in-Q is disabled). The default value is 1500.
For more information, see NAT Gateway Features. -
Define the NAT Gateway Pools and their rules for this VXC.
For more information, see Using NAT Gateway Pools. -
Enter any details specific to the VXC type, such as:
- Packet filters
- BGP connections
- Static routes
-
Click Next.
-
Configure the B-End.
The requirements will vary by destination or provider. -
Click Next.
The Summary page appears.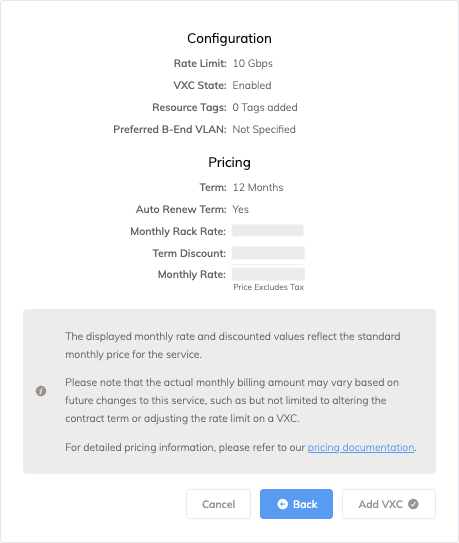
-
Review the Summary details.
Click each down arrow to view A-End and B-End configuration details. -
Click Add VXC.
-
Click Review Order.
-
Click Order Now.