使用 API 创建到 AWS 的 VXC
本主题介绍使用 API 从 Port 到 AWS 创建 VXC 的过程,包括如何查找云互联位置、验证连接以及订购 VXC。
本主题中的示例会创建到 AWS 的托管 VIF 连接,数据速率为 500 Mbps。要逐步完成此示例,请使用预生产环境 URL,该环境允许您配置连接,但不会部署或对服务收费。
在开始之前,请获取一个有效的访问令牌。有关详细信息,请参阅 创建 API 密钥。
提示
若要查看本示例中所用请求的全部选项,请参阅 https://dev.megaport.com。
查找 AWS 端口位置详细信息
要创建到 AWS 的 VXC,您需要知道 AWS 端口的详细信息。使用 API 返回 Megaport 与云服务提供商的接口,以确定所需的 AWS 端口详细信息。
在 Postman 集合中查找 AWS 端口位置详细信息
-
在左侧导航中展开 Locations (位置) 文件夹,然后单击 GET Partner Megaports (获取合作伙伴 Megaports)。
-
单击 Send (发送) 以向 API 服务器发起 GET 请求。
GET {baseUrl}/v2/dropdowns/partner/megaports此请求会返回 Megaport 与云服务提供商的所有接口。您可以单击放大镜,并在搜索字段中输入位置、数据中心或其他参数进行搜索。
connectType 指示云服务提供商。对于 AWS,托管 VIF 使用 “AWS”,托管连接使用 “AWSHC”。
您可以通过
connectType和vxcPermitted来筛选结果。GET {baseUrl}/v2/dropdowns/partner/megaports?connectType=AWS&vxcPermitted=true本示例使用 Interxion DUB2 中一个可接受 VXC(
“vxcPermitted”: true)的端口,所属区域为 eu-west-1。
      {
            "connectType": "AWS",
            "productUid": "6cc21ccb-5ecc-4869-ab0e-b3fa17f5110f",
            "vxcPermitted": true,
            "companyUid": "623cb950-abb4-4b07-b372-8cf55756c322",
            "companyName": "AWS",
            "title": "EU (Ireland) (eu-west-1)",
            "locationId": 96,
            "speed": 10000,
            "rank": 61,
            "lag_id": 2,
            "lag_primary": true,
            "aggregation_id": 54188
        },
创建和部署 VXC
通过 GET Partner Megaports API 获取 AWS 端口详情后,您可以验证并创建 VXC。
测试和验证订单的方法
-
在 Postman 左侧导航栏展开 Cloud Connectivity > Port > AWS Direct Connect,选择 POST Validate AWS - Hosted VIF (v3)。
-
在请求的 Body 中填写端口的
productUid、AWS 端口的productUid以及 AWS 账户 ID。
您还可以更改其他值,如名称、速率限制、合同期限、VLAN ID、ASN 参数、authKey 和 IP 地址分配。 -
点击 Send 发送 POST 请求。
POST {baseUrl}/v3/networkdesign/validate
[
    {
        "productUid": "a49cf3f1-20a1-4390-93aa-5005bdafe3d7",
        "associatedVxcs": [
            {
                "productName": "My Amazon Direct Connect",
                "rateLimit": "500",
                "term": 12,
                "shutdown": false,
                "promoCode": "promox3mnthfree2",
                "aEnd": {
                    "vlan": 777
                },
                "bEnd": {
                    "productUid": "6cc21ccb-5ecc-4869-ab0e-b3fa17f5110f",
                    "partnerConfig": {
                        "connectType": "AWS",
                        "name": "Amazon name for service",
                        "type": "private",
                        "asn": 65105,
                        "amazonAsn": 64555,
                        "ownerAccount": "XXXXXXXXXXXX",
                        "authKey": "123456",
                        "prefixes": "10.0.1.0/24",
                        "customerIpAddress": null,
                        "amazonIpAddress": null
                    }
                }
            }
        ]
    }
]
验证通过后,您即可准备下 VXC 订单。
创建 VXC
-
将已验证的 Body 从 POST Validate AWS - Hosted VIF (v3) 复制,并粘贴到 POST Buy AWS - Hosted VIF (v3) 的 Body 中。
-
点击 Send 发送请求。
POST {baseUrl}/v3/networkdesign/buy
以下是成功响应的示例。
{
    "message": "VXC [47d6cc4d-6a1a-4301-b06c-cebb5f9b8f3e] created. ",
    "terms": "This data is subject to the Acceptable Use Policy https://www.megaport.com/legal/acceptable-use-policy",
    "data": [
        {
            "createDate": 1588868593704,
            "vxcOrderId": 42328,
            "payerMegaPortId": 68124,
            "nonPayerMegaPortId": 52786,
            "payerMegaPortName": "API Port",
            "nonPayerMegaPortName": "EU (Ireland) (eu-west-1)",
            "payerCompanyId": 2278,
            "nonPayerCompanyId": 117,
            "payerLocationId": 89,
            "nonPayerLocationId": 96,
            "salesId": null,
            "payerCompanyName": "Megaport Lab",
            "nonPayerCompanyName": "AWS",
            "payerMegaPortNsId": 138231,
            "nonPayerMegaPortNsId": 221182,
            "payerVlanId": 777,
            "nonPayerVlanId": 0,
            "payerApproverName": "Paul McGuinness",
            "payerApproverId": 12695,
            "nonPayerApproverName": "Paul McGuinness",
            "nonPayerApproverId": 12684,
            "payerApproval": 1582268553574,
            "nonPayerApproval": 1228868693614,
            "fixedTerm": true,
            "duration": 1,
            "rollover": true,
            "serviceName": "from API Port to EU (Ireland) (eu-west-1)",
            "payerStatus": "APPROVED",
            "nonPayerStatus": "APPROVED",
            "speed": 500,
            "distanceBand": "ZONE",
            "intercapPath": "",
            "awsId": null,
            "promoCode": null,
            "rateType": "MONTHLY",
            "vxcJTechnicalServiceId": 57115,
            "vxcJTechnicalServiceUid": "47d6cc4d-6a1a-4301-b06c-cebb5f9b8f3e",
            "provisionDate": 1588868593517,
            "orderType": "NEW",
            "monthlyDiscountAmount": null,
            "discountMonths": null,
            "amazonDirectConnectConfigDto": {
                "type": "private",
                "asn": 65105,
                "ownerAccount": "XXXXXXXXXXXX",
                "authKey": "123456",
                "customerIpAddress": null,
                "amazonIpAddress": null,
                "prefixes": "10.0.1.0/24",
                "name": "Amazon name for service"
            },
            "amsixConnectConfigDto": null,
            "webAirProvItem": null,
            "sdrcProvItem": null,
            "rate": null,
            "setup": null,
            "asn": null,
            "bgpPassword": null,
            "usageAlgorithm": "POST_PAID_HOURLY_SPEED_LONG_HAUL_VXC",
            "costCentre": null,
            "azureServiceKey": null,
            "oracleVirtualCircuitId": null,
            "serviceKey": null,
            "connectType": "AWS",
            "payerConfig": {},
            "nonPayerConfig": {},
            "attributeTags": {},
            "fullyApproved": true
        }
    ]
}
Port 和 VXC 现在会显示在 Megaport Portal 中。
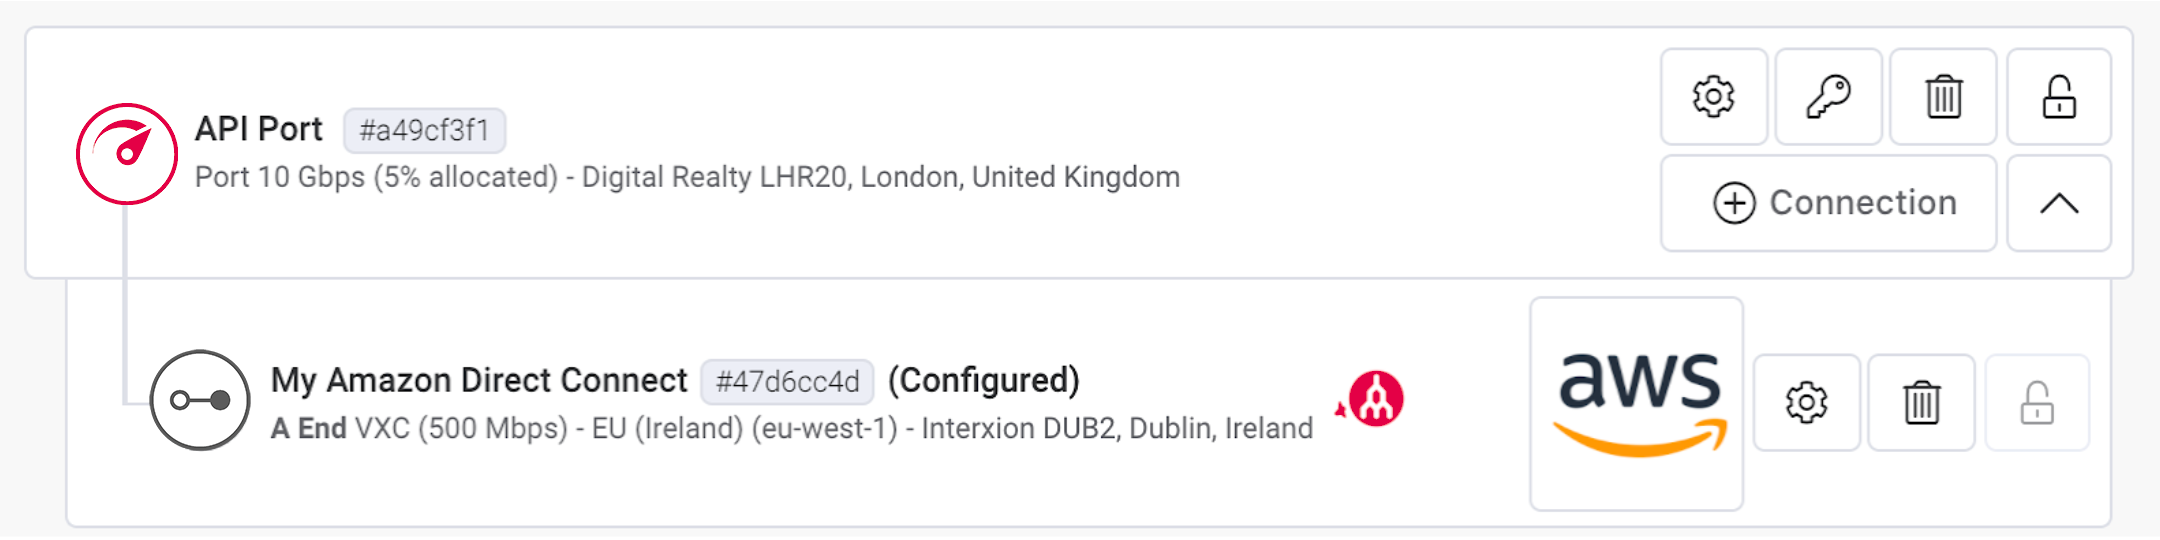
在此示例中,AWS 托管 VIF 会显示在 AWS 门户账户的 Direct Connect - 虚拟接口 下。账户持有人可以接受该虚拟接口,并将其连接到虚拟私有网关或 Direct Connect 网关,然后连接到其 VPC。